TO OPERATE TRIMMER
1. Make sure unit is “off”. Remove clipper
blade by simply placing your thumb in
front of the blade and pushing back until
the blade detaches. Use cleaning brush to
remove any loose hair before attaching
the trimmer blade. Attach blade from the
back, (lining it up with the small tab) and
then push forward until the blade snaps
into place. Be sure that the taper control
is set to the lowest setting (switch will be
away from the blade) before replacing the
blade.
2. To trim your mustache, comb hair in the
direction of growth. Push the taper control
button to its highest setting. Trimming
only works in this setting. Hold trimmer in
an upright position and bring the tip of the
blade straight into the mustache to trim.
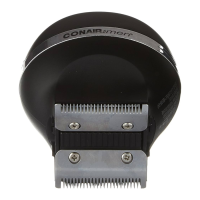
3. To clean the trimmer, turn unit to “OFF”
position. Using your thumb, press
upwards against the blade. This will make
it easy to clean. Brush or blow hair clip-
pings from the cutter blade.
4. Again, snap in the blade set until you
hear a click. This trimmer attachment
works well on sideburns & necks as well
as goatees and short beard styles and
mustaches. For thick, full beards we rec-
ommend using the clipper blade.
Everyone knows that electricity and water
are a dangerous combination. But did
you know that an electric appliance is still
electrically alive even if the switch is off?
If the plug is in, the power is on. So when
you are not using your appliances, keep
them unplugged.
ALWAYS UNPLUG
SMALL APPLIANCES
Public Service ad from Association of Home Appliance
Manufacturers and Underwriters Laboratories, Inc.
KEEP AW
AY FROM
WATER
WARNING:
IF YOU THINK
THE POWER IS OFF
WHEN THE SWITCH
IS OFF,
YOU'RE WRONG.
LIMITED FIVE YEAR WARRANTY
Conair will repair or replace (at our option) your
unit free of charge for 60 months from the date
of purchase if the appliance is defective in work-
manship or materials.
To obtain service under this warranty, return the
defective product to the service centre listed below that
is nearest you, together with your purchase receipt and
$3.00 for postage and handling. In the absence of a
purchase receipt, the warranty period shall be 60
months from the date of manufacture.
ANY IMPLIED WARRANTIES, OBLIGATIONS, OR
LIABILITIES, INCLUDING BUT NOT LIMITED TO
THE IMPLIED WARRANTY OF MERCHANTABILI-
TY AND FITNESS FOR A PARTICULAR PUR-
POSE, SHALL BE LIMITED IN DURATION TO THE
60 MONTH DURATION OF THIS WRITTEN, LIM-
ITED WARRANTY.
IN NO EVENT SHALL CONAIR BE LIABLE FOR
ANY SPECIAL, INCIDENTAL, OR CONSEQUEN-
TIAL DAMAGES FOR BREACH OF THIS OR ANY
OTHER WARRANTY, EXPRESS OR IMPLIED,
WHATSOEVER.
This warranty gives you specific legal rights, and
you may also have other rights, which vary from
province to province.
©2005 2005 Conair Consumer Products Inc.
Service Centre:
156 Parkshore Drive,
Brampton, Ontario
L6T 5M1
1-800-472-7606
Visit us on the web :
www.conaircanada.ca
05CN1135
IB-6115
TAKING CARE OF YOUR
TRIMMER
OILING THE BLADES
About once a month you should oil the
trimmer blades with the oil provided in
your kit. It is best to do this over a piece of
newspaper. Turn the trimmer on and hold it
so that the blades are pointed downward.
Spread one drop of oil across the blades,
then turn the trimmer off and wipe away
the excess oil with a soft cloth.
Be careful not to use too much oil and don’t
oil your trimmer more than necessary, as
this could damage the motor. (Never
attempt to oil the motor bearing, as it is
permanently lubricated.) Keep oil away
from children.
BLADE CARE
Because the trimmer blades are precision-
made for a very special use, they should
always be handled with care. Each time
you finish using the trimmer, take the
cleaning brush provided and brush away
any loose hair that has collected in the
blades. Then store the trimmer in its case
to protect the blades until the next use.
Be especially careful when changing or
adjusting blades.
To promote the long life of the appliance,
use your trimmer blade only for the pur-
pose intended by the manufacturer – to
trim your beard and mustache.
TURBO FEATURE
This product is equipped with a turbo
boost button. When activated, this will
provide 15% more cutting power. This is
especially useful for cutting through
thicker hair.
To activate the turbo feature:
1. Turn the Power switch to the “ON”
position.
2. Press the Turbo button.
3. Continue to press the Turbo button for
as long as you need the extra power.
4. Release the Turbo button to return to
normal power.
GROWING A BEARD AND
MUSTACHE
There are three key factors that will
determine which beard or mustache style
is best for you:
1. The shape and dimensions of your face.
2. The natural growth of your beard/
mustache.
3. The thickness of your beard/mustache. If
you are unsure about the type of beard or
mustache that would most suit your face,
speak with a professional hair stylist and
ask for an opinion on what style would be
best. Once your beard or mustache has
been styled, it is essential that you maintain
its appearance. To do this, use your trim-
mer to trim your beard/mustache weekly.
For the best trimming results, your beard
should be slightly damp (NOT WET) when
using your trimmer. This will prevent the
trimmer from removing more hair than
desired.
TYPES OF BEARDS/MUSTACHES
GETTING STARTED:
OUTLINING YOUR BEARD
1. It is always best to begin with a clean,
slightly damp beard.
2. After you have combed through your
beard in the direction it grows naturally,
you will want to outline the desired shape,
beginning under your jawline.
3. Begin defining your beard’s shape under
your chin and work upward on each side of
your face toward your ears. Then define the
upper outline of your
beard across your
cheeks, past your side-
burns, and toward your
hairline.
NOW YOU’RE READY TO TRIM
YOUR BEARD
1. Your trimmer adjusts to five positions so
you can have a beard length from 3/32”
(shortest) to 3/8” (longest).
2. To use the taper control, push upward
for shorter cuts and downward for longer
cuts. At first, until you become familiar with
the adjustments, use the longest trim set-
ting (3/8”). (You can always go back and
make your beard a little shorter.)
3. Begin trimming your beard using
smooth, even strokes. Start with your side-
burns and work downward toward your
chin. (Never attempt to trim against the
natural growth of your beard because the
hair will be cut too short.)
4. If you decide you want a closer trim, you
can now adjust the 5-position taper control
to a shorter setting (such as 3/32” or
5/32”) and go over your beard again until
you achieve the desired length.
Tout le monde sait que l’eau et l’électricité ne font
pas bon ménage, mais saviez-vous qu’un
appareil électrique est toujours sous tension
même s’il est éteint? S’il est branché, il est sous
tension. Donc, si vous n’utilisez pas l’appareil,
débranchez-le.
TOUJOURS DÉBRANCHER
LES PETITS
ÉLECTROMÉNAGERS
Un message d’intérêt public de l’Association of Home Appliance
Manufacturers et des Underwriters Laboratories, Inc.
TENIR LOIN DE L’EAU
ATTENTION : SI VOUS
CROYEZ QUE LE
COURANT EST COUPÉ
QUAND L’APPAREIL
EST ÉTEINT, VOUS
VOUS TROMPEZ
GARANTIE LIMITÉE DE CINQ ANS
Conair, à sa discrétion, réparera ou remplacera
sans frais un appareil si, au cours des 60 mois
suivant la date de l'achat, il affiche un vice de m
a t i è re ou de fabrication. Pour obtenir un serv-
ice au titre de la garantie, renvoyer le produit
défectueux au serv i c e après-vente le plus près,
indiqué ci-dessous, accompagné du bon de
caisse et de 7,50 $ pour les frais de poste et
administratifs. En l'absence du bon de caisse, la
période de garantie sera de 60 mois à compter de
la date de fabrication.
TOUTE GARANTIE IMPLICITE, OBLIGATION OU
RESPONSABILITÉ, Y COMPRIS MAIS SANS Y
ÊTRE LIMITÉ, LA GARANTIE IMPLICI TE DE
BONNE VENTE ET D'APTITUDE À ACCOMPLIR
UNE TÂCHE PA RTICULIÈRE, SERA LIMITÉE À
LA DURÉE DE 60 MOIS DE CETTE GARANTIE
LIMITÉE ÉCRITE.
EN AUCUN CAS PEUT-ON TENIR CONAIR
RESPONSABLE DE QUELQUE DOMMAGE
SPÉCIAL, INDIRECT OU FORTUIT QUE CE SOIT
POUR LE BRIS DE CETTE GARANTIE OU DE
TOUTE AUTRE GARANTIE, EXPRESSE OU
IMPLICITE QUE CE SOIT.
Cette garantie vous accorde des droits
particuliers et peut vous accorder d’autres droits
qui varient d’une province à l’autre.
©2005 Conair Consumer Products Inc.
SERVICE APRÈS-VENTE :
156 Parkshore Drive,
Brampton, Ontario
L6T 5M1
1-800-472-7606
Visitez notre site web :
www.conaircanada.ca
05CN1135
IB-6115
les barbes épaisses et pleines que nous
recommandons d'à l'aide de la lame de
tonte.
ENTRETIEN
DE LA TONDEUSE
HUILAGE DES LAMES
Veuillez huiler les lames de découpage un
fois par mois avec de l'huile fournie dans
votre trousse. Faire ceci au-dessus d'un
morceau de journal. Assurez-vous qu’il est
en marche (ON) et tenez-le de sorte que les
lames soient dirigées en bas. Écartez une
goutte d'huile à travers les lames, puis
arrêtez le tondeuse et essuyez loin l'excé-
dent d'huile avec un tissu mou. Faites atten-
tion à ne pas employer trop d'huile et
n'huilez pas votre tondeuse plus que néces-
saire, car ceci pourrait endommager le
moteur. (ne jamais huiler le roulement de
moteur, comme il est de manière perma-
nente lubrifié.). Tenir l’huile loins des
enfants.
ENTRETIEN DES LAMES
La tondeuse étant un instrument précis
servant à une fin particulière, elle doit être
manipulée avec soin. Après chaque usage,
nettoyez les lames avec la petite brosse de
nettoyage. Rangez ensuite la tondeuse sur
le support jusqu’à son usage suivant.
Pour assurer la durée utile prolongée de la
tondeuse, ne l’utilisez seulement que pour
l’usage prévu par le fabricant.
FONCTION TURBO
Cet appareil est équipé d'un bouton de
turbo. Quand activé, ceci fournira 15%
plus de puissance de découpage. C'est
particulièrement utile pour couper par
des cheveux plus épais.
Pour activer le dispositif de turbo :
1. Tournez le commutateur de puissance
à la position de "on".
2. Appuyez sur le bouton de Turbo.
3. Continuez à appuyer sur le bouton de
Turbo tant que vous avez besoin de la
puissance supplémentaire.
4. Libérez le bouton de Turbo pour
retourner à la puissance normale.
FAIRE POUSSER UNE BARBE
OU UNE MOUSTACHE
Il y a trois facteurs à considérer pour établir
quel type de barbe ou moustache convient
le mieux à votre visage :
1. La forme et la grandeur de votre visage.
2. La croissance naturelle des poils.
3. L’épaisseur de la barbe ou moustache.
Si vous n’êtes pas certain du type de barbe
ou moustache qui vous conviendrait le
mieux, parlez-en avec un coiffeur et voyez
quels conseils il pourrait vous donner. Une
fois que la barbe ou la moustache est tail-
lée, il est important d’en maintenir l’ap-
parence. Pour ce faire, vous pouvez utiliser
la tondeuse pour tailler votre barbe ou
moustache chaque semaine.
Pour obtenir les meilleurs résultats, la
barbe devrait être légèrement humide (non
pas mouillée) avant d’utiliser la tondeuse.
Vous éviterez ainsi de couper trop de poils.
TYPES DE MOUSTACHES/BARBES
TOUT D’ABORD
DÉCOUPAGE
1. Il est toujours plus facile de débuter avec
une barbe propre et légèrement humide.
2. Une fois la barbe peignée dans le sens de
la pousse naturelle, découpez-la de la
forme voulue, en debutant avec le contour
de la mâchoire.
3. Posez la tête 3/4 po.
Découpez la forme en
partant sous le menton
et en travaillant vers le haut, de part et
d’autre du visage jusqu’aux oreilles.
Découpez ensuite le haut, le long des joues,
des favoris et vers la ligne des cheveux.
VOUS ÊTES PRÊT À
TAILLER VOTRE BARBE
1. Pour utiliser le peigne à 5 positions, glis-
sez-le sur les lames et enclenchez-le. Au
début, si vous n’êtes pas habitué avec la
tondeuse, utilisez le peigne le plus long et
le réglage le plus élevé (5/8 po). (Vous pou-
vez toujours faire un deuxième passage
avec la tondeuse.)
2. Taillez votre barbe en coups doux et uni-
formes débutant des favoris vers le men-
ton. (Ne taillez jamais à contre-poil car les
poils seront coupés trop courts.).
3. Pour tailler de plus près, vous pouvez
alors ajuster le peigne à 5 positions à une
autre position et tailler votre barbe jusqu’à ce
que vous obteniez la longueur voulue.
4. If you decide you want a closer trim, you
can now adjust the 5-position taper control
to a shorter setting (such as 3/32” or
5/32”) and go over your beard again until
you achieve the desired length.
GUIDE D’UTILISATION
DE LA TONDEUSE
1. Assurez-vous que l'appareil est éteinte.
Enlevez la lame de tonte en plaçant sim-
plement votre pouce devant la lame et en
repoussant jusqu'à ce que la lame
détache. Employez la brosse de nettoyage
pour enlever les cheveux lâches avant
d'attacher la lame de découpage.
Attachez la lame du dos, (doublure il vers
le haut avec la petite étiquette) et puis
poussez en avant jusqu'à ce que vous
entendiez un déclic. Soyez sûr que la levi-
er d’effilage est placée au plus bas
arrangement (le commutateur sera parti
de la lame) avant de remplacer la lame.
2. Pour équilibrer votre moustache, peigne
dans la direction de la croissance. Poussez
le bouton de commande pour le levier d’ef-
filage à son arrangement plus élevé. La
tondeuse fonctionne seulement dans cet
arrangement. Tenez la tondeuse en posi-
tion droite et apportez le bout de la lame
droite dans la moustache à l'équilibre.
3. Assurez-vous que l'appareil est éteinte
avant de le nettoyer. En utilisant votre
pouce, serrez vers le haut contre la lame.
Ceci le rendra facile à nettoyer. Balayez ou
soufflez les coupures de cheveux de la
lame de coupeur.
4. Encore, pousse la lame de découpage
jusqu'à ce que vous entendiez un déclic.
Cette lame de découpage fonctionne bien
sur des barbes, barbiches, nuques, des
modèles courts et des moustaches. Pour
 Loading...