34 35
The G4 Helmet is certied according to Standard XP S 72-600 and is designed exclusively for Skydiving
and Wind tunnel use and should not be worn for any other activities. It should not be used on Motorised
and Non-Motorised means of transport. This helmet is intended to reduce the user’s risk of head injury
within the area covered by the helmet This helmet is not a toy. Do not let children wear it while climbing
or doing other activities as there is a risk of hanging/strangulation. For best protection, the helmet must
be properly tted and attached to the user’s head. Read the user’s manual and follow all warnings and
instructions before using the helmet. This helmet is designed to absorb energy of one signicant impact
and should be replaced after such an event. In the event of any impact whether in use or dropped
accidently, the helmet should be replaced. Cookie Composites generally recommends helmet replace-
ment every THREE years. Although this helmet provides some protection it cannot provide complete
protection from all foreseeable impacts. Please use responsibly
Position and Fit
In order for your G4 helmet to perform its functions it must be tted and worn correctly. Follow these
steps to get the correct position and t.
1. Firstly undo the clip beneath the chin and extend the helmet padding at the back of the helmet so
that the liner is fully open Figure 1. Put the helmet on your head and
hold the fabric by the chin area and
rotate the helmet over your face so your chin enters the helmet and the liner sits beneath your chin
Figure2.
2. Grasping the buckle in your right hand, pull the webbing horizontally until the helmet is liner closes
rmly against the back of your head or neck. Now mate the buckle Figure 4. If the buckle is unable to be
fastened or the helmet t is too loose you’ll have to adjust the t using the internal line and anchor
system shown in Figure 5-6.
Figure 5.
Figure 6.
Figure 1.
Figure 2.
Figure 3.
Figure 4.
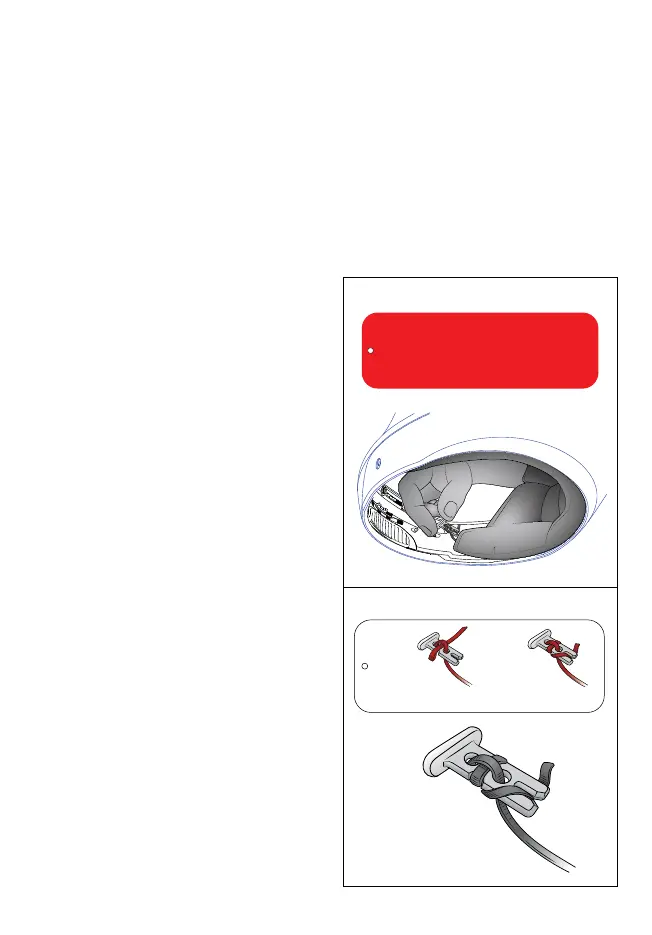
3. To make this adjustment, locate the RED label axed to the Anchor and pull this away from the cheek pad.
You can either shorten or lengthen the adjustment cord at the anchor depending on your requirements.
Shortening will make the rear skirt tighter on the back of you neck. Lengthening the cord will make the rear
skirt looser . Note that any adjustment should be made at the anchor and not at the strap buckle. After making
your adjustment lock the cord of acording to Figure 6. Tuck the anchor and excess cord into the channel
opening and pull the chinstrap to seat the anchor into position . Once adjusted properly the helmet will t
without the need for further adjustment.
G4 Helmet Ventilation
Figure 7.
Figure 8.
The G4 helmet has a unique ventilation syetem to control the airow within the helmet
HELMET OWNER’S MANUAL
English
HELMET OWNER’S MANUAL
English
To make adjustment
Loosen off the cord.
Once completed.
Lock off cord and reinstall.
ANCHOR
IMPORTANT BEFORE USE
To acheive a correct fit. The rear neck cutain
must be tight against your neck and head when the
chinstrap is fastenend beneath your chin. The cord at the anchor
can be adjusted to ensure the correct fit.
RETURN THE ANCHOR TO HOME POSITION AND CHECK FITTING BEFORE USE
Para ajustar,
cordón.
Una vez listo, aoje el
trabe el cordón y vuelva a
colocarlo.
TIRANTE
Figura 5.
Figura 6.
Posición y encaje
Para que el casco G4 pueda cumplir con sus
funciones, se debe ajustar y utilizar de manera
adecuada. A fin de lograr la posición y el encaje
correctos, se deben seguir los siguientes pasos:
Para hacer este ajuste, localice la etiqueta ROJA
fijada al tirante y tire de ella a fin de alejarla de
la almohadilla para la mejilla. Se puede acortar o
alargar el cordón de ajuste del tirante según sea
necesario. Acortarlo hará que la falda trasera
quede más ajustada contra la parte posterior
del cuello. Alargarlo hará que la falda trasera
quede más suelta. Cabe destacar que todos los
ajustes se deben hacer a nivel del tirante y no de
la hebilla de la correa. Luego de hacer el ajuste,
trabe el cordón como se muestra en la figura
6. Inserte el tirante y el cordón sobrante en el
orificio acanalado, y tire del barbiquejo
para colocar el tirante en su lugar. Una vez
que esté ajustado de forma correcta, el casco
quedará bien colocado sin necesidad de realizar
más ajustes.
1. Primero, abra el broche bajo el mentón y
extienda el relleno del casco de la parte
posterior de modo que el revestimiento quede
completamente abierto (figura 1). Colóquese
el casco sobre la cabeza, sostenga la tela
cerca del área del mentón y rote el casco
sobre la cara para que entre el mentón y el
revestimiento quede por debajo del mentón
(figura 2).
2. Sujetando la hebilla con la mano derecha,
tire de la cincha en dirección horizontal hasta
que el revestimiento del casco se cierre
firmemente contra la parte posterior de la
cabeza o del cuello. Luego, encaje la hebilla
(figura 4). Si la hebilla no se puede abrochar
o el casco queda demasiado suelto, ajuste el
encaje usando la línea interna y el mecanismo
de tirante que se observa en las figuras 5 y 6.
3. Para hacer este ajuste, localice la etiqueta
ROJA fijada al tirante y tire de ella a fin de
alejarla de la almohadilla para la mejilla. Se
puede acortar o alargar el cordón de ajuste
del tirante según sea necesario. Acortarlo
hará que la falda trasera quede más ajustada
contra la parte posterior del cuello. Alargarlo
hará que la falda trasera quede más suelta.
Cabe destacar que todos los ajustes se deben
MANUAL PARA PROPIETARIOS DEL CASCO
Español
INFORMACIÓN IMPORTANTE ANTES DE USAR
Para lograr un encaje adecuado, el tapizado trasero del cuello debe
quedar ajustado contra el cuello y la cabeza luego de abrochar
el barbiquejo por debajo del mentón. El cordón del tirante se puede
ajustar para lograr un encaje correcto.
DE USAR, REGRESE EL TIRANTE A LA POSICIÓN INICIAL Y
VERIFIQUE EL ENCAJE.
hacer a nivel del tirante y no de la hebilla de la
correa. Luego de hacer el ajuste, trabe el cordón
como se muestra en la figura 6. Inserte el tirante
y el cordón sobrante en el orificio acanalado, y tire
del barbiquejo para colocar el tirante en su lugar.
Una vez que esté ajustado de forma correcta, el
casco quedará bien colocado sin necesidad.
 Loading...