©The Pampered Chef, Ltd., 2004 2243-9/04
USE AND CARE
How to Use
Turning on and off
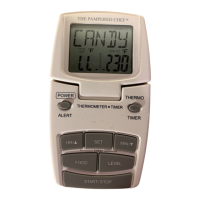
Before use, insert battery into battery slot. The unit will complete a 2-second test and will be in
thermometer mode. The display will first show CANDY in FOOD Category, LL in PROBE
TEMP category, and 230°F/110°C in TEMP SET category corresponding to Level 1. It is now
ready for use.
1. Turn Thermometer on, by pushing the POWER button once.
2. Press and hold POWER button for 2 seconds to turn off thermometer.
NOTE: A display of LL indicates that the probe is not plugged in the base unit. If the base unit
displays HH the unit may need to have batteries replaced.
Thermometer Function
1. Press the THERMO/TIMER button once to switch between the thermometer and timer
function.
2. When in thermometer mode, the word FOOD will appear in the top left-hand corner. When
in timer mode, the word TIMER will appear at the top left side of the display. Switch to
thermometer mode.
3. Slide black button on backside of unit to set desired temperature read out (°F/°C).
4. Press the button marked FOOD until you have reached your Food Selection. Food Selections
include (see backside of display): Candy, Frying, Yeast, Chocolate, Beef (also use for Lamb),
Veal (also use for Pork), and Poultry.
5. Press the button marked LEVEL to choose the programmed temperature of Food Selection.
The level selected determines the degree of doneness for the Food Selection. See chart on
back for Food Selections, Levels and corresponding temperatures.
Readout is accurate to +/- 2.5%
Oven Use with Wire Probe for Meat and Poultry
1. Having chosen the desired Food Selection Level and corresponding temperature (see
Thermometer Function), insert metal probe into center or thickest part of meat or poultry. Do
not allow probe to rest near the bone or gristle, or exit through other side of meat, as this will
result in inaccurate temperature reading.
2. Insert connecting plug into side of thermometer.
3. Place cooking vessel containing meat or poultry in preheated oven with metal probe securely
in meat. Place the Thermometer on a countertop near the oven. The probe wire will be held
in place when the oven door is closed.
4. The current temperature of the food is shown in the PROBE TEMP category located in the
bottom left-hand corner of the display. The level chosen will be shown in the center of the
display. The corresponding doneness temperature will appear in the TEMP SET category
located in the bottom right-hand corner of the display.
5. Press ALERT button once to begin the cooking/timing process. A beeper will sound when
food has reached the desired temperature.
6. When beeper sounds, press the ALERT button once to turn off beeper.
NOTE: While food is cooking, you can view the current temperature of the food in the PROBE
TEMP category on the display.
 Loading...