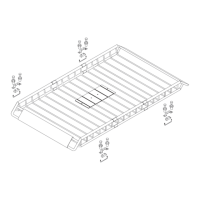
This document is a user's manual for a 64-inch roof rack, model AT5565, designed to carry cargo on a vehicle's roof. The rack has a maximum load capacity of 150 lbs (68 kgs) and itself weighs 35 lbs (16 kgs). It can be assembled in two configurations: with or without an extension. The overall dimensions with the extension are 64 inches (L) x 39 inches (W) x 6 inches (H) (162.5 cm x 99 cm x 15 cm), and without the extension, they are 43 inches (L) x 39 inches (W) x 6 inches (H) (109 cm x 99 cm x 15 cm).
Function Description:
The roof rack is designed to provide additional cargo space for vehicles, allowing users to transport items that may not fit inside the vehicle. It attaches to the vehicle's existing crossbars and provides a secure platform for carrying various loads. The design emphasizes even weight distribution and secure fastening of cargo to prevent product failure and ensure safe driving.
Important Technical Specifications:
- Model: AT5565
- Load Capacity: 150 lbs (68 kgs)
- Rack Weight: 35 lbs (16 kgs)
- Overall Dimensions (with Extension): 64" (L) x 39" (W) x 6" (H) / 162.5 cm (L) x 99 cm (W) x 15 cm (H)
- Overall Dimensions (without Extension): 43" (L) x 39" (W) x 6" (H) / 109 cm (L) x 99 cm (W) x 15 cm (H)
- Crossbar Distance Requirement: Minimum 17-3/4" to Maximum 31-7/8" (center to center)
Usage Features:
The manual provides detailed instructions for assembling and installing the roof rack.
- Assembly: The assembly process involves connecting various sections (Front, Middle-Left, Middle-Right, Rear) using screws, bolts, lock nuts, and middle plates. Sleeves are used to cover joint pipes, and reflectors are mounted on the rear section. All connections should be finger-tightened initially on a flat, level, padded surface, and then securely tightened once the entire assembly is complete. Lubricating the insides of the sleeves with petroleum jelly is recommended for easier assembly.
- Installation on Vehicle:
- Preparation: Park the vehicle on a flat, level, hard surface, engage the transmission in park/neutral, and set the parking brake. The cargo carrier should not be installed on recreational vehicles, trailers, towed vehicles, or off-road vehicles.
- Spacer Placement: Snap spacers onto the underside of the cargo carrier, positioning them as close to the edge as possible at each corner.
- Crossbar Adjustment: Loosen the vehicle's crossbars and adjust their center-to-center distance to be between 17-3/4" and 31-7/8".
- Lifting and Centering: With assistance, lift the cargo carrier onto the vehicle's crossbars, centering it carefully.
- Final Crossbar/Spacer Adjustment: Adjust crossbars and spacers as needed to ensure the spacers are centered on the crossbars. Spacers should not be placed closer than 1/2" from crossbar brackets.
- U-Bolt and Bracket Installation: Place U-bolts under the crossbars. Position brackets over the spacers, aligning holes with tabs, and press down until they snap onto the spacers.
- Securing: Thread knobs over the U-bolts and hand-tighten them. Repeat for all corners.
- Final Check and Tightening: Verify the position of the cargo carrier and ensure all spacers are properly aligned. Make any necessary final adjustments. Securely tighten all knobs and push caps firmly into the knobs.
- Cargo Loading:
- Do not exceed the rated weight capacity of the cargo carrier (150 lbs) or the vehicle's roof capacity. Remember to add the rack's weight (35 lbs) when calculating the total load.
- Distribute cargo evenly, keeping the center of gravity as low as possible.
- Secure the load against slipping using appropriate straps (avoid elastic straps with or without hooks).
- Never carry a load wider than the vehicle.
- If specialized accessories (e.g., bike carriers) are available for specific loads, they should be used.
- For loads producing significant lifting forces, secure them independently to the front and rear of the vehicle using strong straps.
- Driving Considerations:
- Alter driving techniques to account for changes in crosswind sensitivity, which may require reducing speed and increasing braking distances.
- Be aware of the additional height when driving into garages, under bridges, or tunnels.
Maintenance Features:
- Pre-Use Inspection: Before each use, inspect the general condition of the cargo carrier. Check for loose hardware, misalignment or binding of moving parts, cracked or broken parts, and any other condition that might affect safe operation. Do not use damaged equipment.
- Post-Use Care: After each use, remove the cargo carrier and wipe its external surfaces with a clean cloth. Store the cargo carrier and straps in a clean, dry area, out of reach of children.
- Regular Checks: Regularly check all mounting connections and connections of the roof bars and other supports for tight fit, and tighten if required.
- Product Labels: Maintain product labels and nameplates, as they carry important safety information. Contact customer service for replacements if they become unreadable or missing.
Safety Warnings:
The manual emphasizes several critical safety warnings:
- Dynamic Loading: Be aware that sudden load movement can briefly create excess load, leading to product failure.
- Weight Limits: Strictly adhere to the load capacity of both the rack and the vehicle's roof.
- Secure Fastening: Always secure cargo properly to prevent slipping.
- Driving Adjustments: Modify driving habits to account for the presence of the roof rack and cargo.
- Inspection: Regular inspection for damage or loose parts is crucial for preventing accidents.
- Intended Use: Use the product only as intended.
- Children: This product is not a toy; keep children away from it.
- Common Sense: The operator is responsible for exercising common sense and caution.