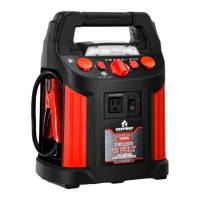
This document describes the Costway Jump Starter, model EP24920US, a versatile portable power unit designed for jump-starting vehicles, powering 12V DC devices, providing AC power, and inflating tires and other inflatables.
Function Description
The Costway Jump Starter is a multi-functional device primarily used for:
- Jump Starting 12V Vehicles: It provides a significant current to start cars, light trucks, ATVs, boats, lawn and garden equipment, and other 12V equipment with a lead-acid battery.
- 12V Power Source: It features a 12V DC cigarette lighter outlet to power various 12V DC devices.
- AC Power Source (Built-in Inverter): Equipped with a 200-watt inverter, it can supply 120V AC, 60Hz power to external AC-powered devices.
- USB Power Source: It offers two 5V DC USB ports (1.3A and 2.1A) for charging USB-powered devices.
- Air Compressor: An integrated air compressor rated for 180 PSI allows for inflating vehicle tires and other inflatables using various adapters (nozzles).
- Work Light: A built-in work light provides illumination for various tasks, especially useful in low-light conditions.
Important Technical Specifications
- Model: EP24920US
- Voltage: 12V
- Cranking Amps: 700A (for 5 seconds)
- Battery Type: Lead-acid battery, 12V 22AH
- AC/DC Adaptor: ETL certificated
- Input: 120V AC, 60Hz, 0.25A
- Output: 12V DC 1A
- Built-in Inverter:
- Output: 120V AC, 60Hz, 200 Watts
- Waveform: Modified sine waveform (caution advised for certain devices)
- USB Power Outlets:
- 12V DC Cigarette Lighter Outlet: Protected by a 15 amp circuit breaker (auto-resetting).
- Air Compressor: Rated for 180 PSI.
Usage Features
General Operation:
- Safety First: Users are strongly advised to read the entire manual, wear safety goggles, and keep children away. The device is for negative ground applications only and should not be used with dry cell batteries or on positive ground systems.
- Battery Status Indicators: Three Battery Status Indicator LEDs show the battery power level, charging status, and full charge.
- Test/USB/Light 3S Button: This multi-function button is used to check battery voltage, activate USB power, and control the work light.
- Power Switch: A main power switch controls the unit's overall power.
Jump Starting a 12V Vehicle:
- Ensure the device is off before connecting.
- Connect the red (positive +) clamp to the positive pole of the vehicle battery and the black (negative -) clamp to the negative pole.
- Safety Alarms: The unit features alarms for internal battery voltage below 8V (red LED flash with alarm), reversed clamp connections (red LED flashes quickly with alarm), and connection to a 24V vehicle (red LED flashes slowly with constant alarm).
- Start the engine for 3-5 seconds. If it doesn't start within 10 seconds, wait at least 4 minutes before retrying to prevent damage and overheating.
- Turn off the unit and disconnect clamps (negative first, then positive).
- Recharge the unit immediately after use.
Using as a 12V Power Source:
- Connect clamps to the positive and negative input terminals of the device to be powered.
- Turn the Power Switch to ON. The Connection Status Indicator LED will turn Green.
- Turn off the unit and disconnect clamps after use.
- Recharge the unit after use.
Using 12V Cigarette Lighter Power:
- Turn Power Switch to ON.
- Insert the 12V DC cigarette lighter plug from the device into the unit's cigarette lighter outlet.
- Can be used with an external power inverter (not included) by plugging the inverter's 12V DC plug into the unit's outlet.
- An extension cord can also be used.
Voltage Testing:
- Press and release the Test/USB/Light 3S button to check the internal battery's voltage level via the Battery Status Indicator LEDs.
- LED Indications:
- Green LED flashes with audible alarm: Internal battery voltage too high (check for wrong charging).
- Green LED on: Unit charged and ready.
- Yellow LED on: Unit needs charging soon.
- Red LED on: Unit never used and needs immediate charging.
- Red LED flashes with audible alarm: Internal battery voltage too low (needs immediate charging).
- Press the button again after testing to prevent battery drain.
Charging Jump Starter:
- Plug the AC Power Cord into the built-in adapter pin on the back of the jump starter.
- Plug the AC Power Cord into a 120V wall outlet.
- Charge until the Green Battery Status Indicator LED stays on.
- The charger automatically shuts off to prevent overcharging.
- Important: Do not use the unit while it is recharging. Disconnect from the charger before use.
Using Air Compressor:
- Remove the hose from storage and install adapters as needed.
- Attach the hose to the item to be inflated.
- Turn the AIR COMPRESSOR Switch on.
- Inflate to the proper air pressure (using the gauge), then turn the switch off and remove the hose.
- Recharge the unit as soon as possible after use.
- Note: Do not run for more than 10 minutes maximum at a time. Allow 10 minutes to cool down before using again.
- For other inflatables, select the appropriate adapter nozzle, insert it into the nozzle connector, and close the thumb latch. Inflate and then remove the adapter.
Using Work Light:
- Press and hold the Test/USB/Light 3S button for 3 seconds to turn on the work light. Battery Status Indicator LEDs will show voltage level.
- Press the button again to make the light flash for alert use.
- Press the button a third time to turn off the light.
- Recharge the unit as soon as possible after using the work light.
- The work light will shut off automatically if the internal battery voltage is too low.
Using Built-in Inverter:
- Set the inverter power switch to the ON position.
- Insert the cable from the external equipment into the 120V outlet.
- Start the external equipment.
- The inverter has undervoltage protection (alarm and automatic shut-off if voltage falls too low) and short circuit protection (switches off if connected equipment short-circuits).
- If the inverter indicator LED is RED, check the connected equipment and battery charge level.
- Caution: Always test if the inverter will operate a particular device. It will automatically shut down on power overload. When powering multiple devices, start them one at a time.
- Important: If using to operate a battery charger, monitor the charger's temperature for 10 minutes. Disconnect immediately if it becomes abnormally warm.
- Extension cords (16AWG or larger, no longer than 50 feet) can be used.
- Note: This inverter uses a modified sine waveform; caution is advised for certain devices.
Using 5V USB Power:
- Plug the USB-powered device into a USB power outlet.
- Press and release the Test/USB/Light 3S button; Battery Status Indicator LEDs will show the voltage level.
- Turn the device on.
- Recharge the unit as soon as possible after use.
- The USB power will shut off automatically if the internal battery voltage is too low.
Additional Feature - Low Voltage Alarm:
- When using the unit (jump starting, 12V power outlet, work light), the microprocessor detects internal battery voltage.
- If the voltage is too low, the Red Battery Status Indicator LED will flash, and an audible alarm will sound, reminding the user to charge the unit.
- The alarm stops when the unit is turned off or the battery voltage returns to normal.
Maintenance Features
- Regular Charging:
- Fully charge the battery when first received.
- Fully charge the battery after each use.
- Fully charge the battery every 3 months to ensure a longer life and efficient operation.
- Pre-Use Inspection: Before each use, inspect the general condition of the unit, checking for loose hardware, misalignment, binding parts, cracked or broken parts, damaged wiring, or any other condition affecting safe operation.
- Cleaning: After use, wipe external surfaces with a clean cloth.
- Storage: Protect from sunlight and moisture. Avoid storing in direct sunlight, extreme heat, cold, or very moist areas. Store the inflator hose and tire fitting in the storage compartment.
- Battery Disposal: Lead-acid batteries must be recycled or disposed of properly. Do not short-circuit terminals or incinerate.
- No User-Serviceable Parts: Do not disassemble the unit. Refer to the service section of the manual for any issues. No lubrication is recommended or required.
- Damaged Equipment: Do not use damaged equipment. If noise or vibration occurs, have the problem corrected before further use.
This comprehensive device offers multiple functionalities for emergency power and inflation needs, emphasizing user safety and proper maintenance for optimal performance and longevity.