This document provides the user manual for the Costway Vacuum Pump, model ET1217. It includes important safety information, operating instructions, maintenance procedures, technical specifications, and an exploded drawing of the pump.
Function Description:
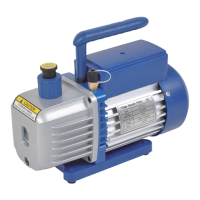
The Costway Vacuum Pump ET1217 is designed to create a vacuum in various systems. It is a single-stage vacuum pump, suitable for applications requiring the removal of air and other gases to achieve a low-pressure environment. The pump is equipped with a motor that drives the pumping mechanism, and it utilizes vacuum pump oil to seal and lubricate internal components, ensuring efficient operation and a high ultimate vacuum.
Important Technical Specifications (based on ET1217 model):
- Model: ET1217
- Voltage: 110V ~/60Hz
- Free Air Displacement: 4 CFM (114 L/min)
- Ultimate Vacuum: 5 Pa (0.05 mbar)
- Motor: 1/3 HP
- Intake Fitting: 1/4" Flare
- Oil Capacity: 300 ml
- Dimensions (mm): 275x122x220
- Net Weight (kg): 5.5
Other models listed in the technical parameter table (ET1216, ET1215, ET1213, ET1214) offer variations in free air displacement (3-5 CFM), ultimate vacuum (5 Pa to 0.3 Pa), oil capacity (230-350 ml), and intake fittings (1/4" Flare, 1/4" SAE & 1/2" Acme). All listed models operate on 110V ~/60Hz.
Usage Features:
The vacuum pump is designed for straightforward operation. Before use, users must ensure the oil level is checked to prevent damage. The pump is equipped with a sight glass to easily monitor the oil level.
Operating Manual:
-
Before using your vacuum pump:
- Motors are designed for operating voltages plus or minus 10% of the normal rating. Single voltage motors are supplied fully connected and ready to operate.
- Check the voltage and frequency at the outlet match the specifications on the pump motor decal.
- Ensure the ON-OFF switch is in the OFF position before plugging the pump into an outlet.
- Remove and discard the exhaust cap from the end of the pump's handle.
- The pump is shipped without oil in the reservoir. Before starting, fill it with oil. Remove the Exhaust Fitting cap and add oil until it shows at the bottom of the sight glass. The approximate oil capacity is 180-800ml (refer to technical data for specific model).
- Replace the Exhaust Fitting cap and remove the cap from one of the inlet ports. Turn the motor switch to ON. When the pump runs smoothly, replace the cap on the inlet port. This may take 20 to 30 seconds depending on ambient temperature.
- After the pump runs for approximately one minute, check the sight glass for proper oil level. The level should be even with the sight glass oil level line. Add oil if necessary.
- Note: When the pump is running, the oil level should be even with the sight glass. Underfilling will result in poor vacuum performance. Overfilling can result in oil blowing from the exhaust.
-
To shut down your pump after use:
- To prolong pump life and promote easy starting, follow these procedures:
- Close the manifold valve between the pump and the system.
- Remove the hose from the pump inlet.
- Cap the inlet port to prevent contamination or loose particles from entering.
Maintenance Features:
Regular maintenance, particularly oil management, is crucial for the pump's performance and longevity.
Vacuum pump oil:
- The condition and type of oil are extremely important for attaining the ultimate vacuum. High Vacuum Pump Oil is recommended, specifically blended for maximum viscosity at normal running temperatures and improved cold weather starts.
Oil Change Procedure:
- Ensure the pump is warmed up.
- Remove the OIL DRAIN cap. Drain contaminated oil into a suitable container and dispose of properly. Oil can be forced from the pump by opening the inlet and partially blocking the exhaust with a cloth while the pump is running (do not operate for more than 20 seconds using this method).
- When oil flow stops, tilt the pump forward to drain residual oil.
- Replace the OIL DRAIN cap. Remove the exhaust fitting and fill the reservoir with new vacuum pump oil until it just shows at the bottom of the sight glass.
- Ensure inlet ports are capped, then turn on the pump. Allow it to run for one minute, then check the oil level. If the oil is below the sight glass OIL LEVEL line, add oil slowly (with the pump running) until it reaches the line. Replace the exhaust fitting, ensuring the inlet is capped and the drain cap is tight.
- Dealing with badly contaminated oil:
- If sludge forms due to water collection, remove the oil reservoir cover and wipe it out.
- Alternatively, force the oil from the reservoir: warm up the pump, then while running, remove the oil drain cap and slightly restrict the exhaust. This back-pressures the reservoir, forcing out contaminated oil. Turn off the pump when oil flow ceases. Repeat as needed.
- Replace the OIL DRAIN cap and refill with fresh pump oil.
Troubleshooting Guide:
The manual provides guidance for common issues:
Exploded Drawing:
An exploded drawing is provided, detailing the various components of the vacuum pump, including:
- Fan cover, fan, motor cover, motor rotor, motor stator
- Power supply cords, power switch, capacitor box, capacitor
- Handle, trestle, gas cap, air inlet nozzle
- Die cast aluminum housing, sight glass, oil drain, oil drain screw O-ring
- Rubber foot, base plate
- Front and back pump bodies, rotors, vanes, springs, covers, oil seals
- Exhaust and oil inlet fitting, cap board
- Various screws, sealing rings, O-rings, and other fasteners.
This comprehensive manual ensures users can operate and maintain their Costway Vacuum Pump effectively and safely.