Do you have a question about the Craftsman 486.240383 and is the answer not in the manual?
Ensuring only trained individuals operate the sweeper.
Prohibiting children from operating the lawn sweeper.
Warning against operating sweeper near fire to prevent bag burning.
Cautioning against removing debris while brush is rotating.
Advising reduced speed on rough terrain, ditches, and hillsides.
Stating the sweeper is not designed for street or highway use.
Emphasizing the importance of keeping all fasteners tight.
Instructing inspection for damage after striking an object.
Directing users to follow maintenance instructions in the manual.
Connecting the hitch bar to the sweeper housing assembly.
Fastening the hitch bar using specified bolts and nuts.
Attaching the hitch bracket to the hitch bar with a bolt.
Securing hitch bracket with a longer bolt and washer.
Connecting bag mount arms and brace rod to the sweeper housing.
Tightening all previously assembled bolts for structural integrity.
Attaching the hitch pin assembly to the hitch pin bracket.
Connecting the hitch pin bracket and spacers to the hitch bar.
Attaching the height adjustment strap to the sweeper housing.
Connecting the height adjustment strap to the handle.
Attaching the grip with finger knobs to the handle.
Threading the left upper hopper tube into the bag's stitched flaps.
Joining the two upper hopper tubes by aligning their center holes.
Fastening the upper tubes using a bolt and nut.
Connecting the two lower hopper tubes together.
Inserting the assembled lower hopper tubes into the bag.
Joining upper and lower tube ends with bolts and nuts.
Attaching the bag frame strap and retainer to the bag's front edge.
Securing the frame strap to the lower hopper frame.
Fastening the bag corners by snapping flaps to the bag bottom.
Installing hopper support rods into upper and bottom tubes.
Creating a hole in the bag aligned with the upper hopper tube.
Inserting the pivot rod through the tube and various clamps/clevises.
Fastening the bag retainer clevises using cotter pins.
Attaching the last two mounting clamps to the bag frame.
Fastening the rope to the top center of the bag frame.
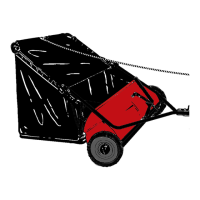
Hooking the wind screen onto the bag frame and pivot rod.
Connecting the hopper bag frame to the sweeper via pivot rod notches.
Detaching the hopper bag frame by lifting bag retainers.
Instructions for hitching vehicles with 8-10 inch ground clearance.
Instructions for hitching vehicles with 10-13 inch ground clearance.
Tips for finding the best speed for maximum hopper bag fill.
Instructions for adjusting brush height for optimal grass sweeping.
How to easily dump the hopper without leaving the tractor seat.
Guidance on servicing wheel gears, advising one wheel at a time.
Instructions for cover removal for internal component servicing.
Technique for holding gears during chain service.
Ensuring correct pawl orientation for proper brush drive.
Procedure to remove the hopper bag before brush replacement.
Recommendation to replace brushes individually.
Tilting the sweeper to facilitate brush replacement.
Instructions for loosening bolts on brush retainers.
Installing new brushes, ensuring proper alignment of bristles.
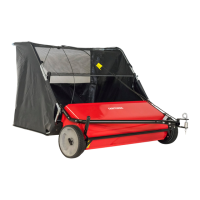
| Brand | Craftsman |
|---|---|
| Model | 486.240383 |
| Type | Lawn Sweeper |
| Wheel Size | 11 inches |
| Adjustable Height | Yes |
| Handle Type | T-handle |