Do you have a question about the Craftsman CMXPTSG1007NB and is the answer not in the manual?
Indicates an imminently hazardous situation resulting in death or serious injury.
Indicates a potentially hazardous situation resulting in death or serious injury.
Indicates a potentially hazardous situation resulting in minor or moderate injury.
Indicates a practice not related to personal injury, may result in property damage.
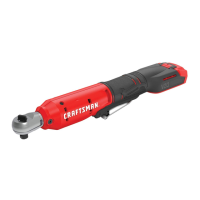
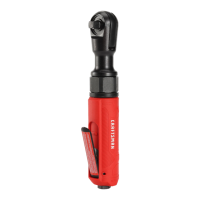
The main body of the air ratchet tool.
The part where the socket attaches.
Control for changing the direction of rotation.
Activates the tool's operation.
Connection point for the air supply hose.
Failure to follow may result in electric shock, fire, or serious injury.
Modifying the product or its parts can lead to damage or injury.
Always read the instruction manual to reduce the risk of injury.
Requires at least 4.4 SCFM at 90 PSI for correct operation.
CMXPTSG1007NB
3/8 inch (9.52 mm)
180 rpm
50 ft.-lbs.
4.4 scfm
1/4 inch npt
3/8 inch (9.52 mm)
90 psi
Could result in serious injury and property damage; read instructions.
Always follow basic safety precautions to reduce personal injury risk.
Anticipate and be alert for sudden changes in motion during operation.
Do not operate if trigger does not turn tool on or off.
Do not use tool at heights exceeding 6 feet (2m) or in unsafe conditions.
Keep fire extinguisher and first aid kit near work areas.
User must read compressor manual and follow its safety instructions.
Tool can propel materials causing serious injury.
Compressed air can propel particles causing injury to soft tissues.
Attachments can break and fly off, causing injury to operator/bystanders.
Always wear ANSI Z87.1 approved safety glasses.
Use an approved face shield in addition to safety glasses for protection.
Never leave an operating tool unattended.
Disconnect from air supply when not in use or changing accessories.
Ensure sockets and attachments are securely fitted before operating.
Exposure to noise can lead to permanent hearing loss.
Always wear ANSI S3.19 hearing protection.
Tool can generate sparks, igniting flammable materials.
Never operate near flammable substances like gasoline or solvents.
Work in a clean, well-ventilated area free of combustible materials.
Never use oxygen, carbon dioxide or other bottled gases as a power source.
Loose clothing, jewelry can get entangled, causing serious injury.
Do not wear loose clothing or jewelry; keep body parts away from moving parts.
Always wear properly fitted clothing and safety equipment.
Tool can cause serious injury if operated improperly or for unintended use.
Accessories can become hot through friction, posing burn risk.
High torque and speed can cause hand entrapment.
Keep the working part of the tool away from hands and body.
Understand the tool's limitations and read the manual.
Ensure clearance behind tool to avoid hand entrapment when loosening fasteners.
Tool not provided with insulated gripping surface; metal parts can become live.
Contact with live wire can cause shock, electrocution or death.
Never use air tools near energized electrical wiring.
Investigate workpieces for hidden wiring to prevent electrocution.
Unattended tools can be activated, causing injury to others.
Air tools can propel fasteners or materials, causing injury.
Disconnect air supply when not in use or changing accessories.
Keep area clean, lit, and free of children; use recommended parts.
Never carry by air hose or with trigger depressed; secure workpiece.
Disconnect air supply for changes/maintenance; use authorized service.
Avoid impairing substances; store tool safely.
Maintain proper footing, keep handles clean, stay alert, use common sense.
Follow lubrication/changing instructions; use rated/undamaged tools and accessories.
Apply force moderately, avoid leaking/damaged tools, do not improvise.
Discontinue use if discomfort occurs; consult physician if symptoms persist.
Do not remove labels; replace damaged labels for safety information.
Ensure all parts are present and undamaged before assembly.
1 – 3 minutes
Wrench, thread sealant tape, tool oil, male plug (not included).
Remove the plastic protective cap from the air inlet.
Tighten male plug clockwise for an airtight connection. Do not overtighten.
Apply threaded sealant tape on the threading of the male plug.
Place 2-3 drops of air tool oil into the male air plug opening before each use.
Select and mount the correct impact socket onto the anvil until it clicks.
Use adapters/sockets with torque rating equal to or greater than the tool.
Ensure adapters and sockets are properly mounted and secure before use.
Connect air supply hose to the male plug and set working pressure at 90 PSI.
Turn knob counterclockwise, press trigger; anvil runs clockwise to tighten.
Turn knob clockwise, press trigger; anvil runs counterclockwise to loosen.
Always disconnect tool from air supply before performing any maintenance.
Ensure tool is properly lubricated during operation for increased tool life.
Recommended for tool life; check and fill with air tool oil as needed.
Use air-tool oil or high-grade turbine oil with specific additives.
Blow dirt/dust with dry air weekly; wear eye protection.
Never use solvents on non-metallic parts; use damp cloth with mild soap.
Repairs should be performed by CRAFTSMAN authorized centers using identical parts.
Use only CRAFTSMAN recommended accessories for safety and performance.
Review maintenance section and perform as necessary before storing.
Tool must be well cleaned and lightly lubricated before storing.
Store tool in a dry, safe place out of reach of children.
Registering helps obtain more efficient warranty service.
Registration serves as proof of purchase for insurance loss.
Allows contact in case of safety notification requirements.
Cause: Grit/gum in tool. Correction: Flush with air-tool oil or gum solvent.
Cause: No oil or improper lubrication. Correction: Lubricate the tool.
Cause: Low air pressure or hose leaks. Correction: Adjust regulators, seal fittings, use proper hoses.
Cause: Worn rotor blade. Correction: Replace rotor blade.
Cause: Moisture blowing out. Correction: Drain compressor tank; oil tool.
Covers defects for three years; excludes wear or abuse. Visit craftsman.com for details.
Does not apply to accessories or damage from unauthorized repairs.
Excludes implied warranties of merchantability and fitness for a particular purpose.
Return within 90 days with receipt for a full refund if not satisfied.
Warranty does not apply to products sold in Latin America; see country specific info.
CRAFTSMAN trademark acknowledgement and manufacturer details.
Diagram showing all internal and external parts of the tool.
List of primary parts like Ratchet Head, Shaft, and Rotor.
Details on various bearings, O-rings, and seals used in the tool.
Includes gears, switch pins, springs, mufflers, and housing.
Covers housings, caps, air inlet, lever, and other external components.
Kit K99000-CMX for replacement of lever spring pin.
| Type | Generator |
|---|---|
| Starting System | Recoil |
| Fuel Type | Gasoline |
| Rated Wattage | 1000 Watts |
| Power Source | Gasoline |
| Speed | 3600 RPM |
| Engine Type | 4-Stroke |
| Amperage | 8.3 Amps |
| Voltage | 120 V |