26
SERVICE AND MAINTENANCE
Leveling the Deck (Side to Side)
If the cutting deck appears to be mowing unevenly, a side to side
adjustmentcanbeperformed.Adjustifnecessaryasfollows:
With the tractor parked on a firm, level surface, place the deck lift 1.
lever in the top notch (highest position) and rotate both blades so
that they are perpendicular with the tractor.
Measure the distance from the outside of the left blade tip to the 2.
ground and the distance from the outside of the right blade tip to
the ground. Both measurements taken should be equal. If they’re
not, proceed to the next step.
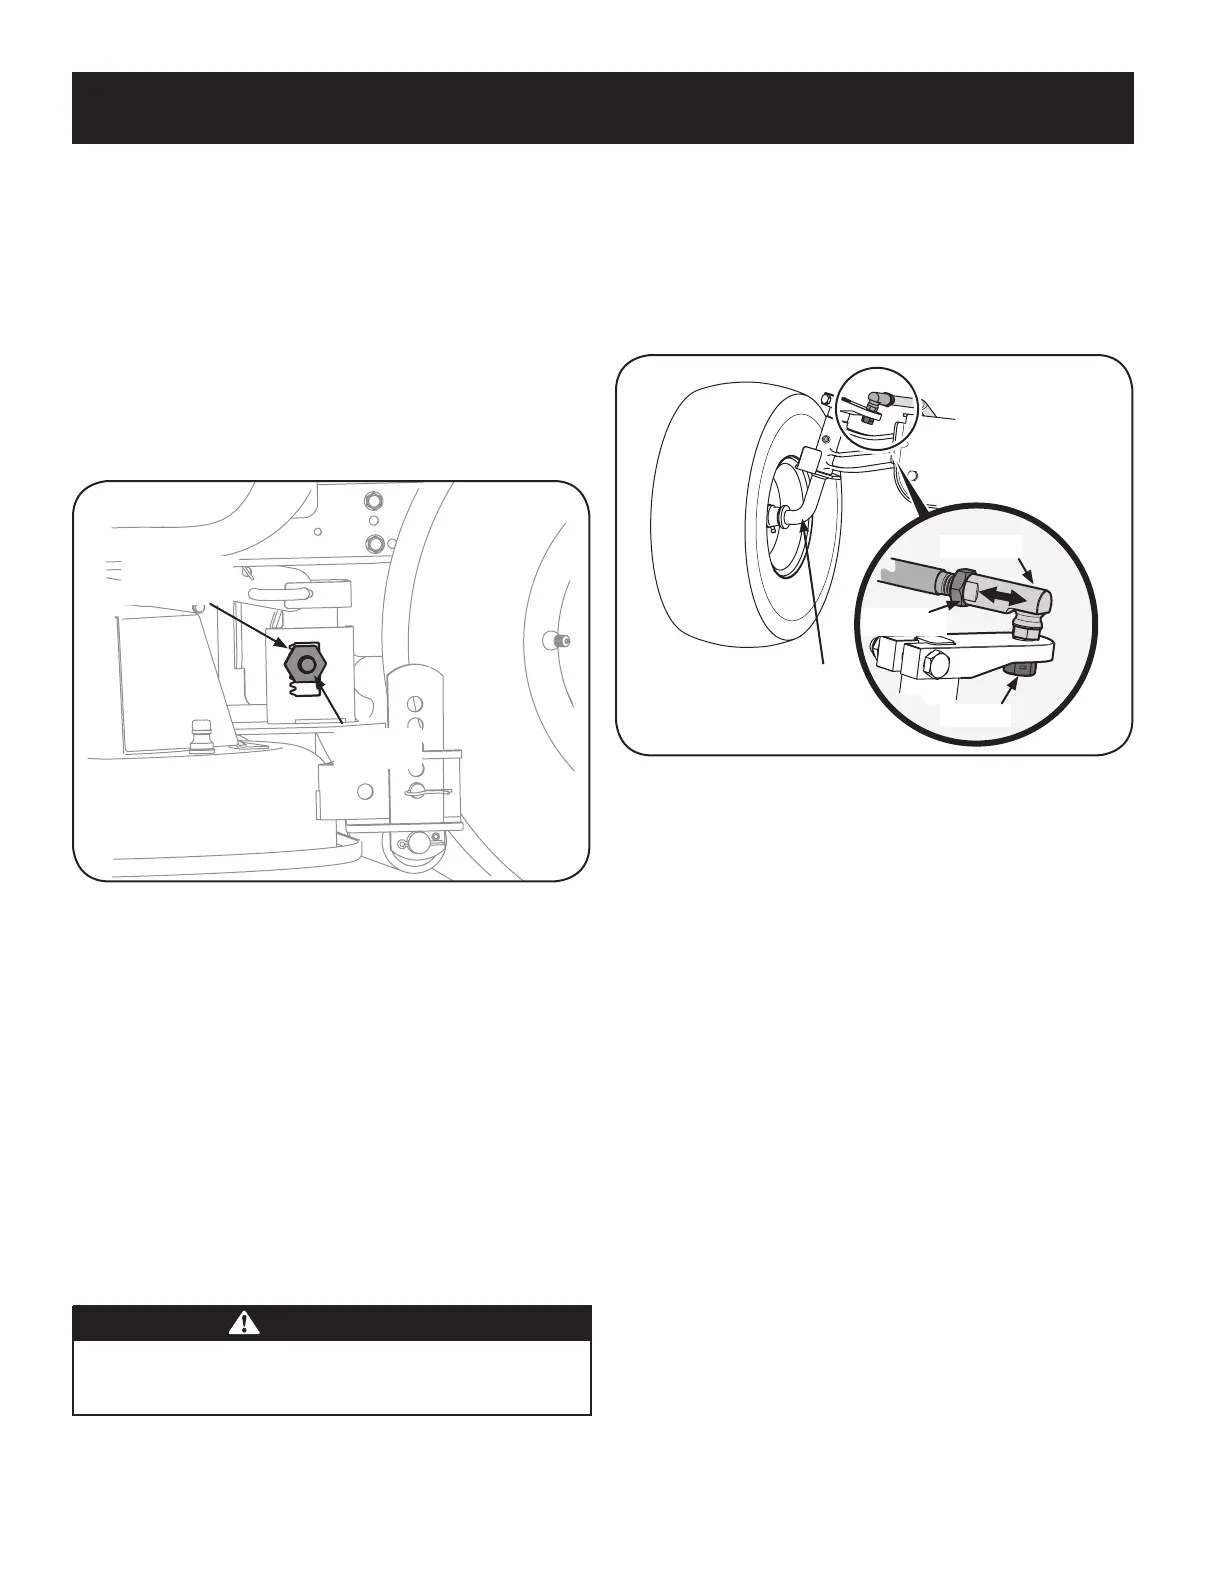
Loosen, but do NOT remove, the hex bolt on the left deck hanger 3.
bracket. See Figure 23.
Using a wrench, raise or lower the left side of the deck by turning 4.
theadjustmentgear.SeeFigure23.
The deck is properly leveled when both blade tip measurements
taken earlier are equal. Retighten the hex bolt on the left deck hanger
bracketwhenproperadjustmentisachieved.
Parking Brake Adjustment
If the tractor does not come to a complete stop when the brake pedal
is completely depressed, or if the tractor’s rear wheels can roll with the
parking brake applied (and the hydrostatic relief valve open), the brake
isinneedofadjustment.SeeaSearsorotherqualifiedservicedealer
tohavethebrakeproperlyadjusted.
Adjusting the Seat
RefertotheAssemblysectionofthismanualforseatadjustment
instructions.
WARNING
Before operating the tractor, make sure the seat is engaged in the
seat-stop. Engage the parking brake. Stand behind the machine and
pull back on seat until it clicks into place.
Steering Adjustment
If the tractor turns tighter in one direction than the other, or if the ball
jointsarebeingreplacedduetodamageorwear,thesteeringdrag
linksmayneedtobeadjusted.
Adjustthedraglinkssothatequallengthsofeacharethreadedinto
theballjointontheleftsideandtheballjointontherightside:
Removethehexnutbelowtheballjoint.SeeFigure24.1.
Threadtheballjointinwardtoshortenthedraglink.Threadthe2.
balljointoutwardtolengthenthedraglink.
Replacethehexnutafterproperadjustmentisachieved.3.
NOTE: Threadingtheballjointstoofarontothedraglinkswillcause
the front tires to “toe-in” too far. Proper toe-in is between 1⁄16” and
5⁄16”.
Front tire toe-in can be measured as follows:
Place the steering wheel in position for straight ahead travel.1.
Infrontoftheaxle,measurethedistancehorizontallyfrom2.
the inside of the left rim to the inside of the right rim. Note the
distance.
Behindtheaxle,measurethedistancehorizontallyfromtheinside3.
of the left rim to the inside of the right rim. Note the distance.
The measurement taken in front of the axle should be between 4.
1⁄16” and 5⁄16” less than the measurement taken behind the axle.
Hydrostatic Transmission
The hydrostatic transmission is sealed at the factory and is mainte-
nance-free. The fluid level cannot be checked and the fluid cannot be
changed.
Hex Nut
Drag Link
Ball Joint
Axle
Figure 24
Figure 23






 To Next Page