Opgelet:
Hou het apparaat en de accessoires in de kit buiten het
bereik van kinderen jonger dan 8 jaar.
Hou het apparaat uit de buurt van water of een andere
vloeistof.
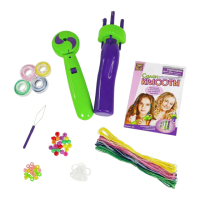
• Apparaat op batterijen om vlechtjes te maken (21 cm)
• Apparaat op batterijen om haar te wrappen (20 cm)
• Rijgpen
• 4 klosjes met gekleurde draad (elk 7,6 m)
• 4 bundels aanvuldraad (elk 4,3 m)
• 60 plastic vastklikkralen
• 30 plastic kralen
• 60 doorschijnende elastiekjes
• Handleiding
hand-greep
batterijvak voor
2 batterijen
wissel-schake-laar
bovenstuk - met drie draaiende pinnen
uitgerust met sluithaakjes
klep
guur 1
Voor je begint:
Duw het klepje onder het batterijvak naar boven om het te openen en plaats
de 2 AA-batterijen (niet meegeleverd). Zie guur 1.
Lees de instructies zorgvuldig voor je begint.
Vlechtjes maken
Stap 1
Bereid een haarstreng voor
1. Zorg ervoor dat je haar droog is. Neem een dunne haarstreng vast en
borstel hem goed door van de wortel tot de punt.
2. Verdeel de streng in drie gelijke delen. Zie guur 2.
3. Houd de drie delen in de ene hand vast en het haarvlechtapparaat in de
andere. Duw met je duim een van de pinnen onderaan het draaiende
bovenstuk van het apparaat naar boven tot het sluithaakje aan de
bovenzijde vrij is. Zie guur 3.
4. Steek een van de drie haarstrengen op 2 cm ervan in het gekromde
uiteinde van het sluithaakje. Zie guur 4.
5. Laat de pin los zodat de haarstreng vast blijft zitten. Zie guur 5.
6. Herhaal dezelfde stappen voor de twee andere haarstrengen.
*
Ook met twee strengen kan je al een leuke vlecht maken!
Volg daarvoor dezelfde instructies maar verdeel de beginlok dan in twee
gelijke delen.
Stap 2
Wind de haarstrengen op
Als de drie haarstrengen door het apparaat worden vastgehouden, duw je de
schakelaar naar boven. Zie guur 6. De drie strengen worden dan elk op de
pin gewonden waardoor je drie afzonderlijke 'haarspoelen' overhoudt.
Plaats de schakelaar weer in zijn oorspronkelijke stand in het midden.
Probeer het apparaat goed recht te houden terwijl je de haarstrengen opwindt
om dat zo gelijkmatig mogelijk te laten verlopen.
Stap 3 Vlecht!
Duw de schakelaar naar beneden
De drie 'haarspoelen' worden nu samengevlochten tot één supercoole vlecht!
Zie guur 7.
Opmerking:
de drie strengen worden heel snel samengevlochten. Breng de
schakelaar meteen naar zijn oorspronkelijke stand in het midden als de vlecht
klaar is.
Voorzichtig: als je de schakelaar te lang ingedrukt houdt, kunnen er door het
te lange vlechten knopen ontstaan.
Duw de pinnen naar boven en haal er de strengen haar voorzichtig weer uit. Om
te voorkomen dat de vlecht loskomt, maak je het uiteinde vast met een
elastiekje of een vastklikkraal.
Voeg een extra stijlelement toe en rijg een kraal aan de haarlok voor je begint te
vlechten of aan het uiteinde ervan als je vlechtje klaar is.
Onder het kopje 'Versierde vlechten' vind je alle instructies en suggesties voor
de meest uiteenlopende haarstijlen.
Opgelet: hou het apparaat uit de buurt van water of een andere vloeistof.
Versierde vlechten
1. Borstel je haar grondig door. Rijg er een of meer kralen aan.
2. Bereid een vlecht of haarwrap voor met de haarstreng waar je een
kraal aan geregen hebt. Bij een vlecht is het beter twee in plaats
van drie strengen te gebruiken zodat je haar mooi door de kraal past.
3. Rijg nog een kraal aan het uiteinde van de vlecht en maak die vast
met een elastiekje of een vastklikkraal.
Kralenvlecht
1. Borstel je haar grondig door. Kies jouw favoriete kleur(en) kralen
en rijg ze een voor een in de volgorde die je wil aan een licht
bevochtigde haarstreng.
2. Maak het uiteinde van de vlecht vast met een elastiekje of een
vastklikkraal. Klaar? Tijd voor een catwalkmomentje!
Half-up met vlechtjes
1. Borstel je haar grondig door.
Maak aan weerszijden van je hoofd 2 of 3 vlechtjes. Zie guur 8.
2. Trek de vlechten aan weerszijden naar achter en bind ze samen
met een elastiekje. Zie guur 9.
Als de vlechten te los zijn, draai je ze (in de richting van het
vlechten) een paar keer rond voor je ze naar achter trekt.
#5381
WAARSCHUWING:
!
Niet geschikt voor kinderen jonger dan 8 jaar.
Bevat kleine deeltjes welke gevaarlijk zijn.
Werkt op 4 AA batterijen (niet inbegrepen).
Enkel gebruiken onder toezicht van volwassene
8
NL
Inhoud