EasyManua.ls Logo

Cruz Lift User Manual

Cruz Lift
8 pages
To Next Page IconTo Next Page
Page #1 background imageLoading...
Page #1 background image
Cruzber SA
ES-A14018311
P.I. Las Salinas II
14960 - Rute - Spain
www.cruzber.com
Label...
000-000
MK
E
Instrucción de montaje
¡Leer primero!
GB
Assembly instructions
Read rst!
F
Instruction de montage
Lire en premier!
D
Montageanleitung
Zuerst lesen!
PT
Instruções de montagem
Ler primeiro!
PL
Instrukcja montażu
Najpierw przeczytaj!
CZ
Montážní návod
Čtěte pozorně!
HU
Szerelési Utasítás
Először olvasd el!
RO
Instructiuni de montaj
Intai cititi!
HR
Detaljne upute
Prvo procitati!
GR
Διαβάστε προσεκτικά τις
Οδηγίες Συναρμολόγησης!
TR
Öncelikle montaj:
Talimatlarını okuyunuz!
RU
Инструкции по монтажу
Сначала прочитайте!
I
Istruzioni di montaggio
Leggere per primo!
NL
Montagehandleiding
Eerst lezen!
SLO
Navodila za sestavljanje
Preberite!
Uputstva за инсталацију
Pеад први
Peso-Weight-Poids-Gewicht:
1,6 kg
2016-r1
940-403
Lote-Lot-Lot-Lot:
01-16
Accesorio
Accessory
Accessoire
Zubehör
Accesório
Wyposażenie
Příslušenství
Kiegészítő
Dodaci
Accesoriu
Αξεσουάρ
Aksesuar
Аксессуары
Accessori
Accessoires
Dodatek
Modelo-model:
Cruz Lift
Max: 30 kg
Question and Answer IconNeed help?

Do you have a question about the Cruz Lift and is the answer not in the manual?

Cruz Lift Specifications

General IconGeneral
BrandCruz
ModelLift
CategoryLifting Systems
LanguageEnglish

Summary

Installation Step 1: Preparation

Component Identification and Fixings

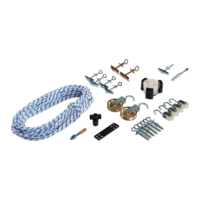
Lists all components (A-O) and specifies fixings for hollow and solid brick ceilings.

Critical Pre-Installation Safety

Ensures ceiling material is adequate and strong enough to support the weight before installation.

Installation Step 2: Drilling

Marking and Drilling Hole Positions

Diagram shows precise placement and spacing of holes for ceiling mounting, with specific drill sizes.

Installation Step 3: Mounts

Insert Ceiling Fixings

Instructions for inserting various fixings (N, L/M, D, E, O, I) into prepared ceiling holes.

Positioning Mounting Points

Diagram illustrating the correct positioning and orientation of mounting points on the ceiling.

Installation Step 4: Supports

Connect Support Brackets

Guides the connection of components B and C to the ceiling mounts.

Adjust Component Angles

Specifies the precise angles (3°, 5°, 2°, 4°, 6°, 1°) for component alignment.

Installation Step 5: Lifting Mechanism

Connect and Adjust Pulleys

Instructions for connecting and adjusting the pulley system for smooth operation.

Final Angle Adjustments

Details the final angle adjustments for the main lift system components.

Installation Step 6: Final Assembly

Final Rope Connections

Illustrates the final connections and tensioning of the lifting ropes.

Using Component G

Demonstrates the correct use and integration of component G in the final setup.

Usage Safety and Load Distribution

Correct Load Placement

Demonstrates proper weight distribution and placement for safe lifting.

Incorrect Load Placement

Illustrates common mistakes and unsafe practices to avoid during lifting.