9
10
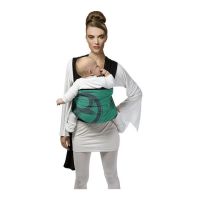
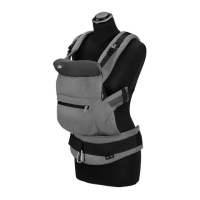
VORNE TRAGEN
1. Legen Sie den Hüftgurt an, schließen Sie die Schnalle und stellen Sie die
Länge so ein, dass der Gurt fest sitzt. Stellen Sie beim Anlegen des Hüftgurtes
sicher, dass immer das männliche Schnallenstück vollständig durch die elastische
Sicherheitsschlaufe gefädelt wurde, bevor die Schnalle geschlossen wird.
2. (a) Nehmen Sie nun Ihr Baby auf den Arm und setzen Sie es in die Trage. Winkeln
Sie die Beine Ihres Babys so an, wie es für Ihr Kind angenehm ist und legen Sie die
Trage anschließend um das Baby. (b) Bitte stellen Sie sicher das bei kleinen Kindern
bis 7 kg die Beinöffnungen geschlossen sind. Es ist jedoch leichter das Kind bei
geöffneten Beinschlaufen in die Trage zu setzen und diese danach zu schliessen.
3. (a) Schlüpfen Sie nacheinander mit Ihren Armen in die Schultergurte und (b)
schließen Sie den Verbindungsgurt hinter dem Rücken.
4. Führen Sie nun die Arme Ihres Babys durch die Armöffnungen, öffnen Sie dazu ggf.
die beiden Verschlüsse der Kopfstütze.
VORWÄRTS GERICHTETE SITZPOSITION
Wegen möglicher Reizüberfl utung wird empfohlen, dass erst Babys ab einem Alter von
6 Monaten mit der Sicht nach vorne getragen werden. Für längere Strecken wird das
Tragen mit dem Gesicht nach innen oder am Rücken empfohlen.
5. Achten Sie darauf, dass sich der Sitzsteg in der schmalsten Position befi ndet,
d.h. dass der untere Reißverschluss komplett geschlossen ist. Lassen Sie die
Kopfstütze nach außen geklappt und befestigen Sie sie so an den Verschlüssen der
Kopfstütze.
Folgen Sie weiter den Punkten 1-4 in der Anleitung, um die Babytrage anzulegen.
AM RÜCKEN TRAGEN
Diese Trageposition sollte erst genutzt werden, wenn das Baby seinen Kopf sicher hal-
ten kann. Klappen Sie die Kopfstütze nach innen (siehe Punkt VIII b und VIII c)
6. Legen Sie den Hüftgurt so an, dass sich die Trage am Rücken befi ndet, schließen
Sie die Schnalle und stellen Sie die Länge so ein, dass der Gurt fest sitzt. Stellen Sie
beim Anlegen des Hüftgurtes sicher, dass immer das männliche Schnallenstück
vollständig durch die elastische Sicherheitsschlaufe gefädelt wurde, bevor die
Schnalle geschlossen wird. Schlüpfen Sie in den linken Schultergurt.
7. Nehmen Sie nun Ihr Baby auf den rechten Arm. Schieben Sie es nach hinten in die
Trage, wobei Sie Ihre linke Hand auf den Rücken legen und den linken Fuß Ihres
Kindes fassen. Beugen Sie sich dazu leicht nach vorne und halten Sie dabei Ihr
Baby stets fest. Sobald das Baby sicher sitzt, schlüpfen Sie auch in den rechten
Schultergurt.
8. Schließen Sie den Querträger in der Höhe des Brustbeines und justieren Sie ggf. die
Breite.
Achten Sie darauf, dass Ihr Kind mit einem leichten Rundrücken in der Trage sitzt.
Ziehen Sie deshalb die Schultergurte nicht zu fest.
FORWARD CARRYING
1. Position the waist belt around your waist/hips, close the buckle and
adjust the length until it sits tightly. Please assure that the male part of the
buckle is always fed through the elastic safety loop before closing the buckle.
2. (a) Now lift your baby up to your chest and place it into the carrier. Bend the legs
of your baby in such a manner, that it is comfortable for your child and then wrap
the carrier around the baby’s back. (b) Please make sure that the safety loops are
closed if the child weighs under 7 kg.
3. (a) Put your arms through the shoulder straps and (b) fasten the straps together with
the sternum strap behind your back.
4. Now lead the arms of your baby through the arm openings, if necessary open the
buckles of the headrest on both sides.
FORWARD FACING SITTING POSITION
Due to possible overstimulation, we only recommend the forward carrying position for
children six months and older. For longer distances we recommend to carry your child
in the forward or the back carrying position.
5. Make sure that the sitting area is adjusted in the narrowest position, i.e. that the
lower zipper is completely closed. Keep the head support bent in the outward
position and fasten it to the buckles of the headrest.
Follow points 1-4 as listed above.
BACK CARRYING POSITION
This carrying position should only be used when your baby is able to safely hold its
own head. Fold the headrest away towards the inner side of the carrier (see points VIII
b and VIII c)
6. Position the waist belt around your waist/hips so that the carrier body is placed on
your back, close the buckle and adjust the length until it sits tightly. Please assure
that the male part of the buckle is always fed through the elastic safety loop before
closing the buckle. Slip into the left shoulder strap.
7. Lift your baby up onto your right arm, then place your left hand on your back and
take hold of your baby´s left foot and then shift your baby into the carrier. To do so
bend forward and continue to hold and support your baby at all times. As soon as
your baby sits safely, slip on the right shoulder strap.
8. Close the sternum strap in the height of your chest and if necessary adjust the
width.
ATTENTION: Hold and support your baby, BEFORE taking off the shoulder straps! Please
see to it that your child forms a slightly rounded back while sitting in the carrier. Hence
do not fasten the shoulder straps too tightly.
PORTAGE FACE A L‘ADULTE
1. Placer la sangle de la taille autour de votre taille, fermer les boucles et
ajuster-la jusqu‘à ce qu’elle soit fermement installée. Merci de vérifi er que
la boucle mâle passe toujours à travers la boucle de sécurité élastique avant de
la boucler.
2. Maintenant, soulevez votre bébé sur votre poitrine et placer le dans le porte bébé.
Plier légèrement les jambes de votre bébé de façon à ce qu‘il soit confortablement
installé. Envelopper le porte bébé autour du dos de l‘enfant. Vérifi ez que les
boucles de sécurité soient bien fermées si l‘enfant pèse moins de 7 kg.
3. (a) Placez vos bras dans les sangles des épaules et (b) verrouiller-les dans votre dos
avec la sangle du sternum.
4. Maintenant, placer les bras de l‘enfant dans les emplacements prévus à cet effet,
si nécessaire ouvrir de chaque côté les boucles du repose tête.
PORTAGE FACE A LA ROUTE
Dû à une possible stimulation de l‘enfant, il est recommandé d‘utiliser la position de
portage face à la route pour des enfants de six mois et plus. Pour des distances plus
longues, il est recommandé de porter votre enfant en position de portage face à
l‘adulte ou en position de portage dans le dos.
5. Assurez-vous que l’assise est ajustée et que la fermeture éclaire basse est
correctement fermée. Garder le support de la tête plié vers l’extérieur et verrouiller
-le grâce à ses boucles du repose tête.
Suivre les points 1-4 listés ci-dessous.
PORTAGE SUR LE DOS
Cette position doit uniquement être utilisée lorsque votre bébé est capable de
maintenir sa tête seul. Plier le repose tête vers l’intérieur du porte bébé (voir points
VIII b et VIII c).
6. Placer la ceinture de la taille autour de votre taille afi n de placer le porte bébé
dans votre dos puis fermer la boucle et ajuster la longueur jusqu’à ce quelle soit
fermement placée. Merci de vérifi er que la boucle mâle passe toujours à travers la
boucle de sécurité élastique avant de la boucler.
7. Soulever le bébé jusqu‘à votre bras droit, puis passer votre main gauche dans
votre dos afi n de soutenir le pied gauche de votre bébé et de le placer dans le
porte bébé. Ne vous penchez pas en avant, tenez et soutenez votre bébé en
permanence. Dès que votre bébé est correctement installé, insérer votre bras dans
la sangle droite des épaules.
8. Fermer la sangle du sternum sur le haut de votre poitrine et si nécessaire ajuster la
largeur.
ATTENTION: Soutenez et portez votre enfant, AVANT d‘ôter les sangles des épaules!
Merci de vérifier que votre enfant a bien le dos légèrement arrondi une fois installé
dans le porte bébé. D‘où ne pas serrer les sangles des épaules trop fermement.
DE EN
FR

 Loading...