EN
15
How do I collect the shredded material?
Shut-off the power unit before attaching or removing the bag.
You can use either the collection bag supplied (if supplied) or place the shredder on a tarpaulin sheet to
catch the shredded material.
When using the collection bag, you need to t the collection bag hooks onto the sides of the discharge
chute
Warning: The ventilation slots on the machine body must never be covered by the
collection bag or shredded material.
How do I replace the blades?
1. Ensure that the shredder is switched off and disconnected from the mains supply.
2. Remove the top feed assembly by unscrewing the reamer knob securing it to the body of the machi-
ne.
3. The blades have two cutting edges. When the blades become worn they can be reversed to use the
second cutting edge.
4. It is recommended that work gloves be used when replacing the blades.
5. Lock the blade disc using hex spanner. Unscrew the two inner hexagonal headed screws and note
the position of the cutting angle of the blade.
6. Remove the blade and rotate it through 180 degrees and t the blade to the blade disc ensuring that
the ground cutting edge is facing downwards.
7. Repeat this for the other blade.
When both cutting edges of the blade have become worn they must be replaced as a pair. The blades
can be re-sharpened, but this must be done by an experienced person using an oil stone. We do not
recommend this be done as the weight of each blade is critical to maintain the balance of the cutting
disc. Any imbalance could cause damage to the machine and possible injury to the operator.
5. MAINTENANCE
1. Warning: During maintenance and cleaning ensure the machine is disconnected from the mains.
2. When the appliance is stopped for servicing, inspection, or storage, or to change an accessory,
switch off and pull the plug from the mains supply before making any inspections, adjustments, etc.
3. If an extension cord is used it shall not be of lighter grade than the supply cord already tted to the
appliance.
4. Check the supply and any extension cord regularly for damage or signs of ageing.
Do not use the appliance, if the cords are damaged.
5. When servicing the cutting means be aware that, even though the motor will not start due to the
interlock feature of the guard, the cutting means can still be moved if the motor is turned by hand.
6. Never attempt to override the interlock feature of the guarding.
7. Remove deposited matter from the machine using a brush.
8. Always clean the machine after use. Clean the plastic body and plastic parts using
soap and a moist cloth. Do not use aggressive agents or solvents for cleaning.
9. Never clean the shredder with a jet of water or by rinsing. Make sure that no water
is allowed to enter into the shredder.Use only the recommende.
TECHNICAL DATA
Rated power: 2500 W
No load speed: 4050 rpm
Cutting dia: 40 mm
Collection box: 45 L
Sound level: 111 dB
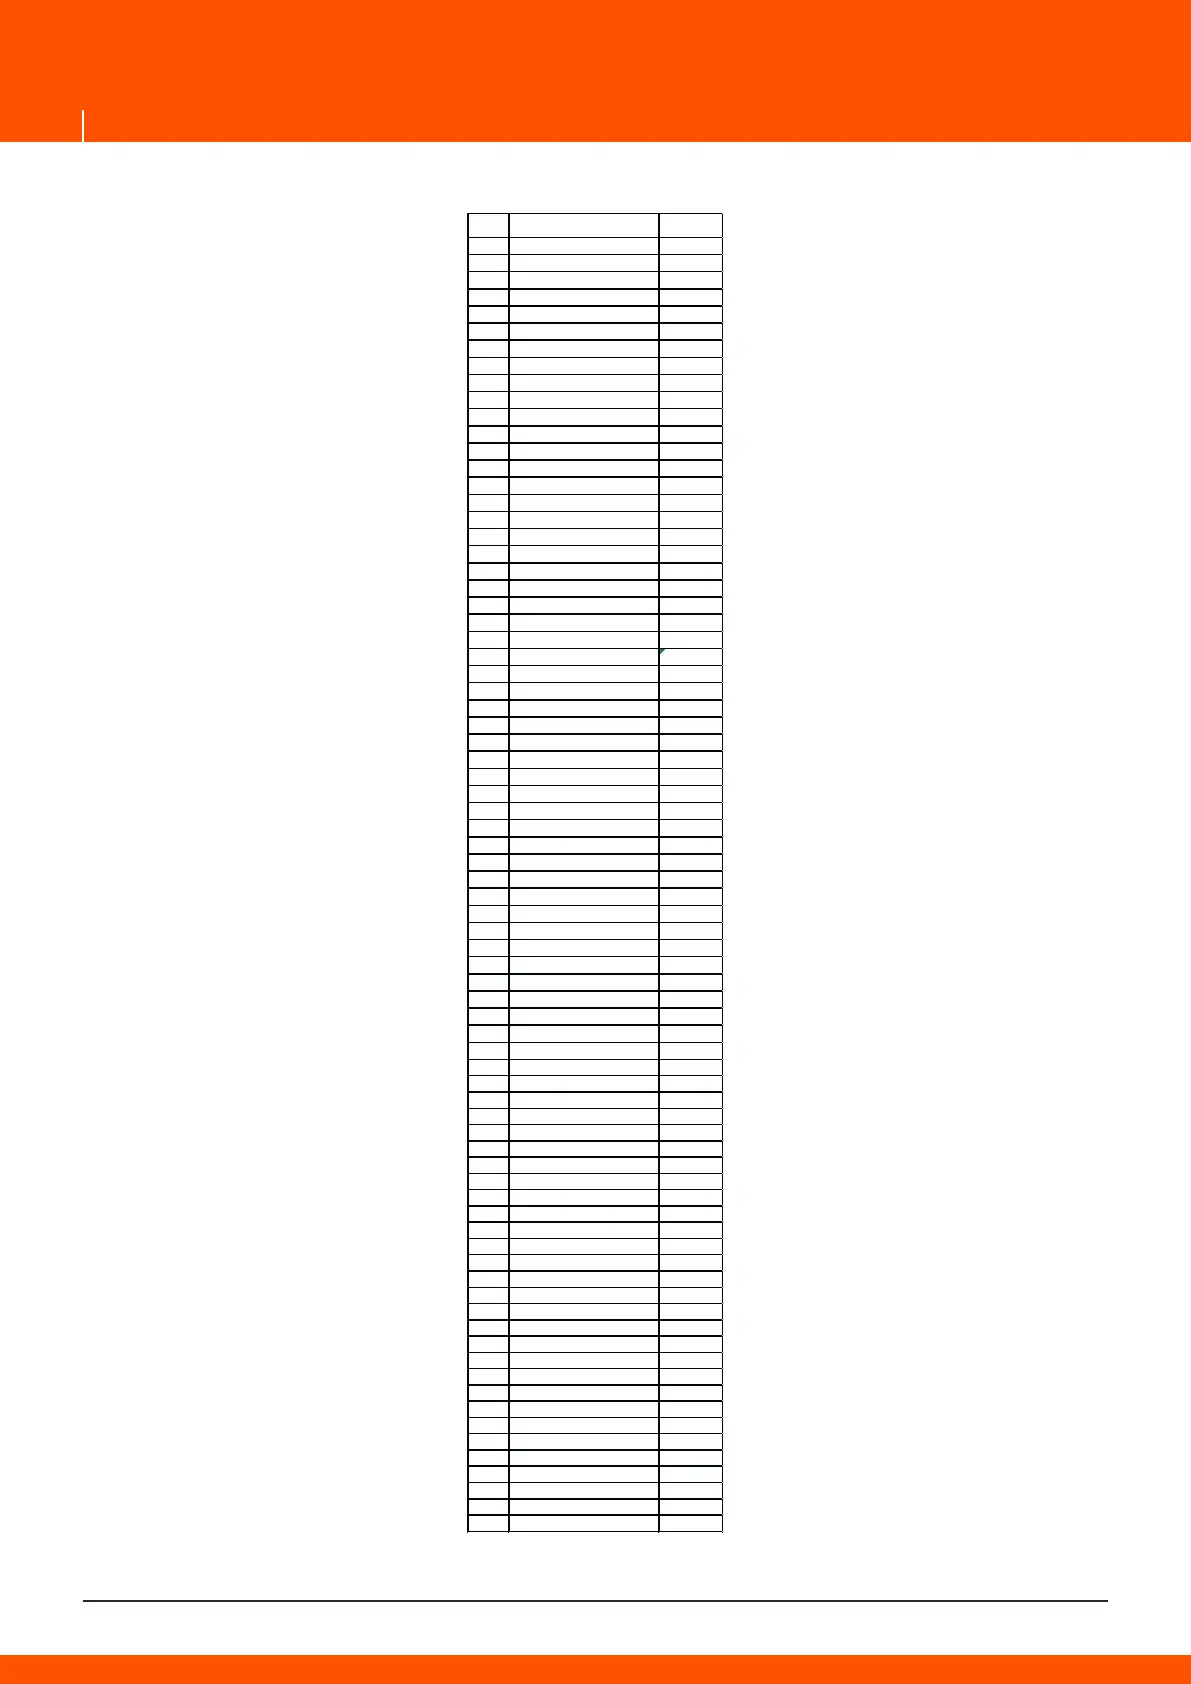
NO English Name
1 feeder hopper
2 Scraps defend block
3 Clamp bar
4 label
5 right housing
6 screw
7 Blade defend block
8 internal hex nut
9 clamp block
10 hex nut
11 blade
12 blade plate
13 drive block
14 screw
15 up cover of gear box
16 connecting knob
17 belt
17-1 overload switch
18 spring washer
19 Switch frame plate
20 screw
21 Big belt wheel
22 Eccentric wheel
23 nut
23-1 spring washer
24 small belt wheel
25 down cover of gear box
26 Flat push s
tick
27 knob
28 spring
29 Retaining ring
30 up housing
31 Bolt frame plate
32 nut
33 spring washer
34 screw
35 switch pin
36 H type screw
37 Fixup nut
38 switch box
39 Electonmagnetic switch
40 label
41 Overcurrent protection
42 connecting wire
43 cord sheath
44 capacitor
45 cord clamp plate
46 supply cord
47 left housing
48 label
49 screw
50 armature
51 eld
52 carbon brush
53 bearing
54 brush holder
55 eld screw
56 fan
57 Support tube
58 screw
59 left hook
clip
60 tube stopper
61 collection box
62 clamp plate
63 defend wheel
64 body support
65 spring
66 pull pin
67 washer
68 right hook clip
72 food washer
69 wheel cover
70 hex nut
71 wheel
73 wheel spindle sheath
74 spacer
75 connecting pole
Dosage
1
1
1
1
1
35
1
1
1
4
2
1
1
12
1
2
1
1
1
1
2
1
1
1
1
1
1
1
1
1
1
1
1
4
4
2
1
2
1
1
1
1
1
2
1
1
1
1
1
1
4
1
1
2
1
1
2
1
2
14
1
2
1
2
1
1
1
1
1
1
2
2
2
2
2
3
1
 Loading...