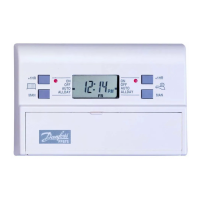
BUTTON SEQUENCE ACTION TYPICAL DISPLAYS
STEP PRESS STARTING FROM RUN MODE
Fig. 1. Colon blinking
1 PROG Go to SET CLOCK mode. Fig. 2
2 DAY Select day
3 + or - Adjust time
4 PROG Start clock and display ON/OFF times
5 NEXT Select the ON/OFF setting to
ON/OFF check/adjust. Figs. 3, 4 & 5
6 + or - Adjust time
7 DAY Select next day - go to step 5 or 8
8 COPY Use previous day's settings
9 PROG Display Hot Water times
10 NEXT Select the ON/OFF setting to
ON/OFF check/adjust. Figs. 3, 4 & 5
11 + or - Adjust time
12 DAY Select next day
(7 day or 5/2 day modes)
13 COPY Use previous day's settings
Repeat 9 to 11 (or 13) until all HW settings are as required.
14 PROG Return to RUN mode - colon blinks
Sequence of button presses whilst adjusting time, day and
programme settings.
Read the section “Error free programming” first.
Press and release + or - to change the time by one minute.
Press and hold down + or - to change the time quickly.
Fig. 2
Fig. 3
Fig. 4
Fig. 5
Fig. 6
Fig. 1
ERROR FREE PROGRAMMING.
ON/OFF times cannot be set out of sequence. The limits of adjustment are:
Setting 1 (first ON) 12:00am to 11:59pm (normally in the morning).
Settings 2 to 6 (first OFF to last OFF) anywhere between the previous Setting and 23 hours 59 minutes after Setting
1.
The - button stops responding when the previous Setting is reached, but the + button continues to its limit, also changing
any later Settings that would have been overlapped.
While becoming familiar with the Setting Sequence the ON/OFF times may become grouped together. If this should
happen use NEXT ON/OFF to select Setting 1, then check/alter each Setting in turn, using + or -, until the desired
programme is entered.
NOTES ON TYPICAL DISPLAYS (See left)
Fig. 1 Immediately following a manual RESET [RUN mode with colon blinking]
Fig. 2 SET TIME and DAY mode [colon steady, day, hours and minutes blink]
Fig. 3 SET FIRST ON TIME “CH”
[setting number and day shown, “ON” blinks]
Fig. 4 SET FIRST OFF TIME “CH”
[setting number and day shown, “OFF” blinks]
Fig. 5 SET LAST OFF TIME AFTER MIDNIGHT
[day when output will switch off blinks]
Fig. 6 SET “HW” FIRST ON TIME
[setting number and day shown, “ON” blinks]
Fig. 7 Typical “CH” ALLDAY, “HW” AUTO programme with “HW”
+1 HOUR selected.
When programming for 7 day operation, the day being set appears in the display, (see typical displays). When being
programmed in 5 day/2 day mode then the days will show as MOTUWETHFR or SASU.
Should the unit be disconnected from the mains a small battery symbol will blink on the left hand side of the display.
FACTORY PRE-SET PROGRAMME
The following ON/OFF times are programmed at the factory and are re-instated by pressing the recessed R/S button behind
the flap.
Monday to Friday Saturday and Sunday
Setting ON/OFF Time Setting ON/OFF Time
1 ON 6:30AM 1 ON 7:30AM
2 OFF 8:30AM 2 OFF 10:00AM
3 ON 12:00PM 3 ON 12:00PM
4 OFF 12:00PM 4 OFF 12:00PM
5 ON 5:00PM 5 ON 5:00PM
6 OFF 10:30PM 6 OFF 10:30PM

 Loading...