Do you have a question about the Datavideo DN-600 and is the answer not in the manual?
Conditions requiring unplugging the unit and referring to qualified service personnel for assistance.
Details the standard one-year warranty against manufacturing defects and exclusions.
Information on extending the warranty to two years by registration and coverage details.
Guidance for EU customers on proper disposal of the product as electronic waste.
Lists the items that should be included in the product box.
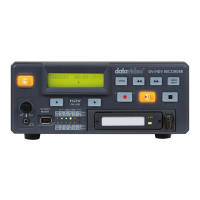
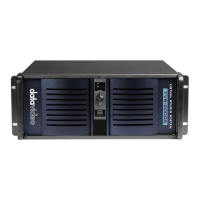
Lists key features such as backlit LCD, VTR controls, removable drive, audio jack, and LED meter.
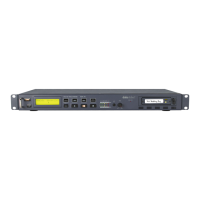
Details the Composite, DV/HDV IEEE-1394 input/output connections for video and audio.
Specifies supported file formats for DV (.AVI, .MOV, .MXF) and HDV (.M2T).
Instructions for removing the PCB from the HE-1 drive enclosure.
Guidance on seating the HDD onto the PCB and securing it with screws.
Procedure for reassembling the PCB and HDD back into the enclosure.
Steps to insert the HE-1 enclosure into the recorder and secure it.
Information that new drives will be formatted upon first use by the recorder.
Describes the function of the power light indicator on the front panel.
Explains the four lines of the LCD display and the information they convey.
Details how the soft keys function and change based on the operation mode.
Explains how to use the Menu button to navigate and exit options.
Describes the function of the Forward and Rewind buttons in playback and menu modes.
How to prepare the unit for recording by pressing PLAY and REC.
Instructions for starting playback and toggling between PLAY and PAUSE.
How to stop playback or recording and enter stop mode.
Description of the IEEE-1394 port for DV25 or HDV camcorders.
How to adjust the volume level for headphones.
Details the stereo mini jack for connecting headphones.
Explains the LED indicators for incoming audio levels.
Location for inserting the HE-1 drive enclosure with a SATA HDD.
Details the 2-channel Mini XLR Balanced Audio input and output connectors.
Explains the GPI socket for simple external control inputs.
Describes the RS-232 interface for remote control of the unit.
Details the BNC connector for composite video input and output.
Describes the RCA jack for analogue audio input.
Explains the BNC connector for time code single input.
Details the socket for connecting the battery or AC adapter.
Instructions on proper grounding for connecting the unit to other components.
Procedure for powering on the DN-600 recorder and checking indicators.
Step-by-step guide to format a newly installed drive before initial use.
Detailed explanation of the information displayed on the LCD Clip Status screen.
How to navigate and select options within the recorder's menu system using soft keys.
Example of selecting an analogue or digital source input via the menu.
Prepares recorded video/audio on the HE-1 drive for computer transfer.
Erases all video and audio content within the currently selected BIN.
Choose the input signal source: DV [DIG] or Composite [ANA].
Erases all content from all BINS on the drive.
Accesses menu options for configuring recording parameters.
Accesses menu options for configuring playback parameters.
Accesses menu options for configuring system-wide settings.
Displays the current revision of the recorder's firmware.
Sets the file type (.mov, .avi, .mxf, .m2t) for all recordings.
Controls recording based on time code changes for sync to tape.
Sets the date attribute for files recorded from analogue sources.
Enables capturing 8 seconds of video before the record trigger.
Sets the audio sampling frequency for analogue sources.
Sets the aspect ratio flag (16:9 or 4:3) for analogue sources.
Allows DV25 recording at slower than real-time frame rates.
Enables the recorder to start recording automatically upon power-on.
Enables playback to loop from the start of the BIN or CLIP.
Enables playback to start automatically upon power-on.
Controls playback to play all clips in a BIN or only the current CLIP.
Sets the recorder's signal type to DV, NTSC, PAL, or HDV.
Chooses the computer's file system emulation (FAT32 or NTFS).
Selects whether to wrap files by BIN or by DISK for transfer.
Sets a custom volume name for the HE-1 drive when connected to a computer.
Allows setting up a separate 6GB partition on the HDD.
Chooses to display internal or external time code during recording/playback.
Enables or disables the remote control capability of the unit.
Allows updating the recorder's firmware with a compatible file.
Configures GPI trigger inputs for record/playback control.
Recalls factory default settings for the current setup.
Sets the NTSC setup level to 7.5 or 0.0 IRE.
Recommendation to transfer existing clips to free up drive space before new projects.
Explains the differences and implications of FAT32 and NTFS file systems.
Details how to partition the HDD, including a reserved 6GB partition.
Option to set a custom volume name for the HE-1 drive.
Configures the recorder for HDV or DV signal types, noting potential data erasure.
Determines whether to use internal or external time code for display.
Instructions for connecting video and audio sources via Composite and XLR/RCA inputs.
Steps to select analogue input as the video source via the menu.
Selects the appropriate file format (.AVI, .MOV, .MXF) for editing software.
Sets the audio sampling rate (48 KHz or 32 KHz) for analogue sources.
Sets the date attribute for files recorded from analogue sources.
Connects video and audio sources via the DV25 IEEE1394 6-pin input.
Steps to select digital IEEE1394 input as the video source via the menu.
Selects the appropriate file format (.AVI, .MOV, .MXF) for editing software.
Recorder matches audio sampling rate of the digital source equipment.
Sets the date attribute for files recorded from digital sources.
Connects video and audio sources via the HDV IEEE1394 6-pin input.
Steps to select digital IEEE1394 input as the video source via the menu.
Specifies .M2T as the only choice for recording HDV video.
Recorder matches audio sampling rate of the digital source equipment.
Sets the date attribute for files recorded from digital sources.
Guidance on selecting an empty BIN (folder) for new recordings.
Methods for starting a recording session manually or via sync/remote.
Describes how to pause a recording session and resume it.
How to use the MARK soft key to create new clips within a recording.
Various methods to stop a recording session.
Configuration for time-lapse recording with six different capture intervals.
Enables continuous 8-second pre-record buffering before a trigger.
Allows the recorder to start recording automatically upon power-on.
Instructions for selecting the correct BIN containing the desired video clips.
Methods for starting playback manually or via remote/GPI triggers.
Configures playback to play all clips in a BIN or only the current CLIP.
How to pause playback and navigate to clip markers.
Steps required before removing the HE-1 drive for computer connection.
Menu operation to prepare recorded content for computer viewing.
Details limitations of FAT32 (2GB file size) and NTFS (no file size limit).
Explains how bins and clips are organized as folders and files on the computer.
Procedure for removing the HE-1 enclosure from the recorder and connecting it.
Tip for insufficient USB power, suggesting a second USB connection.
Information on how the drive name appears on the computer, referencing HDD Volume ID.
Instructions on how to safely eject the HE-1 drive from a computer.
Step-by-step guide to update the recorder's firmware using the HE-1 drive.
Details on manufacturing a GPI trigger cable and its wiring.
Selects the GPI trigger mode: PULSE or LEVEL.
How to use a PULSE trigger for recording or record pause.
How to use a LEVEL trigger for recording or record pause.
How to use a PULSE trigger for playback or play pause.
How to use a LEVEL trigger for playback or play pause.
Specifies the communication parameters for RS-232 commands.
Details the structure of RS-232 commands including CMD1, CMD2, data, and checksum.
Describes the response protocol for RS-232 commands, including ACK.
Lists RS-232 commands for device type, bin navigation, and loop play.
Commands to retrieve time code, current bin, and playback offsets.
Commands for transport functions like Stop, Play, Record, and Fast Forward/Rewind.
Specifies video input/output standards and audio bandwidth, S/N ratio, and THD.
Details Time Code input standard and IEEE-1394 digital interface specifications.
Specifies GPI trigger parameters and supported recording/playback formats.
Lists compatible file systems, input voltage, and power consumption.
Details operating and non-operating temperature ranges for the unit.
Specifies the physical depth, width, and height of the unit.
Note that a 19-inch rack mount kit is not included.
Specifies the gross packed weight and net unit weight.
Provides the main Datavideo website address for support information.
Contact details for Datavideo Corporation, including phone, fax, and email.
Contact details for Datavideo Europe, including phone, fax, and email.
Contact details for Datavideo UK, including phone, fax, and email.
Contact details for Datavideo Asia Pacific offices (Taiwan, Singapore, Hong Kong).
Contact details for Datavideo Technologies China Co., Ltd.
Contact details for Datavideo Technologies India PVT LTD.
| Brand | Datavideo |
|---|---|
| Model | DN-600 |
| Category | Recording Equipment |
| Language | English |