Do you have a question about the Datavideo SE-650 and is the answer not in the manual?
Details on the one-year manufacturing defect warranty and exclusions.
Information on the free two-year extension to the standard warranty for registered products.
Instructions for proper disposal of electronic waste for EU customers.
Explanation of the CE marking symbol and its meaning in EU documents.
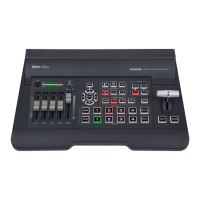
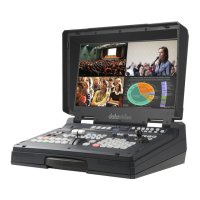
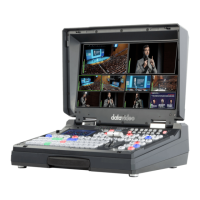
Details the key features and capabilities of the SE-650 video switcher.
Illustrates the system's connections and signal flow.
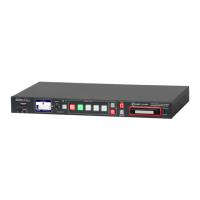
Detailed description of all ports and connectors on the rear panel of the SE-650.
Details on menu navigation, reset function, and transition effect buttons.
Explanation of source selection for program/preview and audio volume adjustments.
Description of keyboard buttons for menu browsing, reset, and user memory.
How to select and reverse wipe transition effects.
Enabling background transition for chromakey effects.
Using MIX and WIPE buttons for transitions, and enabling Clip Transition mode.
Configuring PIP windows, including source selection and placement.
Enabling/disabling keyer functions and logo insertion on outputs.
Using T-Bar, CUT, and AUTO buttons for manual and automatic transitions.
Selecting input sources for program and preview views.
Adjusting audio levels for microphone, auxiliary, digital, and master outputs.
Connecting headphones and adjusting volume via the control knob.
Understanding the LED audio meters for signal strength and clipping.
Steps to connect the SE-650 directly to a Windows computer for initial configuration.
Instructions for downloading and installing the Switcher Image Import/Export software.
Steps to set up the SE-650 using a router with DHCP for network access.
Guide to setting the target IP address within the Switcher Image Import/Export software.
Details on static IP settings, including target IP, network mask, and gateway.
Explanation of using DHCP for automatic IP address assignment.
Introduction to the OSD menu modes and the 'Start' section.
Configuring transition types (MIX, WIPE, Clip) and wipe effect parameters like border and softness.
Adjusting the position of wipes and configuring Matte settings (Luma, Saturation, Hue).
Introduction to keying capabilities and controlling keyer parameters like lift, gain, and opacity.
Explanation of available keying modes and their applications.
Assigning video sources for the key and fill components of the keyer.
Detailed parameters for chromakeying, including Hue, Luma, K Range, and K Fgnd.
Shrinking the camera image by removing borders using the mask feature.
Selecting the source for Picture-in-Picture and adjusting its position and size.
Configuring the border color and adjusting crop parameters for the PIP image.
Using chromakeyer parameters to remove green backdrop from the PIP image.
Defining keyer mode (Chroma, Full) and controlling lift, gain, opacity.
Configuring Hue, Luma, and other parameters for chromakeying within PIP.
Applying linear or luma keyer to logo images and selecting keying modes.
Adjusting logo image properties and selecting the source for the logo.
Selecting fill source and configuring mask for the logo image.
Instructions for creating and placing a logo on the video output.
How to load still images from memory to specific destinations like Still 1 or Still 2.
How to save current images to memory or grab frames from the program view.
Using the freeze function to pause video feeds in input windows.
Using the software to transfer still images between the switcher and a PC.
Detailed steps for installing the software required for image transfer.
How to launch the software and handle network interface selection.
Connecting the software to the SE-650 and verifying connection status.
Accessing and understanding the network settings displayed in the software.
Options for importing different types of data (Still, User, Clip) using the software.
How to crop and resize images if they don't match the required resolution.
Steps to load stored still images onto the SE-650's multiview display.
Loading and saving switcher settings to user memory slots.
How to load clip files into the Still 2 window for use in transitions.
How to load existing clip files for stinger transition effects.
Using the software to import custom clip files for stinger transitions.
Browsing and selecting clip files (e.g., frame-000.png) for import.
Understanding the conversion of image files and the import progress.
How the utility converts image files and imports them into the switcher.
Guide to creating PNG sequences for stinger transitions using After Effects.
Adding After Effects compositions to the render queue for export.
Setting up output modules and format for PNG sequence rendering.
Choosing PNG Sequence format and RGB + Alpha channels for rendering.
Rendering files and sending them to Adobe Media Encoder for conversion.
Selecting PNG format and 'PNG Sequence with Alpha' preset.
Ensuring sequence export with alpha channel and checking render status.
Checking the render status and confirming completion of sequential file creation.
Recommended duration for stinger transition animations (0.5 to 2 seconds).
The SE-650 supports a maximum of 200 image files per animation sequence.
Tips for creating satisfying visual effects by filling the entire frame.
Adjusting black level, white clip, and chroma gain for inputs 1-4.
Selecting sources (Still, Freeze, Live) for input windows.
Flexibly assigning sources (Inputs 1-4, Stills) to program/preview buttons.
Setting output sources, resolutions (HDMI), and audio embed/mute.
Available resolutions for HDMI output ports (1080i, 1080p, 720p).
Understanding and setting tally modes (Normal, Audio Mixer) for output signals.
Configuring multiviewer numbering, label information, and transparency.
Accessing setup options like resolution, menu mode, preferences, and firmware.
Selecting standard output resolution and switching between full/simplified menu modes.
Customizing menu appearance, transparency, size, position, and enabling auto-save.
Resetting to defaults, selecting language, and software upgrade information.
Steps to set up and use the chromakey function for green/blue screen effects.
Guide to placing a logo on the video output using the logo feature.
Final steps for configuring and enabling the logo on PVW and PGM views.
Using the software to import and export still images to and from the PC.
Detailed steps for installing the software required for image transfer.
Finalizing the installation and launching the software.
Connecting the software to the SE-650 and verifying network status.
Displaying and understanding the switcher's network details within the software.
Exploring options to import stills, user presets, and clips.
How to crop and resize images if they don't match the required resolution.
Steps to load stored still images onto the multiview screen.
How to load pre-saved clip files for stinger transition effects.
Setting up PC connection and network for importing custom clips.
Navigating the software interface to initiate clip import.
Browsing and selecting clip files (e.g., frame-000.png) for import.
Understanding the conversion of image files and the import progress.
Adding After Effects compositions to the render queue for export.
Setting up output modules and format for PNG sequence rendering.
Choosing PNG Sequence format and RGB + Alpha channels for rendering.
Rendering files and sending them to Adobe Media Encoder for conversion.
Selecting PNG format and 'PNG Sequence with Alpha' preset.
Ensuring sequence export with alpha channel and checking render status.
Checking the render status and confirming completion of sequential file creation.
Recommended duration for stinger transition animations (0.5 to 2 seconds).
The SE-650 supports a maximum of 200 image files per animation sequence.
Tips for creating satisfying visual effects by filling the entire frame.
Steps to import/export user memory presets between the switcher and a PC.
Selecting a .mem file to import user settings into the switcher.
Selecting a directory to save user settings as .mem files.
Steps to load previously saved user memory presets onto the machine.
Definition of the D-sub 15 pin tally output port connections and signal descriptions.
Step-by-step instructions for downloading and installing firmware updates.
Addressing issues with slow button response after exiting the menu.
Details on video/audio inputs/outputs, tally, and USB ports.
Specifications for the built-in audio mixer and supported video standards.
Information on keyers, upstream keyers, PIP, wipes, stills, and logo capabilities.
List of Datavideo offices worldwide for customer support.
Visiting the Datavideo website for FAQs and manual updates.
| Video processing | 10 bit |
|---|---|
| Maximum frame rate | 60 fps |
| Supported video modes | 720p, 1080i, 1080p |
| Fader | Yes |
| Channels quantity | 4 channels |
| Built-in display | No |
| USB 2.0 ports quantity | USB 2.0 ports have a data transmission speed of 480 Mbps, and are backwards compatible with USB 1.1 ports. You can connect all kinds of peripheral devices to them. |
| VGA (D-Sub) input ports | 1 |
| Output voltage | 12 V |
| Power source type | DC |
| Power consumption (max) | 29 W |
| Operating temperature (T-T) | 0 - 50 °C |
| Operating relative humidity (H-H) | 10 - 80 % |
| Certification | CE, FCC |
| Product color | Black |
| Depth | 264 mm |
|---|---|
| Width | 400 mm |
| Height | 72 mm |
| Weight | 1720 g |