7 Route the SAS data cable through the clip on the card and through the channel on the inner side of the chassis.
8 Attach the connector labeled "BP SAS" to connector SAS A on the backplane, and attach the connector labeled "CTRL SAS" to SAS-
cable connector on the controller card.
9 Close the sled.
10 Insert the sled into the MX chassis and turn on the system and any attached MX chassis peripherals.
Removing the PERC H840 card
CAUTION: Many repairs may only be done by a certied service technician. You should only perform troubleshooting and simple
repairs as authorized in your product documentation, or as directed by the online or telephone service and support team.
Damage due to servicing that is not authorized by Dell is not covered by your warranty. Read and follow the safety instructions
that are shipped with your product.
NOTE: It is recommended that you always use a static mat and static strap while working on components in the interior of the
system.
CAUTION: To prevent damage to the card, you must hold the card by its edges only.
1 Turn o the system, including any attached peripherals, and disconnect the system from the electrical outlet and peripherals.
2 Open the system.
3 Locate the PERC card on the system board.
4 Disconnect the SAS cables connected to the card:
a Press down and hold the metal tab on the SAS cable connector.
b Pull the SAS cable out of the connector.
5 Lift the card to remove it from the connector on the system board.
6 Replace the storage controller card and connect the cable. For more information on installing the card, see Installing the PERC H840
card.
7 Close the system.
8 Reconnect the system to its electrical outlet and turn the system on, including any attached peripherals.
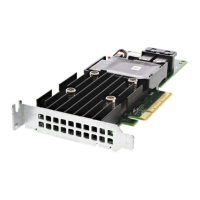
Figure 11. Removing and installing the PERC H840 adapter
1
SAS cables (2) 2 SAS cable connectors (2)
3 heat sink 4 battery
5 PERC card connector 6 card connector on the system board
Deploying the PERC card 35
 Loading...