Removing the TPM
1 Locate the TPM connector on the system board.
2 Press to hold the module down and remove the screw using the security Torx 8-bit shipped with the TPM module.
3 Slide the TPM module out from its connector.
4 Push the plastic rivet away from the TPM connector and rotate it 90° counterclockwise to release it from the system board.
5 Pull the plastic rivet out of its slot on the system board.
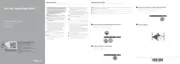
Installing the TPM
Steps
1 To install the TPM, align the edge connectors on the TPM with the slot on the TPM connector.
2 Insert the TPM into the TPM connector such that the plastic rivet aligns with the slot on the system board.
3 Press the plastic rivet until the rivet snaps into place.
4 Replace the screw that secures the TPM to the system board.
Figure 74. Installing the TPM
Next steps
1 Replace the system board.
2 Follow the procedure listed in After working inside your system.
3 To verify if the memory module has been installed properly, press F2 and navigate to System Setup Main Menu > System BIOS >
Memory Settings. In the Memory Settings screen, the System Memory Size must reect the updated capacity of the installed
memory.
4 If the value is incorrect, one or more of the memory modules may not be installed properly. Ensure that the memory module is rmly
seated in the memory module socket.
5 Run the system memory test in system diagnostics.
Initializing TPM for BitLocker users
1 Initialize the TPM.
For more information, see initializing the TPM for Intel TXT users.
2 The TPM Status changes to Enabled, Activated.
100
Installing and removing system components

 Loading...