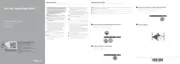
Figure 32. Installing a cabled drive into the drive carrier
Next steps
1 Enter System Setup and ensure that the controller of the drive is enabled.
2 Exit System Setup and reboot the system.
3 Install any software required for the drive operation as described in the documentation for the drive.
4 Follow the procedure listed in the After working inside your system.
Intrusion switch
Removing the intrusion switch
Prerequisites
1 Follow the safety guidelines listed in the Safety instructions.
2 Follow the procedure listed in the Before working inside your system.
3 Keep the plastic scribe ready.
Steps
1 Disconnect and remove the intrusion switch cable connector from the connector on the system board.
NOTE
: Observe the routing of the cable as you remove it from the system. Route the cable properly when you replace it to
prevent the cable from being pinched or crimped.
2 Using a plastic scribe, slide the intrusion switch out of the intrusion switch slot.
62
Installing and removing system components

 Loading...