Card type Slot priority Maximum number of cards supported
CRD, NTWK, PCIE, QP, 1G, BCOM, LP, V2 1 1
CRD, NTWK, PCIE, 1GB, QP, INTEL, V3 2 1
CRD, NTWK, PCIE, 1GB, QP, INT, LP, V3 1 1
CRD, NTWK, DP, BCOM, 1G 2 1
CRD, NTWK, DP, BCOM, 1G, LP 1 1
CRD, NTWK, PCIE, 1GB, DP, INTEL, V3 2 1
CRD, NTWK, PCIE, 1GB, DP, INT, LP, V3 1 1
Removing the expansion card riser
Prerequisites
1 Follow the safety guidelines listed in the Safety instructions.
2 Follow the procedure listed in the Before working inside your system.
3 Remove the air shroud.
Steps
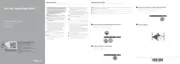
1 Open the blue expansion card riser retention-latch located on the system.
2 Holding the blue touch points, lift the expansion card riser out of the system.
Figure 39. Removing the expansion card riser
3 If you are not replacing the expansion card riser, install a expansion card riser ller bracket by performing the following steps:
a Align the expansion card riser ller bracket with the slot on the system.
b Push the expansion card riser ller bracket downward until rmly seated.
c Close the blue expansion card retention latch by pushing the latch down until the latch snaps into place.
d Using a Phillips #2 screwdriver, tighten the screw to secure the expansion card riser ller to the chassis.
Installing and removing system components
69

 Loading...