2 Follow the procedure listed in the Before working inside your system.
3 Remove the drives.
NOTE: To avoid damaging the backplane, ensure to move the control panel cables from the cable routing clips before removing
the backplane.
NOTE: Route the cable properly when you replace it to prevent the cable from being pinched or crimped.
Steps
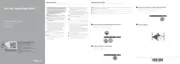
1 Align the slots on the backplane with the hooks on the system.
2 Lower the backplane until the blue release tabs click into place.
Figure 62. Installing the backplane
Next steps
1 Connect the following cables to the backplane:
a Backplane signal cable
b Backplane power cable
c PERC cable
2 Replace the drives.
3 Follow the procedure listed in the After working inside your system.
90
Installing and removing system components

 Loading...