Front panel features
The front panel provides access to the features available on the front of the server, such as the power button, NMI button, system
identication tag, system identication button, and USB and VGA ports.
The diagnostic LEDs or the LCD panel is prominently located on
the front panel.
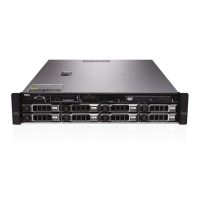
The hot swappable hard drives are accessible from the front panel.
3.5-inch or 2.5-inch (in a hybrid drive carrier) hot swappable
hard drives
Figure 2. 3.5-inch or 2.5-inch (in a hybrid drive carrier) hot swappable hard drives
1
Power button 2 NMI button
3 System identication button 4 Video connector
5 LCD menu buttons 6 LCD panel
7 USB management port or iDRAC Direct 8 USB connector
9 Information tag 10 Optical drive (optional)
11 Hard drive or SSD bay
Table 1. 3.5-inch or 2.5-inch (in a hybrid drive carrier) hot swappable hard drives
Item Indicator, Button, or Connector Icon Description
1 Power-on indicator, power
button
Press the power button to turn the system on or o. The indicator
on the button indicates if the system is on or o.
NOTE: To gracefully shut down an ACPI-compliant
operating system, press the power button.
2 NMI button
Press the NMI button to troubleshoot software and device driver
errors when running certain operating systems. Use the end of a
paper clip to press the NMI button.
NOTE: Use the NMI button only if directed to do so by
qualied support personnel or by the operating system
documentation.
3 System identication button
Press the system ID button:
• To locate a particular system within a rack.
• To turn the system ID on or o.
10 Dell PowerEdge R530 system overview

 Loading...