Do you have a question about the Denver Instrument IR-200 and is the answer not in the manual?
Instructions for carefully unpacking the analyzer and verifying all supplied accessories are present in the box.
Guidelines for choosing a suitable work area for the analyzer to ensure accuracy and dependable operation.
Essential precautions to prevent personal injury or damage to the analyzer, including handling hot parts and materials.
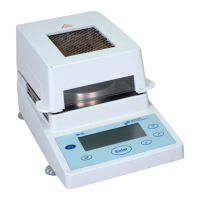
Detailed specifications of the IR-200 Moisture Analyzer including measurement method, heat source, and capacity.
Description of the analyzer's context-sensitive help feature for immediate operational advice.
Steps for correctly installing the pan shield and pan support within the drying chamber.
Instructions on how to connect the moisture analyzer to a suitable power source.
Overview of the analyzer's power and serial ports (Serial 1, Serial 2) for connectivity.
Description of the LCD display and the four types of screens shown during operation.
Explanation of the functions for each key on the analyzer's keypad, including numeric and function keys.
Details on the analyzer's standby mode, including temperature settings and available routines.
Step-by-step guide for performing a sample analysis in test mode.
Instructions on how to recall previously saved drying procedures for analysis.
Configuration and use of the statistics subroutine for storing and analyzing test results.
Details on optimizing and creating new drying procedures for specific applications.
How to view and print important analyzer information like serial number and calibration dates.
Procedure for calibrating the analyzer's balance using a standard weight.
Options for customizing printout styles, including standard and custom formats.
How to set and manage the analyzer's internal clock for accurate timekeeping.
Configuration of serial ports for data transfer and communication with external devices.
Options for activating and managing security passwords for analyzer subroutines.
Customizing standby temperature and LCD backlight turn-off times to conserve energy.
Functionality for transferring drying procedures between analyzers via serial port.
Adjusting the audible tone of the beeper or turning it off.
Setting the desired units for test results, such as moisture, solids, or volatiles.
Configuring drying temperatures (Temp 1, Temp 2) and time durations (Time 1, Time 2).
Setting up automatic endpoint detection using slope variables like window and %IW.
Setting the analyzer's standby temperature for efficient heating between tests.
Options for saving or using configured drying parameters as a new or recalled program.
Accessing and printing analyzer model, serial number, and calibration history.
Step-by-step instructions for calibrating the balance using a 50-gram weight.
Choosing between standard and custom printout formats for analysis results.
Setting up custom printouts by selecting information like header, operator, and sample ID.
Enabling and selecting operator names to be included on result printouts.
Defining up to three lines of custom text for the printout header.
Configuring whether to prompt for or disable sample number entry.
Setting intervals for printing intermediate data during analysis.
Procedures for setting the analyzer's time and date, including format selection.
Setting communication parameters like baud rate, parity for Serial 1 and Serial 2.
Modifying baud rate, parity, and CTS settings for serial communication.
Steps to turn on security and set passwords for specific analyzer subroutines.
Procedures for clearing stored drying programs or statistics data.
Adjusting when the standby temperature and LCD backlight turn off to conserve power.
Guide for transferring drying procedures from one analyzer to another via serial port.
Options to set the beeper to ON, OFF, or select a short or long tone.
Procedure to select or enter operator names for inclusion on result printouts.
Considerations for sample types, chemical composition, and preparation techniques.
Guidelines on sample presentation methods (pads, sand) and optimal sample size.
Explanation of key drying parameters like temperature, time, slope, and units.
Factors influencing analyzer performance including precision, accuracy, and analysis time.
Outlines the systematic steps for developing an optimized drying procedure.
Guidance on preparing representative samples for moisture analysis.
Instructions for replicating standard oven drying parameters on the analyzer.
Choosing appropriate sample presentation methods like glass pads or sand.
Determining the optimal sample weight for analysis based on various factors.
Setting the standby temperature to reduce analysis time and optimize performance.
Guidance on selecting the best method for determining the analysis endpoint.
Adjusting drying temperature to decrease analysis time while avoiding scorching.
Creating a two-step drying procedure for materials with diverse volatiles.
Procedure for implementing a high-to-low temperature drying sequence.
Procedure for implementing a low-to-high temperature drying sequence.
Guidelines for periodic cleaning of the analyzer case with a damp cloth and mild detergent.
Step-by-step instructions for installing the thermal printer paper.
A table of common troubles with checks and adjustments for resolution.
Limited maintenance procedures, primarily focusing on cleaning the analyzer case.
Information on returning the product for service and obtaining technical assistance.
| Brand | Denver Instrument |
|---|---|
| Model | IR-200 |
| Category | Measuring Instruments |
| Language | English |