This document describes the LED Dual-alarm Clock, a mains-powered device with battery backup designed to display time and provide dual alarm functionalities.
Function Description
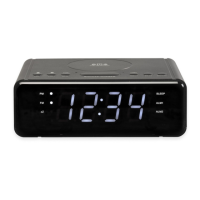
The LED Dual-alarm Clock is primarily an AC-powered clock with two independent alarms. It uses two 'AAA' size batteries for power interruption backup, ensuring that time settings are retained during power outages. The device features an LED display for showing the time and includes controls for setting the clock, configuring two separate alarms, and adjusting display brightness. It also provides visual indicators for activated alarms.
Important Technical Specifications
- Power Source: AC powered.
- Battery Backup: Requires two 'AAA' size batteries for retaining time settings during power interruptions.
- Display: LED display.
- Alarms: Dual independent alarms.
- Snooze Function: 9-minute snooze duration.
- Operating Frequency Range: Not specified in the provided document.
- Max Output Power: Not specified in the provided document.
- Compliance: Declared in compliance with Directive 2014/53/EU (radio equipment type CR-420NR).
Usage Features
The device offers several user-friendly features for timekeeping and alarm management:
Controls
The clock is equipped with seven distinct buttons on its top panel for various operations:
- "AL/OFF" button (1): Used to turn off an sounding alarm.
- "HOUR" button (2): Used to adjust the hour setting during clock or alarm setup.
- "MIN" button (3): Used to adjust the minute setting during clock or alarm setup.
- "DIMMER HI/LOW SNOOZE" button (4): Serves a dual purpose:
- When an alarm sounds, pressing this button activates the snooze function for 9 minutes.
- When no alarm is ringing, it adjusts the display brightness (HI/LOW).
- "ALARM 1" button (5): Used to set, activate, or deactivate Alarm 1.
- "ALARM 2" button (6): Used to set, activate, or deactivate Alarm 2.
- "TIME" button (7): Used to enter and confirm clock settings.
Indicators
The front display panel includes two visual indicators:
- A. AL1 BUZZER: Illuminates when Alarm 1 is activated.
- B. AL2 BUZZER: Illuminates when Alarm 2 is activated.
Setting the Clock
- Initiating Clock Setting: The time digits will flash automatically when power is first connected. Alternatively, hold down the "TIME" button (7) for approximately 3 seconds until the time digits flash on the display.
- Adjusting Hour: Press the "HOUR" button (2) repeatedly to set the desired hour.
- Adjusting Minute: Press the "MIN" button (3) repeatedly to set the desired minute.
- Confirming Settings: Press the "TIME" button (7) to save the clock settings.
Using Alarm (Dual Alarms)
The device supports two independent alarms, Alarm 1 and Alarm 2. The setup process is identical for both. The following steps describe setting Alarm 1; for Alarm 2, substitute "ALARM 1" button (5) with "ALARM 2" button (6).
- Entering Alarm Setting Mode: Press and hold the "ALARM 1" button (5) to enter the setting mode for Alarm 1.
- Adjusting Hour and Minute: While the digits are flashing, press the "HOUR" button (2) repeatedly to set the hour and the "MIN" button (3) repeatedly to set the minute.
- Confirming Alarm Settings: Press the "ALARM 1" button (5) to confirm the settings. Alarm 1 will be activated, and the "AL1 BUZZER" indicator (A) will light up.
- Activating/Deactivating Alarm: To toggle Alarm 1 on or off, simply press the "ALARM 1" button (5).
- Snooze Function: When an alarm sounds, press the "DIMMER HI/LOW SNOOZE" button (4) to activate snooze. The alarm will sound again after 9 minutes.
- Turning Off Alarm: To completely turn off a sounding alarm, press the "AL/OFF" button (1).
Note: During both clock and alarm settings, if no button is pressed for five seconds, the time digits will stop flashing, and the setting mode will exit without saving any new changes.
Adjusting Display Brightness
When no alarm is ringing, the "DIMMER HI/LOW SNOOZE" button (4) can be pressed to adjust the brightness of the display.
Maintenance Features
Battery Management
- Installation: Insert two 'AAA' size batteries into the battery compartment (8), ensuring correct polarity (+/-) as marked.
- Replacement: Replace all batteries simultaneously with new ones.
- Storage: Remove batteries if the product will not be used for extended periods to prevent leakage and damage.
Power Connection
- Main Power: Plug the power cable (9) into an electrical outlet with the correct voltage.
- Safety Warning: Do not plug the product into an electrical outlet if you are unsure of the voltage.
Environmental Considerations
- Disposal: The product and its batteries contain materials that can be hazardous to health and the environment if not disposed of correctly.
- Waste Symbol: The crossed-out trash can symbol indicates that electric and electronic equipment and batteries should not be disposed of with household waste but must be disposed of separately.
- Recycling: End-users are responsible for submitting used batteries and electronic equipment to appropriate and designated recycling facilities to ensure proper recycling and prevent environmental harm.
- Collection Points: Most cities have established collection points where electric and electronic equipment and batteries can be submitted free of charge at recycling stations or other collection sites, or collected from households. Further information can be obtained from the local technical department.
- Product Changes: All products are subject to change without prior notice. The manufacturer reserves the right to make reservations for errors and omissions in the manual.
- Manufacturer: DENVER ELECTRONICS A/S.
- EU Declaration of Conformity: The full text of the EU declaration of conformity for radio equipment type CR-420NR is available on the manufacturer's website (www.denver-electronics.com) by searching for the model number CR-420NR.