9
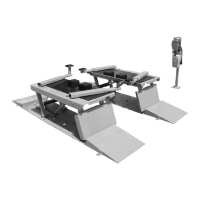
AIR BLEEDING PROCEDURE FOR BLAZER 9000
Step #1 Fill the power unit reservoir with Dexron III Mercon Automatic Transmission Fluid or equivalent,
approximately 7.5 quarts to start with, check all connections for proper security and clearances around and
under both of the lifting surfaces, example,…. binding, chafing, and pinching. :DUQLQJ6DIHW\H\HZHDULV
UHTXLUHGSULRUWRHTXLSPHQWRSHUDWLRQ.
Step #2 Prior to connecting the hydraulic hoses to the cylinders, press and hold the green “lifting” button on
the power unit, this will flow fluid through the hydraulic lines/hoses, flushing any foreign material along with
any air from the system and allow you to inspect for possible leaks. Cycle the pump until clear fluid is coming
out of both lift pad hydraulic hoses + approximately 1 quart1RWH'RQRWUHXVHWKLVIOXLGLWLVOLNHO\
FRQWDPLQDWHG
Step #3 You will need to manually raise each lifting pad to the KLJKHVW safety lock setting, making sure that it
is securely latched into the latch bar on the base plate. :DUQLQJ3ODFHDVDIHW\EORFNRURWKHUPDWHULDO
XQGHUHDFKOLIWLQJVXUIDFHSULRUWRPDNLQJWKHVHFRQQHFWLRQV'LVFRQQHFWWKHK\GUDXOLFF\OLQGHUIURPWKH
OLIWLQJSDGFRPSUHVVF\OLQGHUFRPSOHWHO\1RWHK\GUDXOLFIOXLGDQGDLUZLOOEHHYDFXDWHGIURPWKHF\OLQGHU
5HSHDWWKLVSURFHVVIRUERWKOLIWLQJSDGV&RQQHFWWKHK\GUDXOLFKRVHVWRWKHERWWRPRIWKHF\OLQGHU'HSUHVV
DQGKROGWKHDLUORFNUHOHDVHEXWWRQWKLVVKRXOGUDLVHWKHORFNVRXWRIWKHODWFKEDURQERWKOHIWULJKWVLGH
EDVHSODWHVVLPXOWDQHRXVO\GHSUHVVLQJWKHUHGORZHULQJEXWWRQWKHSDGVVKRXOGEHJLQWRORZHUZLWKLQDIHZ
PRPHQWV
1RWH7KHGHJUHHFRQQHFWLRQWRWKHOLIWF\OLQGHUQHHGVWREHVHFXUHGDWVXFKDQDQJOHWKDWWKHKRVH
FRPHVFORVHWRWKHEDVHSODWHZLWKPLQLPDOFRQWDFWRIWKHEDVHSODWH
Step #4 Press and hold the green “lifting” button until both pads are elevated enough to clear the first set of
locks, then release. 1RWH,WLVFRPPRQIRUWKHSDGVWRUDLVHDQGORZHUDWGLIIHUHQWHOHYDWLRQVRQWKHLQLWLDO
VWDUWXSWKH\ZLOOHYHQRXWDVWKLVSURFHVVXQIROGV. Depress and hold the air lock release button, this should
raise the locks out of the latch bar on both left & right side base plates, simultaneously depressing the red
lowering button, the pads should begin to lower within a few moments. Allow the pads to lower all the way to
bottom. Duplicate this process numerous times, 5 to 6 cycles, increasing the lifting height by one extra lock
per cycle. Each completed operation should facilitate a more even pad elevation and smoother equipment
function. Some installations may require more or less cycles to accomplish this stage of the bleeding process.
1RWH$IWHUFRPSOHWLQJWKLVSURFHVVILOOWKHUHVHUYRLUWRWKHSURSHUIOXLGOHYHO
1RWH'RQRWUDLVHWKHOLIWSDGVWRWKHLUKLJKHVWSRLQWXQWLOFRPSOHWLQJWKHHQWLUHEOHHGLQJSURFHVV
Step #5. Once you have both lifting services raising/lowering evenly and smoothly you now are ready to put a
load on the system to complete the bleeding process. As in Step #1 an inspection around and under each lifting
surface for possible leaks and clearances is required. A mid-size vehicle of approximately 4500 + lbs will be
needed to finish this process. :DUQLQJ$OOXQQHFHVVDU\SHUVRQQHOQHHGWREHUHPRYHGIURPWKHWHVWDUHD
IRUVDIHW\. Stage the vehicle for lifting, utilizing necessary adapters as required, announce the lift operation,
and then when all is clear depress the green “lifting” button. Raise the vehicle until the tires are clear of the
floor surface, at this point you will release the green button and depress the lock release button, :DUQLQJ$V
LQSUHYLRXVVWHSVPDNHVXUHEHIRUHGHSUHVVLQJWKHUHG³GRZQ´EXWWRQYLVXDOO\LQVSHFWWKDWWKHORFNVRQ
ERWKSDGVDUHFOHDURIWKHODWFKEDURQWKHEDVHSODWH. Now you can depress the red “down” button allowing
the vehicle to lower down. Make sure that for each cycle you allow the pads to bottom out before starting up
again. Continue this process for a few cycles until the vehicle is coming up and going down level/smooth.
Note: Do not adjust any valves on the power unit pump without prior contact and instructions to do so
from DEVON. @ 1-800-468-1970
 Loading...