10
DANSK
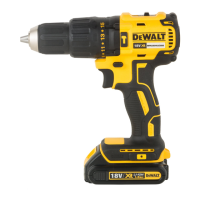
Indsættelse og fjernelse af batteripakken
fra værktøjet (Fig.B)
BEMÆRK: For de bedste resultater kontrollér at batteripakken
7
er fuldtopladet.
Sådan installeres batteripakken i
værktøjetshåndtag
1. Ret batteripakken
7
ind efter rillerne inde i håndtaget
(Fig.B).
SAMLING OG JUSTERING
ADVARSEL: For at reducere risikoen for personskade,
sluk og tag batteripakken af, inden der foretages
justeringer eller afmontering/installation af udstyr
eller tilbehør. Utilsigtet start kan medførekvæstelser.
ADVARSEL: Anvend kun DeWALT-batteripakker
og-opladere.
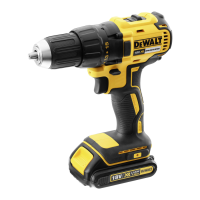
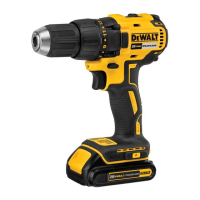
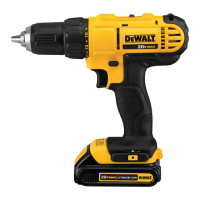
Beskrivelse (Fig. A)
ADVARSEL: Modificér aldrig elektrisk værktøj eller nogen
dele deraf. Det kan medføre materiale- ellerpersonskade.
1
Udløserkontakt
2
Forlæns-/baglæns styreknap
3
Justeringskravens drejemoment
4
Gearskifter
5
Arbejdslys
6
Patron uden nøgle
7
Batteripakke
8
Batteriets udløsningsknap
9
Hovedhåndtag
10
Bæltekrog (følger med i nogle modeller)
11
Skrue
12
Magnetisk borholde (følger med i nogle modeller)
13
Datokode
Tilsigtet Brug
Disse bor/skruemaskiner/hammerbor er fremstillet til
professionel boring, slagboring ogiskruning.
MÅ IKKE anvendes under våde forhold eller i nærheden af
brændbare væsker ellergasser.
Disse boremaskiner/skruemaskiner/slagboremaskiner er
professionelt el-værktøj.
LAD IKKE børn komme i kontakt med værktøjet. Overvågning
er påkrævet, når uerfarne brugere anvender detteværktøj.
• Dette produkt er ikke beregnet til anvendelse af personer
(inklusive børn) med nedsatte fysiske, sensoriske eller
mentale handicaps; mangel på erfaringer, viden eller
færdigheder, medmindre de er under overvågning af en
person, der er ansvarlig for deres sikkerhed. Børn må aldrig
efterlades alene med detteprodukt.
f
Brugøjeværn.
n
Synlig stråling Kig ikke ind ilyset.
Mærkning på værktøjet
Følgende piktogrammer er vist på værktøjet:
a
Læs brugsvejledningen førbrug.
g
Bærhøreværn.
Datokodeposition (Fig.A)
Datokoden
13
, der også inkluderer produktionsåret, er tryk
påhuset.
Eksempel:
2021 XX XX
Produktionsår
Pakkens indhold
Pakken indeholder:
1 Bor/drivværk eller 1 bor/drivværk/hammerbor
1 Oplader
1 Bæltekrog (følger med i nogle modeller)
1 Borklemme (følger med i nogle modeller)
1 Li-ion batteripakke (C1, D1, E1, L1, M1, P1, S1, T1, X1, Y1
modeller)
2 Li-ion batteripakker (C2, D2, E2, L2, M2, P2, S2, T2, X2, Y2
modeller)
3 Li-ion batteripakker (C3, D3, E3, L3, M3, P3, S3, T3, X3, Y3
modeller)
1 Brugsvejledning
BEMÆRK: Batteripakker, opladere og værktøjskasser følger ikke
med N-modeller. Batteripakker og opladere følger ikke med
NT-modeller. B-modeller omfatter Bluetooth®-batteripakker.
BEMÆRK: Bluetooth®-mærket og -logoerne er registrerede
varemærker, der ejes af Bluetooth®, SIG, Inc. og al brug af
sådanne mærker af DeWALT er under licens. Andre varemærker
og handelsnavne tilhører deres respektive ejere.
• Kontrollér for eventuelle skader på værktøjet, dele og tilbehør,
der kan være opstået undertransport.
• Tag dig tid til at læse denne vejledning grundigt og forstå den
førbetjening.
Batteritype
De følgende SKU(er) fungerer på en 18 volt batteripakke:
DCD777, DCD778
Disse batteripakker kan bruges: DCB181, DCB182, DCB183,
DCB183B, DCB183G, DCB184, DCB184B, DCB184G, DCB185,
DCB187, DCB189, DCB546, DCB547, DCB548. Se Tekniske data
for flereinformationer.
z
Destruér ikkebatteripakken.
B
ANVENDELSE (uden transportdæksel). Eksempel: Wh
ydelsen angiver 108Wh (1 batteri med 108watttimer).
A
TRANSPORT (med indbygget transportdæksel).
Eksempel: Wh ydelsen angiver 3x 36Wh (3batterier på
36watttimer).
 Loading...