4
English
WARNING: Do not attempt to modify this product or create
accessories not recommended for use with this product. Any
such alteration or modification is misuse and could result in a
hazardous condition leading to possible serious personal injury.
WARNING: Turn off air compressor when not in use, and drain
air lines by turning the drain valve on each manifold block.
WARNING: Pressurize system slowly by turning valve.
WARNING: Check local building codes before installation.
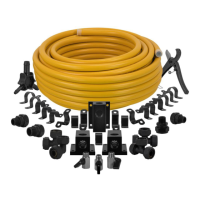
Fittings Installation
1. Unroll and straighten out a section of tubing from the coil. It
is recommended you straighten out a section of tubing 1 to
2 feet longer than needed.
2. Square cut the tubing with the supplied cutting tool to
planned length. Rotate wrist while cutting. Failing to cut the
tubing straight could lead to a possible air leak.
3. Using the supplied deburring tool, insert the correct size
plug (25) into the hose. Rotate the tool at least 3 times.
4. Push the nut on first and then the split ring fitting onto the
tubing. Push the fitting of choice onto the tubing.
NOTICE: Make sure shoulder of fitting is fully seated against
pipe. If you cannot seat the fitting properly apply soapy water to
help this process.
1
2
4a
6
5. Tighten the nut by using your fingers. Draw a reference mark
on the fitting and nut.
6. With the reference mark as a guide, tighten nut with ¾ turn
minimum or until tight. If you have to remove the fitting,
loosen the nut, remove the split ring and pull the fitting off
the tube. Before reassembling be sure to inspect the split
ring and O-ring for damage and replace if necessary.
NOTICE: Do not over tighten. Damage may occur to the pipe if
nut is overtightened.
3
4b 5