10
ENGLISH
OPERATION
This appliance is equipped with memory capacity in order to
store the selected radio channels and paired Bluetoothdevices.
NOTE: The music mode will operate when connected with
the AC/DC power adaptor and/or when operated solely on
batterypower.
NOTE: When the appliance is connected by the supplied power
supply unit to the outlet it will charge the installed battery.
Unplugged, the appliance can run up to 8hours on a fully
charged battery using a premium 2A/h XR Li-ion battery. Using
batteries of lower voltage and amp hours will yield less runtime.
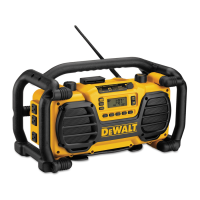
This appliance can be operated in the vertical or
horizontalposition.
NOTE: This product has two internal aerials that contribute to
its ruggedness by omitting an external aerial that can be bent
or broken. These aerials work together to provide 360degree
radio reception without the need of extending and tuning
an extruding antenna as required by other radios. In order to
improve reception in very low signal areas we recommend
placing the ToughSystem Music in the vertical position so
the handle is facing upwards, or moving the radio closer to a
window oropening.
Faulty Battery Packs
This charger will not charge a faulty battery pack. The charger
will indicate faulty battery pack by displaying an X on the LCD
battery image. If this occurs, re-insert the battery pack into
the charger. If the problem persists, try a different battery
pack to determine if the charger is working properly. If the
new pack charges correctly, then the original pack is defective
and should be returned to a service center or other collection
site for recycling. If the new battery pack elicits the same
trouble indication as the original, have the charger and the
battery pack tested at an authorized service center.
NOTE: This could also mean a problem with a charger.
When the appliance is turned ON
When the appliance is turned on, indicators for the power
supply and the battery status are displayed on the lower right
portion of the LCD screen
18
.
Appliance is operating via the AC/DC
power adaptor
Battery level is low
Battery is partially charged
Battery is fully charged
Hot/Cold delay of charging
Problem with the battery pack or charger
Button Functions (Fig.G)
The front panel includes a selection dial andmode buttons
21
.
Selection dial
20
(the selection dial has more than one
function)
Power On/Off
Back button
Source selection button
Bluetooth button
Radio preset buttons
Powering ON and OFF (Fig.G, H)
Press the power button
for 1second. The appliance turns on
to the last selected audiosource.
Press the power button
for 3seconds. The appliance
turnsoff.
Volume Adjustment
WARNING: Excessive sound level can cause hearingloss.
NOTE: The volume is set and saved separately for each of the
audio sourcetypes.
Turn the dial
20
clockwise to increase the volume. To decrease
the volume, turncounterclockwise.
Back Button( )
After entering any one of the screens, press the back button
to return to the previousscreen.
Audio Source Select( )
To choose one of the audio sources (DAB+, FM, AUX or
Bluetooth) push the source selection button
until the
desired source is found. For example, if the radio is on FM, seen
in upper left portion of LCD display, push the source button to
change to AUX
MAIN MENU (GeneralSetup)
General Setup can be accessed from each of the selected audio
sources by:
1. Pressing the selection dial
20
.
2. Rotating the selection dial clockwise until Main Menu
isreached.
3. Pressing the selection dial to access the MainMenu.
From the main menu the following actions can be performed:
‑ Sound: tone adjust: Bass, Treble and Mid
‑ Language: select the interface Language
‑ Brightness: adjust the screen Brightness
‑ Restore todefault.
FM TUNER SETUP
The appliance can be tuned to DAB+ / FM radio frequencies
with the option of saving up to (6) DAB+ and (6) FM preset
stations. After setting and saving the preset stations, pressing a
preset button
instantly changes the frequency to the
desiredstation.

 Loading...