56
ENGLISH
56
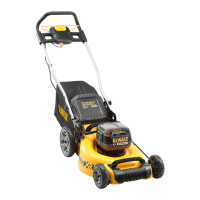
Installing and Removing the Battery Packs
(Fig. S)
DANGER: MAKE CERTAIN THE SAFETY KEY IS
REMOVED TO PREVENT ACTUATION BEFORE
REMOVING OR INSTALLINGBATTERIES.
This mower is designed to operate on two battery packs of
equal capacity. The mower will not operate on a single battery
pack, and If using different capacity battery packs, the smaller
capacity battery pack, when depleted, will cause the unit to
turn off.
The mower will turn off and the overheat indicator
13
will blink
if the battery pack reaches the high temperature limit, which
can be caused by cutting heavy grass. If this occurs, allow the
battery pack to cool and then resume cutting with the mower
deck set higher.
NOTE: For best results, make sure the battery packs are
fullycharged.
To Install the Battery Packs
1. Lift and hold the battery port cover
19
up to expose the
battery port
38
.
2. Slide a battery pack
26
into the battery port
38
until
an audible click is heard (Fig. S). Repeat for the second
batterypack
26
.
READ THIS INSTRUCTION MANUAL
BEFORE OPERATING YOUR MOWER
Refer to Fig. A at the beginning of this manual for a complete list
ofcomponents. Save this manual for futurereference.
DANGER: Sharp moving blade. Do not operate the
mower in mulching mode if the rear door is not closed
under spring tension as serious injury could result. Take
your mower to the nearest service center forrepair.
DANGER: Do not operate mower unless handle is locked
intoposition.
DANGER: Sharp moving blade. Never operate the
mower in bagging mode unless the bag lugs on the grass
collection bag are seated properly on the mower and the
rear door rests firmly against the top of the grass collection
bag as serious injury couldresult.
DANGER: Sharp moving blade. Do not operate the
mower in side discharge mode unless the rear side
discharge chute is properly installed with the rear door
cover resting firmly against it.
WARNING: Let the mower work at its own pace. Do
notoverload.
DCMWP134
Proper hand position requires both hands grasping the main
handle
4
and bail handle
8
as shown in Fig. Q.
DCMWSP156
Proper hand position requires both hands grasping the main
handle
4
and bail handle
8
together when not in self-propel
mode; and both hands grasping the main handle, bail handle,
and self drive lever
9
together when in self-propel mode as
shown in Fig. R.
Proper Hand Position (Fig. Q, R)
WARNING: To reduce the risk of serious personal injury,
ALWAYS use proper hand position asshown.
WARNING: To reduce the risk of serious personal
injury, ALWAYS hold securely in anticipation of a
suddenreaction.
OPERATION
DANGER: To reduce the risk of serious personal
injury, turn unit off and remove the safety key and
battery packs before making any adjustments or
removing/installing attachments or accessories. An
accidental start-up can causeinjury.
Adjusting Mower Height (Fig. P)
The height of cut is adjusted by the cut height adjust lever
20
.
NOTE: If you are not sure which height to mow at, begin mowing
with the cut height adjustment leve
r
20
positioned at the highest
setting and adjust height down as needed for your application.
To Set the Height of Cut
1. Pull the cut height adjustment lever
20
out of the locking
notch
37
.
2. Move the cut height adjustment lever
20
towards the rear
of the mower to raise the height ofcut.
3. Move the cut height adjustment lever
20
towards the front
of the mower to lower the height ofcut.
4. Push the cut height adjustment lever
20
into one of the
lockingnotches
37
.
Side Discharge (Fig. O)
DANGER: Turn unit off and remove safety key and
batterypacks.
1. To operate mower in side discharge mode, remove the grass
collection bag
22
.
NOTE: If installed, remove the mulching plug
24
.
2. Lift the rear door cover
21
and hook side discharge
chute
25
onto themower as shown in Fig. O.
3. Release the rear door cover
21
and ensure the side
discharge chute
25
is secured in place before operating
the mower.
Mulching (Fig. N)
DANGER: Turn unit off and remove safety key and
batterypacks.
1. To operate mower in mulching mode, remove the grass
collection bag
22
or side discharge chute
25
.
2. Lift the rear door cover
21
and slide the mulching plug
24
fully into the mower.
3. Ensure the pins
35
on the mulching plug
24
engage the
slots
36
on the mower as shown in Fig. N.
4. Be sure rear door cover
21
isclosed.

 Loading...