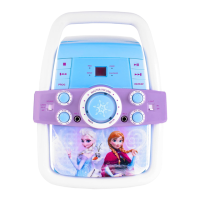
CDG Mode
Pairing Your Device Via Bluetooth
To connect and amplify other audio sources (MP3 players, etc):
1. Turn on the unit and set the Mode Button to AUX. “AU” will
glow solid on the LED screen.
2. Connect one end of a 3.5mm audio cable (not included) into
the AUX-IN jack and the other end to the headphone jack of
your audio device.
3. Control/navigate tracks from your audio device.
AUX Mode
673 IB_Back side Size: 357 x 201 mm Color: Black
Voice Control Button / Voice Control App
25
Turn on your Bluetooth device and turn on Bluetooth mode
(check in Options or Settings).
• Turn on the unit and set the Mode Button to BT mode. Press
and hold the Bluetooth Pairing Button for 2 seconds. A tone
will sound and the LED screen will flash ‘bt’ as the speaker
enters pairing mode.
• “Karaoke 677” should appear on your device’s screen. Select
“Karaoke 677” to connect.
• Once paired, a confirmation tone will sound and ‘bt” will glow
solid on the LED screen. Put your Bluetooth device in Play
mode to stream audio to the speaker. Use your Bluetooth
device OR the Play/Pause, Previous Track, and Next Track
buttons on the unit to control audio functions.
When the unit is in BT mode, you can access Siri or Google
Assistant using voice commands by pressing and holding the
Voice Control Button. This special feature is disabled on the
unit when shipped, and requires parental consent to be
activated. To start the one-time activation process, download the
free “Voice Control Set Up” app on your smartphone using the
App Store or Google Play. Once downloaded and installed on your
smartphone, the app will provide prompts to help you set up the
Voice Control function.
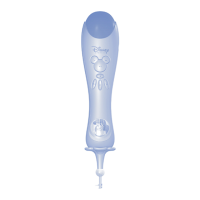
Connect the included microphone to one of the input jacks on
the back of the unit. Turn on the unit and choose Bluetooth,
AUX, or CDG modes using the Mode Button.
1. Slide the switch on the Microphone to ON. Now you can sing
along to your favorite music in either CD, Bluetooth, or AUX
modes, and hear your voice through the speaker!
2. When not in use, slide the Microphone switch to OFF. Unlock
the removable slots on the side of the unit to store your
microphone, as shown in the image on the right.
Using the Microphone
Vocal Effects
Add vocal effects while you sing! Make sure your microphone
is connected to the unit and is turned ON.
Auto Voice Control Dial (For Multiplex CDG discs only):
When playing a Multiplex recording, spin the dial to replace the
lead singer’s voice with your own!
Echo Effect Rotary Dial:
Spin the dial as you sing to add an echo effect to your voice!
24
Back of Unit
Repeat/Program Buttons
To repeat a track on your CD, press the Repeat Button on the
unit. The “Repeat” LED Indicator will blink. Press again, the
“repeat" LED indicator will glow solid, and the unit will repeat all
tracks. Press again to cancel the ‘repeat all’ program.
You can also program up to 20 tracks of the CD in a desired
order. With CD playback stopped, press the Program Button
once.The "PROG" LED indicator blinks, and the LED display
shows the program number.
Press the Previous Track and Next Track Buttons to select a
track number. When the desired track number is displayed,
press the Program Button to confirm entry.
Repeat these steps until all desired tracks are entered. To begin
programmed playback, press the Play/Pause Button. To cancel
programmed playback, press the STOP button twice.
This unit plays CD, CDR, and CDG formats. To play a CD or
CDR, turn on the unit and set the Mode Selector to CDG.
• Open the disc compartment on the front of the unit and insert
the disc face up. Close the compartment door.
• Use the controls to play/pause, stop, or navigate tracks.
To play a CDG disc on your television:
• Connect the included RCA cable (white and red connectors)
to the RCA audio output jacks located at rear of the unit.
• Connect the other end of the audio cable to the RCA audio
input jack of a TV set.
• Connect the RCA video cable (yellow connector) to the RCA
video output jack located at rear of the unit.
• Connect the other end of the video cable to the RCA video
input jack of a TV set, and make sure your television is set to
the corresponding input.
• Turn on the unit and set the Mode Selector to CDG.
• Insert a CDG disc into the unit and press the Play/Pause
Button. Now you can follow the lyrics on the screen and sing
along through the microphone!
• Use the Previous Track and Next Track buttons to navigate
tracks on the CDG.
23
2. Echo Effect Rotary
3. LED Power Indicator
1. Mic Volume Rotary
4. Power ON/OFF
5. Voice Control Button
6. Voice Control Mic
7. Auto Voice Control
8. Master Volume Rotary
9. Previous Track
10. Stop Button
11. Mode Selector
12.
13.
14.
15.
16.
17.
18. Next Track Button
19. CD Compartment
20. Microphone
Light Button
10+/Folder+
Bluetooth Pairing
Repeat Button
Program Button
Play/Pause Button
21. Light Show LEDs
22. LED Display
23. DC Power Jack
24. RCA Audio/Video Jack
25. AUX-IN Jack
2
1
26. Microphone Jacks
27.
27. USB Port
28. Phone Stand - Not
Recommended for Use
with Tablets
26
Using The Light Button:
By default, the unit will display a repeating light pattern when no
music is playing.
• Press to pulse to music.
• Press again to turn lights OFF.
• Press again to return to default setting.
USB Mode
• Connect a USB flash drive to the USB port.
• Make sure the Mode Button is set to USB.
• When a USB drive is detected, the number of files on
the USB drive will appear on the LCD display.
• Use the ”Forward” and “Reverse” buttons to advance
through the numbers of files on the USB drive.
• After pressing “Play”, the automatic play-all function will
activate, and songs will play in the order they were stored.
• Press the “10+/Folder+” button to quickly navigate through
a large number of files.
3
4
5
6
7
8
9
10
11
12
13 14
15
16
17
18
19
20
21
21
22
27
28

 Loading...