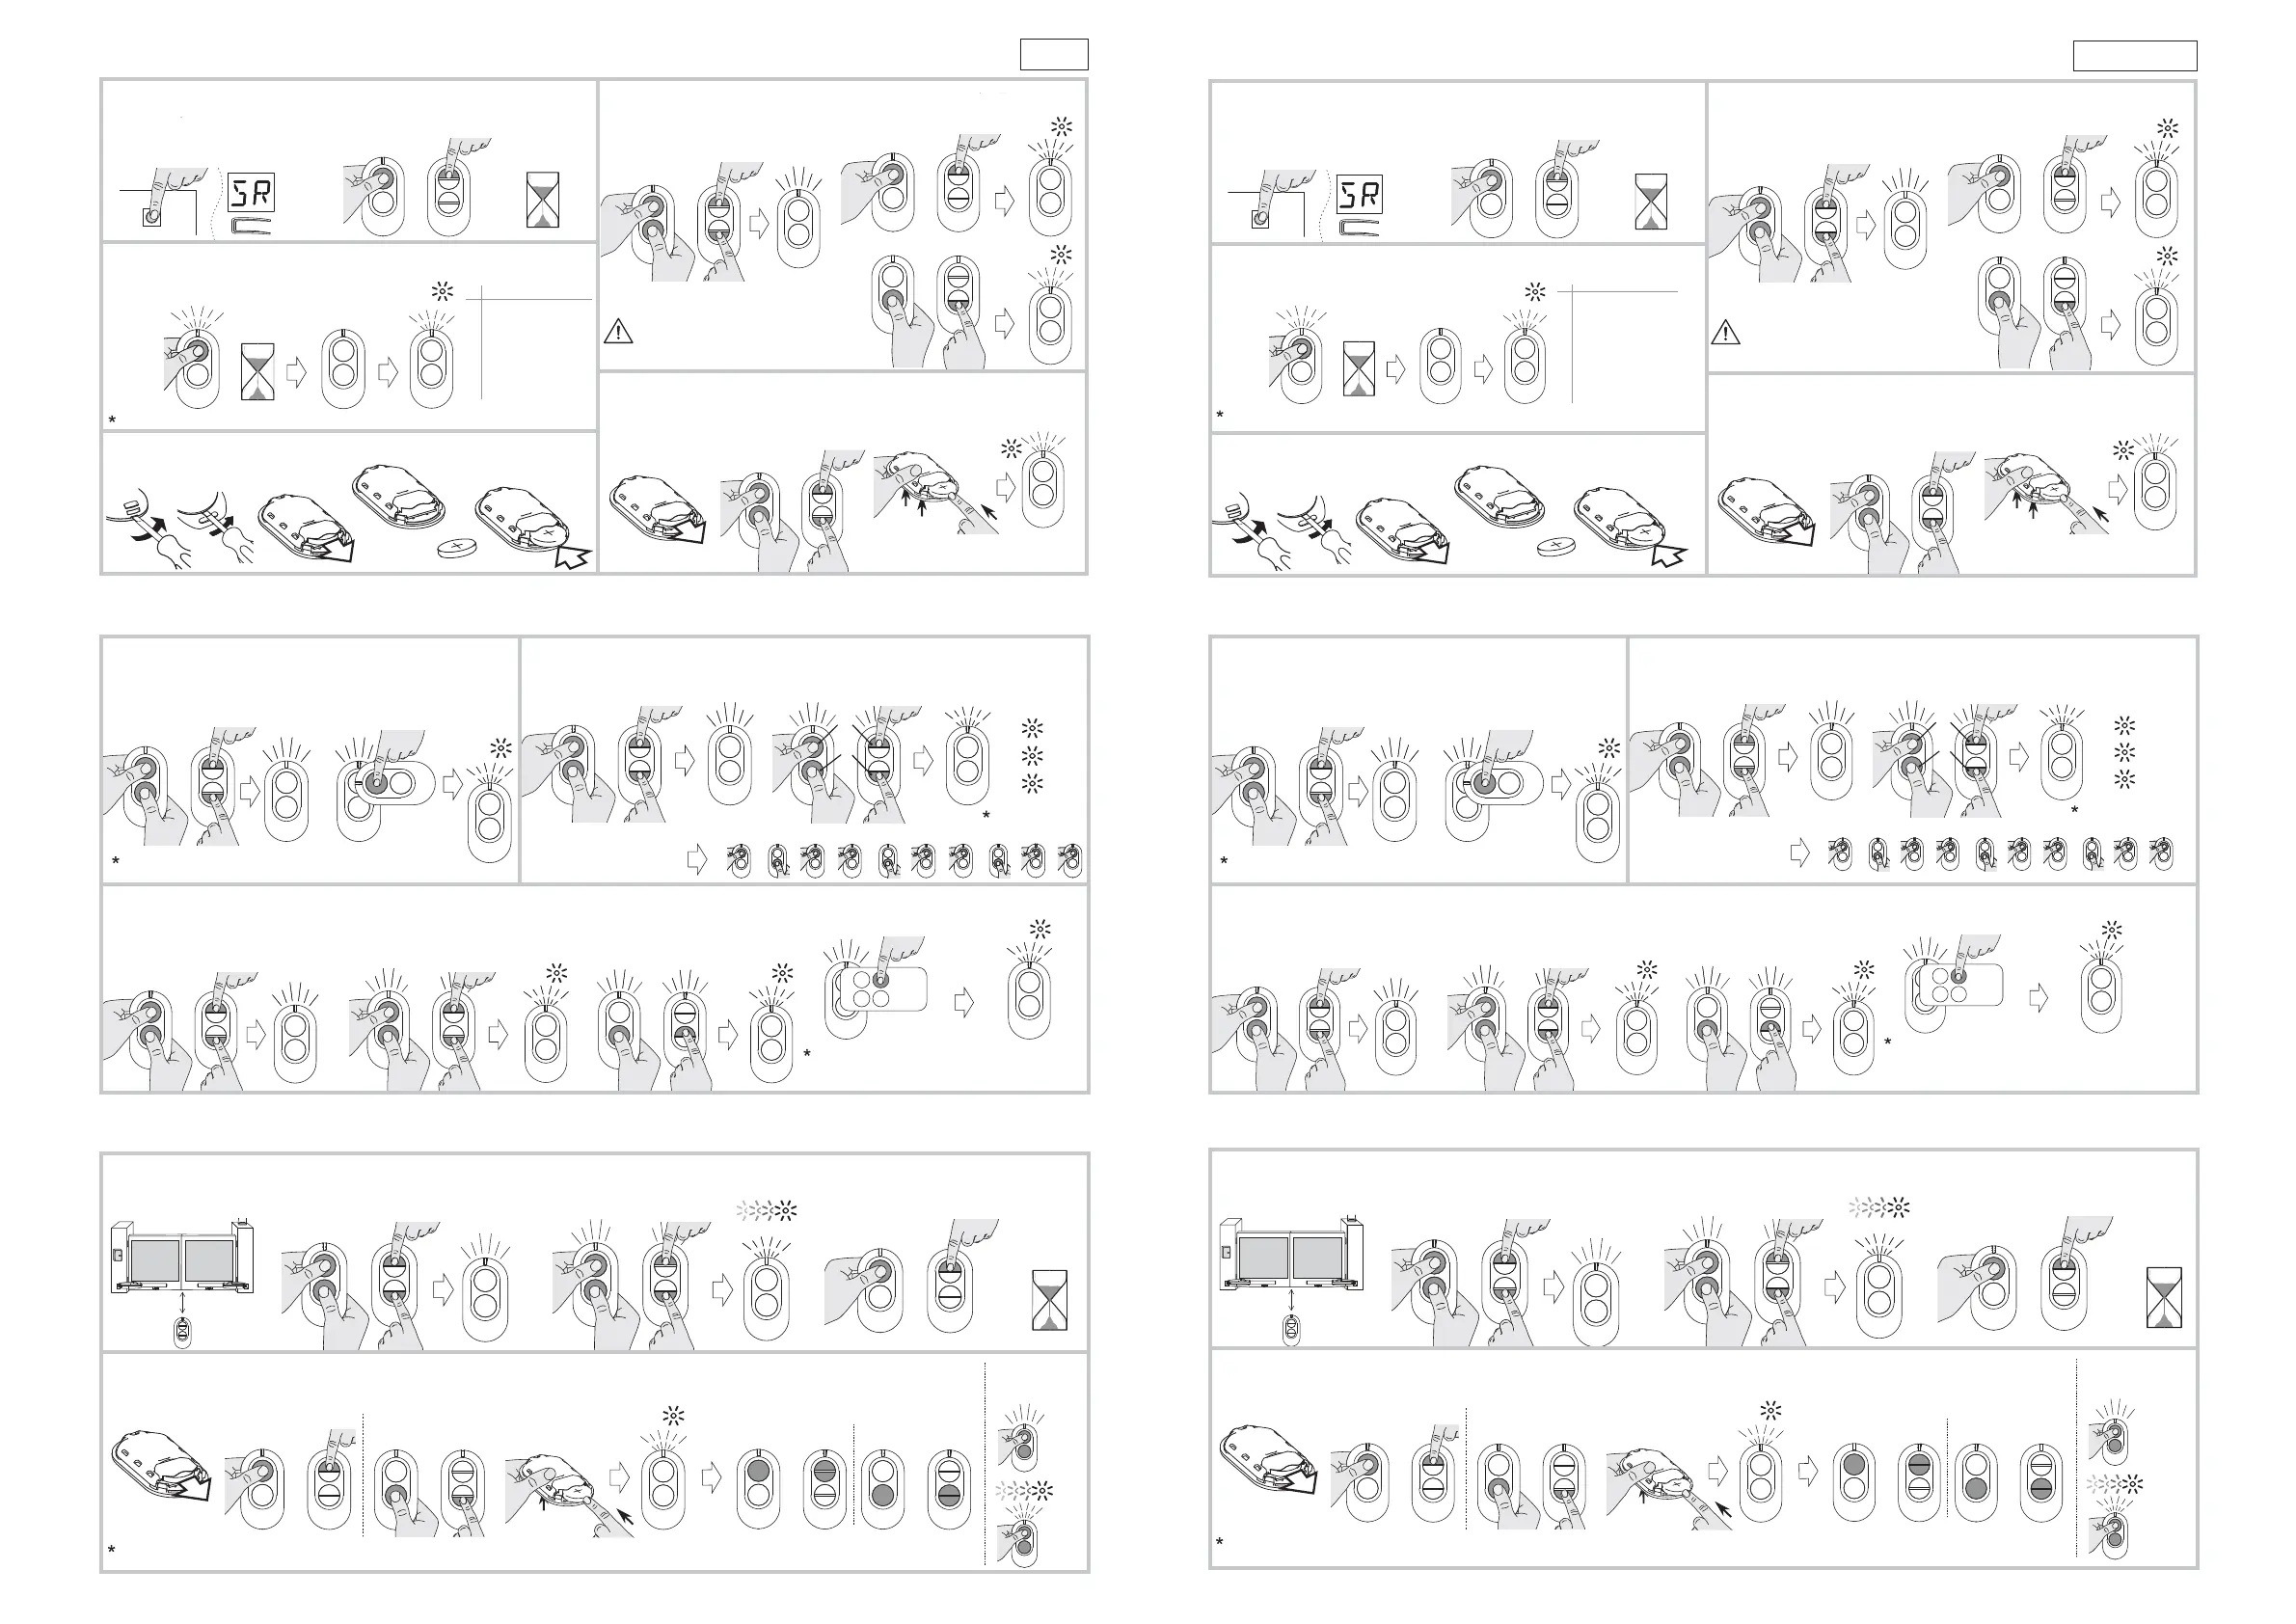
Solo modelli /Only models ZEN (2/2B/2G/2R/2W/2Y/2MT/4/4W/4MT) - ZENP (2/2MT/4/4W/4MT)
Solo modelli / Only models ZEN2C-ZEN4C
o
or
[F] Duplicazione completa TX esistente*
Existing TX full duplication*
x 3s
1. Con TX NUOVO
With NEW TX
ESISTENTE
EXISTING
NUOVO
NEW
2. Con TX ESISTENTE, entro 10s
With EXISTING TX, within 10s
Compatibile anche con:
Also compatible with:
GOL4C,
BIXLS2
3 x
LED ON
o
or
0
1
[G] Inserimento manuale codice* /
manual code setting*
2. Inserire sequenza di dieci “0” o “1”
Insert sequence of ten “0” or “1”
x 3s
1. Con TX NUOVO
With NEW TX
Lampeggi di conferma:
Confirmation blinks:
Esempio / :
Example
0100100100
Code
0 1 0 0 1 0 0 1 0 0
1 x = "0"
2 x = "1"
3 x = OK
"Dip-switch" code
LED ON
o
or
o
or
o
or
[H] Duplicazione di un pulsante daTX generico*
Generic TX single-button duplication*
x 3s
1. Con TX NUOVO
With NEW TX
x 3s
2. Ancora con TX NUOVO, entro 10s
Again with NEW TX, within 10s
3. Premere e rilasciare pulsante su
TX NUOVO dove duplicare TX generico
Press and release button on NEW TX
on which duplicate generic TX
(esempio / )
example
4. Entro 10s premere pulsante desiderato su TX generico
Within 10s press desired button on generic TX
Compatibile con prodotti a 433MHz con codifica
tipo "MM53200" o similare /
Compatible with 433MHz
products with "MM53200" encoding or similar
1 x
2 x
3 x
LED ON
o
or
o
or
o
or
x 2s
x 3-10s
[I] Aggiunta NUOVO TX da TX esistente /
Add NEW TX by existing TX
5 - 10m
x 3 -10s
10s
1. Avvicinarsi al cancello
Go near the gate
2. Con TX ESISTENTE (programmato)
With EXISTING (programmed) TX
3. Ancora con TX ESISTENTE
Again with EXISTING TX
4. Con NUOVO TX, entro 10s
With NEW TX, within 10s
5. Attendere
Wait
LED ON
o
or
o
or
o
or
o
or
LED ON
[J] Abilitare-disabilitare criptazione AES* /
Enable-disable AES encryption*
3. Con pulsante premuto
reinserire batteria
With button pressed
re-insert battery
1. Estrarre batteria
Take out battery
AES abilitato-disabilitato nei pulsanti indicati
AES enabled-disabled on the indicated buttons
2. Tenere premuto pulsante indicato
Keep pressed button as shown
La procedura commuta modalità AES (ON-OFF-ON-OFF...). Decodifica AES disponibile solo su ricevitori e Q.E. di nuova generazione - consultare manuale prodotto specifico
The procedure toggles AES mode (ON-OFF-ON-OFF...). AES decoder available only on new generation receivers or control units - refer to specific product manual
Caso a) pulsanti 1 / 1-2
Case a) buttons 1 / 1-2
Case b) pulsanti 2 / 3-4
Case b) buttons 2 / 3-4
PRESS
Verifica modalità
Mode verification
Caso /
Case a)
Case /
Case b)
1
2
3
4
1
2
5 x
AES
OFF
AES
ON
5 - 10s
PRG
ENTER
o
or
[A] Programmazione diretta /
Direct programming
10s
1. Attivare Apprendimento Ricevitore
(consultare manuale prodotto specifico)
Activate Receiver Learning mode
(refer to specific product manual)
2. Premere pulsante sul NUOVO TX
Press button on NEW TX
3. Attendere
Wait
[C] Verifica tipo codifica* /
Encoding type check*
1. Tenere premuto pulsante da verificare
Keep pressed button to be checked
esempio
example
Funzione salva-batteria deve essere abilitata /
Battery save function must be enabled
LED OFF
3 - 5s
N x
N Codifica /
Encoding
0 Fisso /
Fixed code
1 "Dip-switch"
2 Rolling code
3 "MM53200" clone
4 AES
5 Protetto/Protected
o
or
[E] Ripristino condizioni fabbrica /
Factory RESET
2. Tenere premuti pulsanti indicati
Keep pressed buttons as shown
1.
Estrarre la batteria
Take out battery
3. Con pulsanti premuti reinserire batteria
Keeping buttons pressed re-insert battery
PRESS
5 - 10s
o
or
o
or
o
or
x 3 - 10s
LED ON
2a. Abilitare /
Enable
2b. Disabilitare /
Disable
x 3 - 10s
x 3 - 10s
[B] Abilitare-disabilitare funzione salva-batteria*
Battery save function enable-disable*
1. Premere simultaneamente
Press simultaneously
Si sconsiglia l'uso di radiocomandi per
effettuare operazioni a uomo presente
Do not use remote controls to perform
hold-to-run operations
1 x
2 x
*
Abilitata di fabbrica su tutti i modelli
Factory enabled in all models
Tutti i modelli / All models
[D] Sostituzione batteria /
Battery replacement
Nuova /
New
CR2032
2. Estrarre batteria
Take out battery
1. Aprire contenitore
Open housing
3. Inserire nuova batteria
Insert new battery
Fig.3
ITALIANO
ENGLISH
DEUTSCH FRANÇAIS
Seulement modèles / Nur Modelle
ZEN (2/2B/2G/2R/2W/2Y/2MT/4/4W/4MT) - ZENP (2/2MT/4/4W/4MT)
Seulement modèles / Nur Modelle ZEN2C-ZEN4C
ou
oder
[F] Duplication complète TX existant*
Komplette Duplizierung des bestehenden TX*
x 3 - 10s
1. Avec NOUVEAU TX
Mit NEUEM TX
EXISTANT
BESTEHENDES
NOUVEAU
NEUES
2. Avec TX EXISTANT, dans les 10s
Mit BESTEHENDEM TX, innerhalb von 10s
Également compatible avec :
Auch kompatibel mit:
GOL4C,
BIXLS2
3 x
VOYANT ALLUMÉ
LED EIN
ou
oder
0
1
[G] Saisie manuelle du code* /
2. Saisir une séquence de dix «0» ou «1»
Zehn “0” oder “1” hintereinander eingeben
x 3s
1. Avec NOUVEAU TX
Mit NEUEM TX
Clignotements de confirmation :
Blinkzeichen zur Bestätigung:
Exemple / Beispiel:
0100100100
Code
0 1 0 0 1 0 0 1 0 0
1 x = "0"
2 x = "1"
3 x = OK
Code «Commutateur»
"Dip-Schalter"-Code
VOYANT ALLUMÉ
LED EIN
Manuelle Code-Eingabe*
ou
oder
ou
oder
ou
oder
[H] Duplication d'un bouton TX générique*
Duplizierung einer Taste von generischem TX*
x 3 s
1. Avec NOUVEAU TX
Mit NEUEM TX
x 3 s
2. Encore avec NOUVEAU TX, dans les 10 s
Wieder mit NEUEM TX, innerhalb von 10 s
3. Appuyer et relâcher le bouton sur
NOUVEAU TX où dupliquer le TX générique
Taste auf NEUEM TX wo generisches TX
dupliziert werden soll drücken und loslassen
(exemple / Beispiel)
4. Dans les 10 s appuyer sur le bouton souhaité sur le TX générique
Innerhalb 10 s gewünschte Taste auf generischem TX drücken
Compatible avec des produits à 433 MHz avec
un codage de type «MM53200» ou similaire
Kompatibel mit Produkten mit 433 MHz mit
Codierun
styp "MM53200" oder ähnlichem
1 x
2 x
3 x
VOYANT ALLUMÉ
LED EIN
ou
oder
ou
oder
ou
oder
x 2s
x 3 -10s
[I] Ajout du NOUVEAU TX depuis TX existant /
5 - 10m
x 3 -10s
10s
1. S'approcher du portail
Zum Tor gehen
2. AVEC TX EXISTANT (programmé)
Bei BESTEHENDEM TX (programmiert)
3. Encore avec TX EXISTANT
Wieder bei BESTEHENDEM TX
4. Avec NOUVEAU TX, dans les 10 s
Bei NEUEM TX, innerhalb von 10 s
5. Attendre
Warten
VOYANT ALLUMÉ
LED EIN
NEUES TX von bestehendem TX hinzufügen
ou
oder
ou
oder
ou
oder
ou
oder
VOYANT ALLUMÉ
LED EIN
[J] Activer-désactiver le cryptage AES* /
AES-Kryptierung aktivieren-deaktivieren*
3. Tout en gardant le bouton enfoncé,
réinsérer la batterie
Mit gedrückter Taste die
Batterie wieder einsetzen
1. Extraire la batterie
Batterie entnehmen
Activer-désactiver le cryptage AES*
AES-Kryptierung aktivieren-deaktivieren*
2. Garder enfoncé le bouton indiqué
Angegebene Taste gedrückt halten
La procédure passe au mode AES (ON-OFF-ON-OFF...). Le décodage AES n'est disponible que sur les récepteurs et les tableaux électroniques de nouvelle génération - consulter le manuel du produit spécifique
Das Verfahren schaltet AES-Modus um (EIN-AUS-EIN-AUS...). AES-Decodierung nur auf Empfängern und Steuerungen der neuen Generation verfügbar - siehe Handbuch des spezifischen Produkts
Cas a) boutons 1 / 1-2
Fall a) Tasten 1 / 1-2
Cas b) boutons 2 / 3-4
Fall b) Tasten 2 / 3-4
APPUYER
DRÜCKEN
Vérification du mode
Modus-Überprüfung
Cas /
Fall a)
Cas /
Fall b)
1
2
3
4
1
2
5 x
AES ÉTEINT
AES AUS
AES ALLU
MÉ
AES EIN
5 - 10s
PRG
ENTER
ou
oder
[A] Programmation directe /
Direkte Programmierung
10s
1. Activer apprentissage récepteur
(consulter le manuel du produit spécifique)
Einfahren Empfänger aktivieren
(siehe Handbuch für das spezifische Produkt)
2. Appuyer sur le bouton sur le NOUVEAU TX
Die Taste am NEUEN TX drücken
3. Attendre
Warten
[C]
Vérification du type de codage* /
berprüfung des Codierungstyps
1. Garder enfoncé le bouton à vérifier
Zu prüfende Taste gedrückt halten
exemple
Beispiel
La fonction économiseur de batterie doit être activée/Batteriespeicherfunktion muss aktiviert sein
VOYANT ÉTEINT
LED AUS
3 - 5s
N x
N Codage/Codierung
0 Fixe /Festcode
1 «Commutateur»/
"Dip-Schalter"
2 Rolling code
3 Clone "MM53200"/
"MM53200" duplizieren
4 AES
5 Protégé/Geschützt
ou
oder
[E] Restauration des conditions d'usine /
2. Garder enfoncés les boutons indiqués
Angegebene Tasten gedrückt halten
1. Extraire la batterie
Batterie entnehmen
3. Tout en gardant les boutons enfoncés, réinsérer la batterie
Mit gedrückten Tasten die Batterie wieder einsetzen
APPUYER
DRÜCKEN
Werkseitige Einstellungen wiederherstellen
5 - 10s
ou
oder
ou
oder
ou
oder
x 3 - 10s
VOYANT ALLUMÉ
LED EIN
2a. Activer / Aktivieren
2b. Désactiver / Deaktivieren
x 3 - 10s
x 3 -10s
[B] Activer-désactiver l'économiseur de batterie*
Batteriespeicherfunktion aktivieren-deaktivieren*
1. Appuyer en même temps sur
Gleichzeitig drücken
Il est déconseillé d'utiliser des radiocommandes
pour effectuer des opérations homme présent
Für Arbeiten mit Totmann-Funktion wird vom
Gebrauch von Funksteuerungen abgeraten
1 x
2 x
*
Activée en usine sur tous les modèles
Werkseitig auf allen Modellen aktiviert
Tous les modèles / Alle Modelle
[D] Remplacement de la batterie / Batteriewechsel
Nouvelle / Neue
CR2032
2. Extraire la batterie
Batterie entnehmen
1. Ouvrir le compartiment
Behälter öffnen
3. Insérer une nouvelle batterie
Neue Batterie einsetzen
Fig. / Abb .3
 Loading...