QB]
Warnings
1. Place
the
charging
hub
on
a flat, stable surface w
ith
good ventilation when charging an external device
or
accumulating power. Make
sure
tl"te
device is
properly insulated
to
prevent fire hazards.
2.
DO NOT
attempt
to
touch
the
metal
terminals
on
the battery ports. Clean the metal terminals with a
clean,
dry
cloth
if
there is any noticeable buildup.
3.
Make
sure
to
charge
batteries
with
low
battery
power
in
time.
It
Is
recommended
to
store
the
batteries
in
the
charging
hub
. The charging
hub
automatically
checks
the
battery
power
every
seven days. When a battery has
0%
power level,
the
battery
with
a high
power
level will charge
the
low
power
level battery
until
its
power
reaches
596
to
prevent over-discharging.
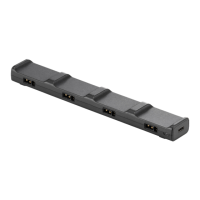
Introduction
The
OJI™
Air
3 Battery Charging
Hub
is designed
to
charge
up
to
three Intelligent Flight Batteries. After the
lntelllgent Flight Batteries are installed,
the
charging
hub can supply power
to
extemal devices via the
USB-C
port, such
as
remote controllers
or
mobile phones. The
charging
hub
can also use
the
power
accumulation
function
to
transfer
the
remaining
power
of
multiple
low-power batteries
into
the
battery with the highest
remaining power.
Usage
Charging Intelligent Flight
Battery
1. Insert
the
batteries
into
the charging
hub
until
It
clicks Into place. (Figure A 1)
2. Connect
the
charging
hub
to
a power
outlet
using
a
USB-C
charger. The Intelligent Flight Battery with
the
highest
power
level
will
be charged first, and
then
the rest will be charged
in
sequence according
to
their
power
levels. The status
LED
indicates
the
battery level during charging. Refer
to
the Status
LED
Descriptions
for
more information about the blinking
patterns
of
the status
LED.
3.
The battery
can
be stored In
the
charging
hub
after
charging. Remove
the
battery
from
the
charging
hub
for
use. (Figure
A2)
Using Charging
Hub
as a Power Bank
1.
Insert an Intelligent Flight Battery Into
the
charging
hub.
Connect
an
external
device via
the
USB-C
port, such
as
a mobile phone
or
remote controller.
(Figure B)
2.
Press
the function button, and the status
LED
of
the
charging hub turns solid green. The battery with the
lowest power level will be discharged first, followed
by
the remaining batteries to be discharged sequentially.
To
stop charging the external device, disconnect the
external device from the charging hub.
•
If
the
remaining charge
of
a battery Is
lower
than
796,
the
battery
cannot
charge
the
external device.
Accumulating
Power
1.
Insert more than one battery into the charging hub,
and press and hold the function button until the status
LED
rums
green. The starus
LED
of
the charging hub
pulses green, and the charge
is
transferred from the
battery with the lowest power level to the battery with
the highest power level.
·-
2.
To
stop
accumulating power, press
and
hold
the
function button until the status
LED
turns yellow. After
stopping
power
accumulation, press
the
function
button
to
check the power
level
of
the batteries.
• Power accumulation stops automatically In
the
following situations:
a.
The receiving battery Is fully charged,
or
the
power
of
the
output
battery is lower than
5%.
b.
A charger
or
external
deVice
is connected
to
the charging
hub
or
any battery is inserted
or
withdrawn
from
the charging hub during
power
accumulation.
c.
Power accumulation Is Interrupted
for
more
than
1 S minutes due
to
abnormal battery
temperature.
•
After
accumulating power, charge the battery
with
the
lowest power level
as
soon
as
possible
to
avoid discharge.
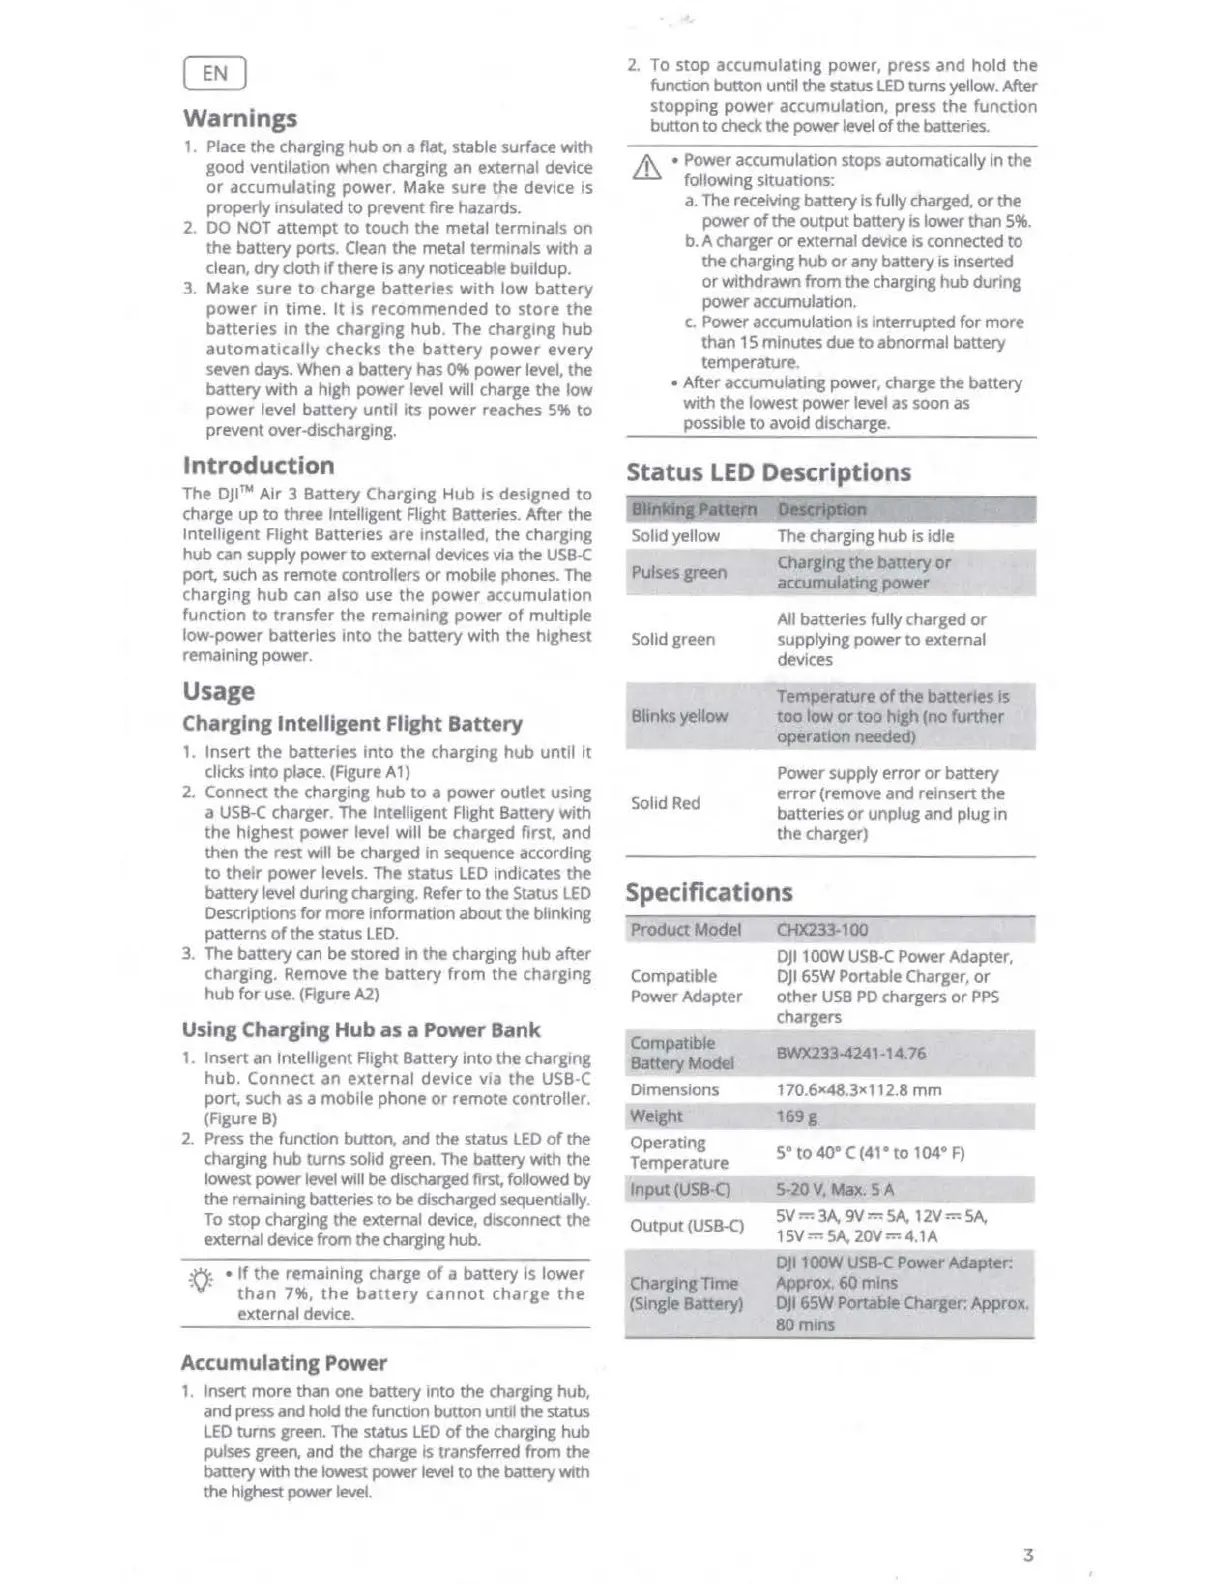
Status
LED
Descriptions
Solid yellow
Pulses
green
~~----~
Solid green
The charging
hub
is idle
Charging
the
battery
or
accumulating
power
All batteries fully charged
or
supplying power
to
external
devices
Blinks
yellow
Temperature
of
the
batteries
Is
too
low
or
too
high
(no
further
_______
operation
needed)
Solid
Red
Power supply
error
or
battery
error
(remove and reinsert the
batteries
or
unplug and plug
in
the charger)
Specifications
Product
Model
Compatible
Power Adapter
Compatible
Battery
Model
Dimensions
Weight
Operating
Temperature
Input
(USB-Q
Output
(USB-C)
CHX233-100
OJI
1
OOW
USB-C
Power Adapter,
OJI
65W Portable Charger,
or
other
USB
PD
chargers
or
PPS
chargers
BWX233-4241-14.76
170.6x48.3x112.8
mm
169g
5°
to
40° C
(41
•
to
104°
F)
5-20
V,
Max. 5 A
SV=3A,
9V=SA,
12V=SA,
1
SV=
SA,
20V=
4
.1
A
OJI
100W
USB-C
Power Adapter.
Approx.
60
mlns
Charging Time
(Single Battery)
OJI
65W
Portable
Charger:
Approx.
80mins
3
 Loading...