7
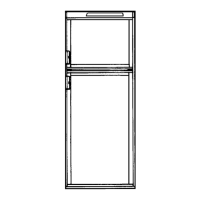
14. CHANGING DOOR HINGES FROM
ONE SIDE TO THE OTHER
Open the top door and remove the two screws holding the top
decoration. The screws are accessible from beneath.
Remove the top hinge pin and lift out the door. Remove
center hinge pin and lift out the lower door. Unscrew the
bottom hinge pin. Remove the plastic cap from the opposite
lower hinge and place it in the hole just "left empty" by the
lower hinge pin. Screw the lower hinge pin in the hole from
which the plastic cap was removed.
Before replacing the doors on the refrigerator, remove the
catches and move them to the opposite side of the cabinet.
Plastic caps for the empty holes are in the parts bag.
Remount the doors and the hinge pins in the reverse order of
their removal. Unscrew the handles and refasten them on the
opposite side of the door. Insert the plastic caps (from the
parts bag) into the holes left open on the doors. Before the
top decoration is refitted, check that the door closes easily
and the gasket seals well on all sides. (See FIG. 9.)
SECTION B. CERTIFIED VENT SYSTEM KITS
FIG. 9
REFRIGERATOR KIT
MODEL NO. COMPONENTS PART NO.
RM2611 4A ROOF BASE 3103633.XXX *
RM2811 ROOF COVER 3103634.XXX *
LOWER SIDE VENT 3102277.XXX *
POWER VENT POWER VENT ASM. 3104131.002 **
(Island/through ROOF BASE 3103633.XXX *
floor) ROOF COVER 3103634.XXX *
* Fill in "XXX" with color code numbers. For color codes, contact your supplier.
** Alternate instructions forwarded with the Vent Kit.