2.5 iMeter and Xflo
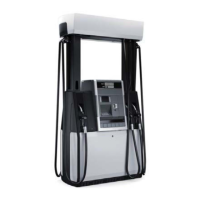
The iMeter module, shown in Figure 2.5, contains two meters in one assembly and the Wayne™
Intelligent Pulser (WIP). Each of the two meters in the iMeter module is a positive displacement
meter. There are no external moving parts on the iMeter.
The WIP pulser has two calibration doors - one for each meter. Only one door may be opened
at one time during meter calibration. If for any reason the pulser is replaced, be sure the replace-
ment pulser’s tabs snap into place in the meter slots before tightening the two screws securing
the pulser. More details on WIP operation are explained in the Electronics section of this manual.
Also see the Meter Calibration section.
Dispenser
Side 1
Dispenser
Side 2
iMeter
WIP
Figure 2.5: iMeter and WIP
Note that the above figure shows the iMeter calibration seal pins used in NA. IEC uses a different
sealing method. Both sealing methods are shown in the Meter Calibration section.
2.5.1 Check and Pressure Relief Valve
There are two Check & Pressure Relief (C&PR) valves located atop the meter under removable
covers. These are shown in Figures 6.15 and 6.16 in the Replacement Procedures section of
this manual. The top mounted location allows for check valve replacement without draining the
meter body. Once a delivery is complete and the diaphragm valve is closed, the product pressure
between the check valve and the nozzle will be held at the pressure of the last delivery. If the
pressure should build up due to temperature rise in the hose or a car runs over the hose, the
C&PR valve will relieve the pressure buildup. The relief valve is set to relieve pressure between
207-345 kPa (30-50 psi).
iMeter Assembly - The WIP has two calibration doors - one for each meter. Only one door may
be opened at one time during meter calibration. If for any reason the pulser is replaced, be sure
the replacement pulser’s tabs snap into place in the meter slots before tightening the two screws
securing the pulser.
18 WM048523 Rev 08 01/2019
2 Hydraulics
 Loading...