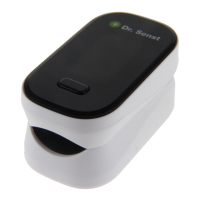
OLED-Display:
OLED-Display-Modi:
OLED-Display
Batteriefachdeckel
Einschalt-/Modus-Taste
Le principe de l’oxymètre est le suivant : Une formule d’expérience pour le traitement de
données est établie en exerçant la loi de Lambert Beer Law concernant les caractéristiques
d’absorption de spectres de l’hémoglobine réduite et de l’oxyhémoglobine (HbO2) dans des
zones luminescentes et proches infrarouge. Le principe de fonctionnement de l’instrument est
d’associer la technologie d'inspection photoélectrique Oxyhémoglobine avec la capacité
d'impulsion de numérisation et la technologie la d'enregistrement, de sorte que deux lumières
ayant des longueurs d’onde différentes (luminescence à 660 nm et proche infrarouge à 940
nm) puissent être focalisées sur l’ongle du patient dans un capteur en perspective en forme de
pince, et ensuite le signal mesuré peut être capté par un élément photosensible. Les données
de mesure pertinentes seront traitées dans les circuits électroniques et le microprocesseur et
ensuite affichées sur un écran OLED.
Écran OLED
Modes d'affichage OLED :
Écran OLED
Cache de la pile
allumer/mode
ENSM80BV3202205105WHH/00000000000/0000000000000
Version:Ver.1.2
YK-80B
User Manual (English)
Ver.1.2
Fingertip Pulse Oximeter
General Description
Measurement principle
Haemoglobin Saturation is the percentage between the capacity of Oxyhemoglobin (HbO2) that
compounded with oxygen and that of all combinativable haemoglobin (Hb) in blood. In other
words, it is the saturation of Oxyhemoglobin in blood. It is a very important physiological
parameter for Respiratory and Circulation Systems. Many respiratory diseases could reduce
haemoglobin saturation in human blood. Moreover, factors such as Automatic Organic Regulation
Malfunction caused by anaesthesia, trauma resulted from major operation and some medical
examination can also cause problems in oxygen supply, which might reduce human haemoglobin
saturation. As a result, such symptoms as megrim, vomiting and asthenia might appear to
patients. Hence, it is very important to know hemoglobin saturation of patient timely in clinical
medical aspects.
The fingertip pulse oximeter features in small volume, low power consumption, convenient
operation and portability. It is only necessary for patient to put one finger into fingertip
photoelectric sensor for diagnosis, and the display screen will directly show measured value of
hemoglobin saturation. It has been proved in clinical experiments that it possesses rather high
precision and repeatability.
The principle of the oximeter is as follows: An experience formula of data process is
established by exerting Lambert Beer Law according to Spectrum Absorption Characteristics of
Reductive hemoglobinand oxyhemoglobin (HbO2) in glow and near-infrared zones. Operation
principle of the instrument is to combine Photoelectric Oxyhemoglobin Inspection Technology
Diagram of Operation Principle
This Fingertip Pulse Oximeter is a kind of innovated medical device with non-invasive features
for artery SPO2 and PR detection. Being portable, it is able to measure SPO2 and PR values
quickly and precisely.
wth Cpacity Pulse Scanning and Recording Technology, so that two lights with different
wavelength (660nm glow and 940nm near infrared light) can be focused onto human nail
through perspective clamp finger-type sensor. Then measured signal can be obtained by a
photosensitive element, information acquired through which will be shown on two groups of LEDs
through process in electronic circuits and microprocessor.
1. Do not use the Fingertip Pulse Oximeter together with MRI or CT equipment.
2. Explosion hazard: Do not use the Fingertip Pulse Oximeter in an explosive atmosphere.
3. The Fingertip Pulse Oximeter is intended only as an adjunct in patient assessment. Doctors
should make diagnosis in conjunction with clinical manifestation and symptoms.
4. Check the Fingertip Pulse Oximeter sensor application site frequently to make sure that the
circulation and skin integrality of patient are under good condition.
5. Do not stretch the adhesive tape while applying the Fingertip Pulse Oximeter sensor. This
may cause inaccurate reading or skin blisters.
6. Please read the manual carefully before your operation.
7. The Fingertip Pulse Oximeter has no SpO2 prompt, it is not for continuous monitoring.
8. When used for a long time, it will produce discomfort or tenderness,especially for patients
with microcirculation disorders.Please change the test sites periodically according to different
situations of patients.The test site must be changed and the skin integrity and circulation
condition of the patient must be checked at least every 2 hours, and
the correct adjustment must be made.
9. Inaccurate measurements may be caused by autoclaving, ethylene oxide sterilizing, or
1. Infrared-ray receiving tube
2. Infrared-ray transmitting tube
Precautions for use
immersing the sensors in liquid.
10.Significant levels of dysfunctional hemoglobins (such as carboxyl-hemoglobin or
methemoglobin) may cause inaccurate reading.
11.Intravascular dyes such as indocyanine green or methylene blue may cause inaccurate
reading.
12.SpO2 measurements may be adversely affected in the presence of high ambient light. Please
shield the sensor area (with a surgical towel or direct sunlight, for example) if it is necessary.
13.Unexpected action may cause inaccurate reading.
14.Medical signal with high frequency or interference caused by defibrillator may lead to
inaccurate reading.
15.Venous pulsations may cause inaccurate reading.
16.It may cause inaccurate reading when the positions of sensor and blood pressure cuff are on
the same arterial catheter or intravascular line.
17.Hypotension, severe vasoconstriction, severe anemia, or hypothermia may cause inaccurate
reading.
18.It may cause inaccurate reading by giving use of cardiotonic to patient after his cardiac arrest
or when he is in quiver.
19.Bright nail or painted nail may cause inaccurate SpO2 reading. Follow local ordinances and
recycling instructions regarding to disposal or recycling of the device and device components,
including batteries.
Scope of application / Intended use
contraindication:not found
The fingertip pulse oximeter can be used to measure human haemoglobin saturation and pulse
rate through finger , it can be used in hospitals, families, schools and medical centers.
note
Features
◆ OLED display
● Product adopts double color OLED display,can show the six different display mode
★ If the hand movements, under the effect of accelerometer, the interface can have four different
kinds of display mode (suitable for matching accelerometer function instrument)
● Low-power consumption, continuously work for more than six hours with two AAA batteries
● Low voltage indicator
● In the absence of signals, the product will be in after 8 seconds to enter standby state
● Small in volume, light in weight, and convenient to carry
★ Instrument has 5s automatic signal detection function, when you insert finger, timely will
automatically start;Automatic startup function instrument (applicable to Automatic startup
function instrument)
Product include:main machine and SPO2 sensor。
1.The image in the instruction may have slight differences with the actual instruments。
2.Technical parameters and appearance change, without prior notice。
Operation Instructions
1. Install two AAA batteries into battery cassette before covering its cover.
2. Plug one finger into rubber hole of the Oximeter (it is best to plug the finger thoroughly)
before releasing the clamp with the nail upwards.
3. Press button on the front panel;(Note: if equipped with automatic startup function refers to
clamp oximeter, need not press the button, the instrument has 5 s automatic signal detection
function, directly inserted into the finger, instrument is automatically switched on timely)
4. Don’t tremble your finger when the Oximeter is working. Your body is not recommended on
moving status.
5. Press the button on the front panel, if we want change display direction;
(Note: if equipped with accelerometer function of instrument then don't press the button,
hand movements, the instrument with the accelerometer has four corresponding interface
switch)
6. Read relevant datum from display screen.
7. The instrument has the function of sleep, no signal will enter standby state of sleep;
8. Please replace new batteries when OLED indicates the batteries are in low power.
Hang rope installation
Battery installation
When plugging your finger into the Oximeter, your nail surface must be upward.
Declaration: Please use the medical alcohol to clean the rubber before each test and clean the
tested finger with alcohol before and after the test. (The rubber inside of the Oximeter adopts
medical rubber, which has no toxin, no harm, and brings no side effect such as allergy to the our
skin ).
1, According to the positive and negative identity right will be two AAA batteries into the battery
2, In the direction of the arrow at the bottom of the level of battery back cover.
Please note: pay attention to the battery positive and negative polarity, must be installed
correctly, otherwise it may cause damage to instrument.
1, Put the rope thin end through the hole.
2, Put the rope coarser end through its already wearing thin end part and tighten。
OLED display:
OLED display modes:
OLED display
Battery cover
Power button / Mode switch
Brief Description of Front Panel
note
Attention
Parameter setup:
Keys function description: in standby mode, start the key instrument into the working state,
push down this button under working state, can change the display mode.
Press start button(>3s),into parameter setup .As menu 1:1.In menu
1,When the “*” signal is shown on the “Alm Setup”, press the button(>3s)and enter into
the menu . 2. Press the button(<1s)can select item,then press button(>3s)to set the
on/off for alarm ,beep,demo and screen brightness adjustment (optional "1" ," 2 "," 3 "and"
4 "). When the “*” signal is shown on the “Restore”,press the button(>3s) and all the
settings are back to the factory settings.
1. Ne pas utiliser l’oxymètre de pouls en même temps que l’équipement d’I.R.M ou de
tomodensitométrie.
2. Risque d’explosion : Ne pas utiliser l’oxymètre de pouls dans une atmosphère explosive.
3. L’oxymètre de pouls n’est qu’un accessoire dans l’évaluation du patient. Les médecins
doivent poser un diagnostic en tenant compte des manifestations et des symptômes
cliniques.
4. Vérifier fréquemment le site d’application du capteur de l’oxymètre de pouls pour s’assurer
que la circulation et l’intégralité de la peau du patient sont dans de bonnes conditions.
5. Ne pas étendre la bande adhésive lors de l’application du capteur de l’oxymètre de pouls.
Ceci peut entraîner des lectures imprécises et des coupures au niveau de la peau.
6. Veuillez lire ce manuel avec attention avant d’utiliser l’appareil.
7. L’oxymètre de pouls possède une fonction de demande de la saturation en oxygène du sang,
mais ne doit pas être utilisé pour une surveillance continue.
8. Une utilisation prolongée ou l’état du patient pourrait nécessiter le changement périodique du
site du capteur. Changer le site du capteur et vérifier l’intégralité de la peau, l’état de la
circulation et le bon alignement au moins toutes les 2 heures.
9. Les causes des mesures imprécises pourraient être l’autoclavage, la stérilisation par l’oxyde
d’éthylène ou l’immersion des capteurs dans le liquide.
10.Des niveaux importants d’hémoglobines dysfonctionnelles (tels que la carboxyhémoglobine
ou la méthémoglobine) peuvent entraîner des lectures imprécises.
11.Les colorants intravasculaires tels que le vert de l’indocyanine ou le bleu de méthylène
peuvent entraîner une lecture imprécise.
12.Les mesures de la SpO2 peuvent être négativement affectées par la présence d’une forte
lumière ambiante. Veuillez protéger la zone du capteur avec une serviette chirurgicale contre
la lumière directe, s’il y a lieu.
13.Une action inattendue peut entraîner une lecture imprécise.
14.Un signal médical à fréquence élevée ou une interférence causée par un défibrillateur peut
entraîner une lecture imprécise.
15.Les pulsations veineuses entraîner une lecture imprécise.
1. Verwenden Sie das Pulsoximeter nicht zusammen mit MRI- oder CT-Ausrüstung.
2. Explosionsgefahr: Verwenden Sie das Pulsoximeter nicht in einer explosiven Umgebung.
3. Das Pulsoximeter ist lediglich ein Hilfsmittel bei der Beurteilung eines Patienten. Ärzte sollten
Ihre Diagnose in Verbindung mit der klinischen Manifestation und den Symptomen stellen.
4. Überprüfen Sie häufig die Sensorkontaktstelle des Pulsoximeters,
um sicherzustellen, dass sich Kreislauf und Hautintegrität des Patienten in gutem Zustand
befinden.
5. Dehnen Sie nicht das Klebeband, während Sie den Pulsoximetersensor anlegen. Dies kann zu
ungenauen Ablesewerten oder Hautblasen führen.
6. Lesen Sie vor der Verwendung bitte sorgfältig das Benutzerhandbuch.
7. Das Pulsoximeter hat eine Blutsauerstoffsättigungs-Anzeigefunktion, aber es ist nicht zur
kontinuierlichen Überwachung gedacht.
8. Bei längerer Benutzung, oder in Abhängigkeit vom Zustand des Patienten, kann ein
regelmäßiger Wechsel der Sensorposition erforderlich sein. Wechseln Sie die
Sensorkontaktstelle und überprüfen Sie die Hautintegrität, den Kreislaufzustand und die
korrekte Ausrichtung mindestens alle Stunden.
9. Durch Autoklavierung, Ethylenoxidsterilisierung oder Eintauchen der Sensoren in Flüssigkeit
können die Messungen verfälscht werden.
10.Erhöhte Werte von dysfunktionalen Hämoglobinen (wie zum Beispiel Carboxylhämoglobin
oder Methämoglobin) können die Messungen verfälschen.
11.Intravaskuläre Farbstoffe, wie zum Beispiel Indocyanin grün oder Methylen blau, können die
Messungen verfälschen.
12.SpO2-Messungen können bei hellem Umgebungslicht verfälscht werden. Schirmen Sie das
Oximeter erforderlichenfalls mit einem OP-Handtuch vor direkter Sonneneinstrahlung ab.
13.Plötzliche Bewegungen können die Messungen verfälschen.
14.Medizinische Signale mit hoher Frequenz oder Interferenzen durch Defibrillatoren können die
Messungen verfälschen.
15.Venenpulsationen können die Messungen verfälschen.
16.Wenn die Positionen des Sensors und der Blutdruckmanschette auf demselben
Arterienkatheter oder derselben intravaskulären Leitung liegen, können die Messungen
1. Non utilizzare il pulsossimetro in un ambiente adibito a risonanza magnetica o tomografia
assiale. Non utilizzare il pulsossimetro in situazioni in cui gli allarmi sono obbligatori.
Il dispositivo non è dotato di allarme.
2. Pericolo di esplosione: non utilizzare il pulsossimetro in atmosfere esplosive.
3. L’uso del pulsossimetro è indicato solamente come ausilio nella valutazione del paziente. Il
dispositivo deve essere usato unitamente ad altri metodi per la valutazione di segni e
sintomi clinici.
4. Controllare frequentemente la zona di applicazione del pulsossimetro per determinare il
posizionamento del sensore e la corretta circolazione e sensibilità della pelle del paziente.
5. Il pulsossimetro da dito è indicato sia per l’uso domestico che per l’uso ospedaliero.
6. Il sensore SpO2 e il lettore fotoelettrico devono essere posizionati in modo che l’arteriola del
paziente si trovi in mezzo ad essi.
7. Un utilizzo prolungato o lo stato del paziente possono richiedere di cambiare regolarmente la
sede di applicazione del sensore. Variare la sede di applicazione del sensore e verificare
l’integrità della cute, lo stato circolatorio e il corretto orientamento almeno
ogni 4 ore.
8. Misurazioni non accurate potrebbero essere causate da autoclavaggio, sterilizzazione con
ossido di etilene, dall’immersione del dispositivo in liquidi, da livelli significativi di
emoglobine disfunzionali (come carboxi-emoglobina o metaemoglobina), da coloranti
intravascolari come il verde indocianina o blu di metilene.
9. Le misurazioni di SpO2 potrebbero essere negativamente influenzate in presenza di elevata
luce ambientale (evitare l’esposizione diretta del sensore alla luce solare), da eccessivi
movimenti del paziente, da pulsazioni delle vene, dal collocamento dell’ossimetro su un dito
e contemporanea presenza di un bracciale pressorio sul braccio, dalla presenza di
catetere arterioso o una linea intravascolare, in pazienti con ipotensione, grave
vasocostrizione, con gravi anemie o ipotermia, in presenza di arresto cardiaco o in stato di
shock.
10.La presenza di smalto per unghie o unghie finte può causare letture imprecise.
Prodotto soggetto a normativa RAEE per lo smaltimento dei rifiuti elettrici/elettronici e loro
parti.
Dispositivo medico per rilevazione del valore di ossimetria e battito cardiaco di piccole
dimensioni e a basso consumo energetico. Equipaggiato con 2 batterie AAA per un
funzionamento di circa 40 ore. Lo stato di carica insufficiente delle batterie viene visualizzato
sul display multifunzione. Spegnimento automatico quando non viene rilevato un segnale per
oltre 8 secondi.
1. Inserire due batterie AAA nel cassetto batteria nel verso corretto.
2. Riposizionare la copertura.
3. Inserire il dito del paziente nel sensore rivestito in gomma (assicurarsi che il dito sia nella
posizione corretta), lasciare quindi chiudere il sensore sul dito.
4. Premere il pulsante ON sul pannello frontale.
5. Non agitare le dita quando il saturimetro è in funzione.
6. Premere il pulsante ON sul pannello frontale, per cambiare l'orientamento del display.
7. Leggere i dati rilevati dal display.
8. Se non rileva nessun segnale, si spegne automaticamente.
9. Sostituire le batterie quando il display indica che le batterie sono scariche.
Quando il dito è collegato all’ossimetro la superficie dell’unghia deve essere verso l'alto come
da figura.
NOTA: Si raccomanda di utilizzare alcool medico per pulire la gomma di contatto all’interno
dell’ossimetro prima e dopo ogni utilizzo.
Premi il pulsante e tienilo premuto per più di 3 secondi per accedere alla configurazione (vedi
immagine 1).Premi di nuovo il pulsante (per meno di 1 secondo) per muoverti fino ad arrivare
alla modalità che vuoi configurare. L'indicatore "*" si muoverà ogni volta che premi sul pulsante
di accensione. Clicca sul pulsante di accensione e tienilo premuto per più di 3 secondi per
iniziare la configurazione. Sposta l'indicatore "" fino ad arrivare all'opzione "Alm Setup", premi il
pulsante di accensione e tienilo premuto per più di 3 secondi per accedere alle impostazioni
(vedi immagine 2). Il funzionamento è lo stesso mostrato nell'immagine 1. "HI" significa "Più
alto" e "Lo" significa "Più basso"
1. Tipo di display display Display OLED
2. SpO2:Intervallo di misurazione:70%~100%
Precisione:80%~100%:±2% (incluso 80%);
70%~79%: ±3% ;
instruments equipped with accelerometer function , OLED display mode only1. 2.3.4, no
large font interface according to 5.6
The machine profile picture only for your reference use, specific in kind prevail
Using devices outdoors or under strong light, please adjust the screen brightness to a higher
proper level for observation.
It’s better for user to choose a lower brightness to conserve battery power.
2. In menu 2,When the “*”signal is shown on the “Sounds Setup”, press the button(>3s)and
enter into the menu 2 ,Press the button(<1s)can select item ,then press the button(>3s)
to setup data.choose “+”or“-” to plus or minus values.
Menu 1 Menu 2
Settings
Alm Setup
Alm off
off
off
OK
3
Beep
Demo
Restore
Brightness
Exit
*
Settings
Spo2 Alm Hi
Sounds Setup
Spo2 Alm Lo
PR Alm Hi
PR Alm Lo
+/-
Exit
100
85
130
50
+
*
Note: If the matching refers to clamp oximeter is basic, not equipped with parameter setting
function
1.Display Type:OLED display
2.SpO2:Measurement range:70%~100%
Accuracy:80%~100%:±2% (Including 80%); 70%~79%: ±3% ;
Below 70% no requirement;
Detailed descriptions of product functions:
Resolution:1%
3.PR:Measurement range:30BPM~254BPM
Accuracy:≤100BPM ,±1BPM;>100BPM ,±2BPM
4.Parameters of LED probe
5. PI index:measurement scope:0~20 (optional)
6. Power: two AAA 1.5V alkaline batteries
7. Automatic standby:the product shuts off by itself when no finger is in the product about 8
seconds
8. Automatic startup: every 5 s instrument will automatically detect the signal, after the hole
with my finger, timely automatically boot;(optional)
9. Accelerometer function: finger movement, the screen display will change with the
accelerometer changes (optional)
10.Dimension:58mm×36mm×33mm
11.Operation environment:temperature: 5 ℃ ~ 40 ℃
Humidity: 15% ~ 80%
Atmospheric pressure: 70kPa ~ 106kPa
Transport, storage environment:Temperature: -10 ℃ ~ 40 ℃
Humidity: 10%~95%
Atmospheric pressure: 70kPa ~ 106kPa, non-corrosive gas and well-ventilated
environment.
12.Declaration:EMC of this product comply with IEC60601-1-2 standard.
wavelength
660±5nm
940±10nm
radiation power
1.8mW
2.0mW
RED
IR
1.Management Class for Medical Devices: Ⅱequipment
2.Anti-electric Shock Type: Internally powered equipment
3.Anti-electric Shock Degree: Type BF equipment
Classification
1.Replace the batteries timely when low voltage lamp is on.
2.Clean the surface of fingertip pulse oximeter before it is used to diagnose patients.
3.Remove the batteries inside if you will not operate the Oximeter for a long time.
4.It would be better to preserve the product in -10~40℃ (14-104℉) and humidity is 10%~95%.
5.It is recommended that the product should be kept dry anytime. A wet ambience might affect
its lifetime and even damage the product.
6.Please follow the law of the local government to deal with used batteries.
Maintenance and Preservation
Symbols and Definitions
This parameter can be especially useful to clinicians.
BF type
application part
This device has no
alarm function
Up toward
Humidity range
IP22
95%
10%
First characteristic numeral 2:
Against ingress of solid foreign objects:≥
12.5mm diameter
Second characteristic numeral 2
Against ingree of water with harmful
effects:dripping(15º tilted)
signal inadequacy
一一
Keep dry
Product certification
Reference
manual
Cautions
Serial number Lot number
Temperature range
Avoid sunlight
Date of
manufacture
Manufacturer
European union r
epresentative
一一
-10℃
40℃
①Indication of probe faults (open circuit
condition or close circuit condition)
②Indication of Probe cable faults
③Indication of Probe cable extender
faults
To protect the environment, dispose of
empty
batteries at appropriate collection sites
according
to national or local regulations.
1.One hang lace 2.One user manual
Product Accessories
Guidance and manufacturer´s declaration – electromagnetic emission
– for all EQUIPMENT AND SYSTEMS
Guidance and manufacturer´s declaration – electromagnetic emission
Emissions test Compliance
RF emissions CISPR 11
Group 1
1
2
3
4
The Fingertip Pulse Oximeter is intended for use in the electromagnetic environment specified
below. The customer or the user of Fingertip Pulse Oximeter should assure that it is used in
such an environment.
RF emissions CISPR 11 Class B
Harmonic emissions IEC 61000-3-2
N/A
Voltage fluctuations /flicker emissions
IEC 61000-3-3
N/A
5
6
7
Guidance and manufacturer's declaration – electromagnetic immunity –
for all EQUIPMENT and SYSTEMS
Guidance and manufacturer’s declaration – electromagnetic immunity
EN 60601 test level
Compliance level
Immunity test
Electrostatic
discharge (ESD) IEC 61000-4-2
± 8 kV contact
± 15 kV air
± 8 kV contact
± 15kV air
Electrostatic transient / burst
IEC 61000-4-4
± 2 kV for power supply lines
± 1 kV for input/output lnes
N/A
Surge
IEC 61000-4-5
± 1 kV differential mode
± 2 kV common mode
N/A
Voltage dips, short
interruptions and voltage
variations on power supply
input lines
IEC 61000-4-11
< 5 % UT (>95 % dip in UT )
for 0.5 cycle
40 % UT (60 % dip in UT )
for 5 cycles
70 % UT (30 % dip in UT )
for 25 cycles
< 5 % UT (>95 % dip in UT )
for 5 sec
N/A
Power frequency(50/60 Hz)
magnetic field IEC 61000-4-8
30 A/m 30A/m
The Fingertip Pulse Oximeter is intended for use in the electromagnetic environment specified
below. The customer or the user of the Fingertip Pulse Oximeter should assure that it is used in
such an environment.
Guidance and manufacturer´s declaration – electromagnetic immunity –
for EQUIPMENT and SYSTEM that are not LIFE-SUPPORTING
Précautions d’utilisation
Caractéristiques
Mode d’emploi
Guidance and manufacturer´s declaration – electromagnetic immunity
EN 60601 test level
Compliance level
N/A
Immunity
Conducted RF
IEC 61000-4-6
3 Vrms
150 kHz to 80 MHz
The Fingertip Pulse Oximeter is intended for use in the electromagnetic environment specified
below. The customer or the user of the Fingertip Pulse Oximeter should assure that it is used in
such an environment.
Table 9 - Test specifications for enclosure port immunity to RF wireless
communications equipment
(MHz)
Band
a)
(MHz)
Service
a)
Modulation
b)
Maximum
power(W)
Distance
(m)
Immunity
TEST LEVEL
385
380 -390
TETRA 400
Pulse modulation
1,8 0.3 27
450
430 - 470
GMRS 460, FRS 460
FMc) ± 5 kHz deviation
2 0.3 28
710
745
780
810
870
930
704 - 787
LTE Band 13,17
Pulse modulation
b)
b)
217 Hz
2 0.3 9
800 - 960
GSM 800/900.TETRA 800,
iDEN 820,CDMA 850,
LTE Band 5
Pulse
modulation
b)
18 Hz
2 0.3 28
1 700-1 990
2 400-9 570
5 100-5 800
GSM 1800;CDMA 1900;
GSM 1900;DECT;LTE Band 1, 3
4, 25; UMTS
Bluetooth,WLAN,
802.11 b/g/n, RFID 2450,
LTE Band 7
WLAN 802.11 a/n
Pulse modulation
b)
217 Hz
Pulse modulation
b)
217 Hz
Pulse
modulation
b)
217 Hz
2 0.3 28
2 0.3 28
0,2 0.3 9
1 720
1 845
1 970
2 450
5 240
5 500
5 785
Test frequency
NOTE:
If necessary to achieve the immunity test level, the distance between the transmitting antenna and the me
equipment or me system may be reduced to 1 m. The 1 m test distance is permitted by IEC 61000-4-3.
a) For some services, only the uplink frequencies are included.
b) The carrier shall be modulated using a 50 % duty cycle square wave signal.
c) As an alternative to FM modulation, 50 % pulse modulation at 18 Hz may be used because while it does not
represent actual modulation, it would be worst case.
Possible Problems and Resolutions
Problem Possible reason Solution
SpO2 or PR is
shown unsteady
1. Finger is not plugged
correctly
2.Patient’s hemoglobin
value is too low to be
measured
1. The finger might not be
plugged deep enough
2. Finger is trembling or the
patient is on movement
status
1. Retry by plugging the finger
2. Try more times. If you can make sure
there is no problem in the product, please
go to hospital timely for exact diagnosis
1. Retry by plugging the finger
2. Please remain at rest
SpO2 or PR can not
be shown normally
The Oximeter can
not be turned on
Indication lamps
are suddenly off
1. Inadequate power or
power off
2. Batteries might be
installed incorrectly
3. The Oximeter might be
damaged
1. The product automatically
shuts off when no signal is
detected in 8 seconds
2. Inadequate power
1. Normal
2. Replace the batteries
1. Please replace the batteries
2. Please reinstall the batteries
3. Please contact with local customer
service centre
1, Maintenance with data such as circuit diagram, components list, figure and the detailed rules of
correction, injection, available only to the repair factory training qualified personnel and units.
2, The company can be in the form of email or other electronic files provide users with random
files.
3, The instrument is not used for evaluation of blood oxygen probe pulse and pulse blood oxygen
monitor accuracy.
Statement:
● Please read user manual before using the instrument;
● According to the requirement of the instruction manual for the operation and daily
maintenance, and make sure the machine power supply, and environmental requirements
Monday to Friday 9 to 17:30pm, except for the national legal holiday
After-sales service
Maintenance time
Maintenance regulations
Ensure that users
Reserves the right to technical change appearance, our products are subject to change
without prior notice, please forgive me!
● To conform to the regulations, free maintenance within the scope of products, with warranty
card for free maintenance.All that is beyond the scope of free maintenance product, provide
paid services.
● With warranty card and shopping invoice,main machine for a year, accessories for three
months are under free maintenance services from the date of purchase.
● Following does not belong to the scope of free maintenance
The fault caused by human factors, the damage;
Due to the use to be inconsistent with the provisions of our company work environment to
cause damage;
Due to the product in the our company authorized personnel disassembling or repairing
damaged;
Products beyond the warranty period.
● If any problem,please call us in 9:00 am to 5:30 pm from Monday to Friday(except
national holiday),call us:400-828-6667
Description générale
Mode d’emploi (French)
Ver.1.2
Oxymètre de pouls (doigt)
Principe des mesures
Description détaillée des fonctions du produit :
Schéma du principe de fonctionnement
Portée/usage prévu
L’oxymètre de pouls est un type d’appareil médical innovateur comportant des
caractéristiques non-invasives pour la mesure du SPO2 et du PR. Il permet de mesurer les
valeurs de SPO2 et de PR, rapidement et avec précision, grâce à sa portabilité.
Les oxymètres de pouls du bout des doigts peuvent être utilisés pour mesurer la saturation
en hémoglobine humaine et la fréquence du pouls à travers les doigts, et peuvent être utilisés
dans les hôpitaux, les maisons, les écoles et les centres médicaux.
La saturation en oxygène de l’hémoglobine représente le pourcentage entre la capacité de
l’oxyhémoglobine (HbO2) qui s’est lié à l’oxygène et de celui de toutes les hémoglobines (Hb)
dans le sang. En d’autres termes, c’est la saturation de l’oxyhémoglobine dans le sang. C’est un
paramètre physiologique très important pour le système respiratoire et le système sanguin. La
saturation en oxygène de l’hémoglobine dans le sang humain est diminuée par plusieurs
maladies respiratoires.
En outre, des facteurs tels que la régulation d’un mauvais fonctionnement organique
automatique causé par l’anesthésie, un traumatisme suite à une intervention chirurgicale
majeure et certains examens médicaux peuvent également causer des problèmes au niveau de
l’alimentation en oxygène, qui pourraient réduire la saturation en oxygène de l’hémoglobine
1. Enfoncer le bouton d’alimentation pendant plus de 3 secondes pour entreren mode « Réglage
des paramètres ». Menu illustré dans la figure 1 :Appuyer sur le bouton (moins de 1
seconde) pour défiler vers le bas pour atteindre le mode que vous souhaitez. ,Le signal «*»
se déplacera lorsque vous appuyez sur la touche « alimentation » à chaque fois. Appuyer sur
la touche d’alimentation pendant plus de 3 secondes pour commencer la configuration.
2. Déplacer le signal «*»dans « réglages Alm », appuyer sur le bouton pendant plus de 3
secondes pour entrer dans la deuxième page des règlages.
1.Type d’affichage : écran OLED
2.SpO2:Plage de mesure:70%~100%
Précision : 80 % ~ 100 % : ± 2 % (y compris 80 % );
70 %~79 % : ±3 % ; En dessous de 70 %, aucune exigence ;
Résolution :1 %
3.PR : fourchette de mesure :30 BPM~254BPM
Précision :≤100BPM ,±1BPM;>100BPM ,±2BPM
4.paramètres de la sonde LED
Ce paramètre peut être particulièrement utile aux cliniciens.
5.Alimentation : 2 piles alcaline AAA 1,5V
6.Consommation d’énergie : inférieure à 30 mA
7.Mode veille : retirer le doigt de l’appareil, l’instrument se met en mode veille au bout de 15 sec
8.Environnement de fonctionnement : températures de fonctionnement entre 5 ~ 40 °C
Dieses Fingerspitzen-Pulsoximeter ist ein innovatives medizinisches Gerät zur nicht-invasiven
arteriellen SPO2- und PR-Bestimmung. Dieses tragbare Gerät ist in der Lage, SPO2- und
PR-Werte rasch und präzise zu messen.
Unter Hämoglobinsättigung versteht man das prozentuale Verhältnis zwischen der Menge an
Oxyhämoglobin (HbO2), das an Sauerstoff gebunden ist, und der Gesamtmenge an
kombiniertem Hämoglobin (Hb) im Blut. Oder anders ausgedrückt: Es ist die
Oxyhämoglobinsättigung im Blut. Es ist ein sehr wichtiger physiologischer Parameter für
Beatmungs- und Kreislaufsystems. Viele Atemwegserkrankungen können die
Hämoglobinsättigung im Blut eines Patienten senken. Darüber hinaus können auch Faktoren
wie zum Beispiel eine automatische organische Regulierungsstörung infolge von Anästhesie,
Traumata infolge schwerer Operationen und einige medizinische
1. Display-Typ: OLED- Display
2. SpO2: Messbereich: 70 % ~ 100 %
Genauigkeit: 80 % ~ 100 %: ± 2 % (einschließlich 80 %);
70 % ~ 79 %: ±3 %;Unter 70 % keine Anforderung;
Auflösung: 1 %
3. PR: Messbereich: 30 BPM ‒ 254 BPM
Genauigkeit: ≤100BPM ,±1BPM;>100BPM ,±2BPM
4. Parameter der LED-Sonde
Dieser Parameter kann besonders für Ärzte nützlich sein.
5. Strom: 2 Alkalibatterien Typ AAA, 1,5 V
6. Stromverbrauch: weniger als 30 mA
7. Bereitschaft: ziehen Sie den Finger aus dem Instrument; nach 15 Sekunden geht das Gerät in
den Bereitschaftsmodus
8. Betriebsumgebung: Betriebstemperatur: 5°C – 40°C
Lagertemperatur: -10°C ~ 40°C
Umgebungsfeuchtigkeit: 15 % ~ 80 % während des Betriebes,
10%~95% während der Lagerung
Luftdruck: 70 kPa ~ 106 kPa
9. Erklärung: Die elektromagnetische Verträglichkeit dieses Produkts erfüllt die Norm
IEC60601-1-2.
10.Messungsleistung bei geringer Durchblutung: Die erforderliche Testausrüstung (BIO-TEK
INDEX Pulsoximetertester) konnte die verfügbare Pulswelle mit der Amplitude von 6 % der
Simulationspulswellenamplitude messen.
11.Interferenzbeständigkeit gegen Umgebungslicht: Das Gerät arbeitet normal, wenn der
BIO-TEK INDEX Pulsoximetertester einen Interferenzsignaltest ausführt.
1.Managementklasse für medizinische Geräte: Ausrüstung Klasse II
2.Stromschlagvermeidungstyp: intern mit Strom versorgte Ausrüstung
3.Stromschlagvermeidungsgrad: Ausrüstung vom Typ BF
1. Ersetzen Sie die Batterien zeitnah, wenn die Spannungswarnlampe leuchtet.
2. Reinigen Sie die Oberfläche des Fingerspitzen-Oximeters, bevor es zur Diagnose an einem
anderen Patienten verwendet wird.
3. Nehmen Sie die Batterien heraus, wenn Sie das Oximeter lange Zeit nicht benutzen.
4. Das Gerät sollte idealerweise in einem Temperaturbereich von - 10°C – 40°C und einem
Feuchtigkeitsbereich zwischen 10%~95%gehalten werden.
Fingerspitzen-Pulsoximeter können verwendet werden, um die menschliche
Hämoglobinsättigung und Pulsfrequenz durch die Finger zu messen und können in
Krankenhäusern, Heimen, Schulen und medizinischen Zentren verwendet werden.
chez l’humain.
Par conséquent, des symptômes tels que la migraine, les vomissements et l’asthénie peuvent
survenir chez les patients. Il est donc très important de connaître la saturation en oxygène de
l’hémoglobine d’un patient au bon moment dans un environnement médical clinique.
Les caractéristiques de l’oxymètre de pouls sont : un faible volume, une faible consommation
d’énergie, un fonctionnement convenable et la portabilité. Le patient n’a qu’à mettre le bout du
doigt dans le capteur photoélectrique pour le diagnostic, et l’écran d’affichage indiquera
directement la valeur mesurée de la saturation en oxygène de l’hémoglobine. Il a été démontré
dans des expériences cliniques qu’il possède une précision et une répétabilité relativement
élevées.
1. Tube de réception du rayon infrarouge
2. .Tube de transmission du rayon infrarouge
16.Elles peuvent causer des lectures imprécises lorsque les positions du capteur et du brassard
du tensiomètre sont sur le même cathéter artériel ou ligne intravasculaire.
17.Une hypotension, une vasoconstriction grave, une anémie grave ou une hypothermie peut
entraîner une lecture imprécise.
18.Le fait d’administrer des cardiotoniques au patient après un arrêt cardiaque ou lorsque
celui-ci tremble peut entraîner une lecture imprécise.
19.Des ongles vernis ou colorés peuvent entraîner une lecture SpO2 imprécise.
Veuillez respecter les ordonnances et les instructions locales en matière de recyclage
concernant l’élimination ou le recyclage de l’appareil et les composants de l’appareil, y
compris les piles.
● Écran OLED
1. Le produit adopte un affichage OLED de couleur double, qui peut afficher les 6 modes
d’affichage différents
2. Consommation d’énergie plus faible, fonctionnement continu pendant 40 heures
3. Voyant de faible voltage
4. En absence de signaux, le produit se mettra en état de veille stable après 8 secondes
5. Fonction d’interrogation visuelle et auditive.
6. Petit volume, léger et facile à porter
1. Enfoncer le bouton de verrouillage sur le couvercle de la pile, faire glisser le couvercle de la
pile dans la direction des flèches imprimées et ouvrir en même temps le couvercle de la pile.
2. Mettre 2 piles AAA dans le compartiment des piles et respecter la polarité imprimée au fond
du compartiment avant de mettre le couvercle.
3. Mettre un doigt dans le trou en caoutchouc de l’oxymètre (le mieux c’est d’entrer
complètement le doigt) avant de relâcher la pince avec l’ongle sur le dessus.
4. Appuyer sur le bouton du panneau avant .
5. Ne pas faire trembler votre doigt lorsque l’oxymètre fonctionne. Il est recommandé de rester
immobile lors de l’utilisation de l’oxymètre.
6. Appuyer sur le bouton du panneau avant, si vous voulez changer la direction de l’affichage .
7. Lire les données pertinentes sur l’écran d’affichage.
8. L’instrument a une fonction de veille, aucun signal ne sera affiché dans le mode veille .
9. Veuillez remettre de nouvelles piles lorsque le voyant OLED indique que les piles sont faibles.
Lorsque vous mettez votre doigt dans l’oxymètre, la surface de votre ongle doit être sur le
dessus.
Déclaration : Veuillez utiliser un alcool de qualité médicale pour nettoyer le caoutchouc avant
chaque test et nettoyer le doigt testé avant et après chaque test. (Le caoutchouc à l’intérieur
de l’oxymètre et caoutchouc de qualité médicale, qui ne contient pas de toxines, quin’est pas
nocif et qui n’entraîne aucun effet indésirable tel qu’une allergie à la peau humaine).
Description des touches de fonctions : En mode veille, appuyer sur la touche de
l’instrument pour passer en état de fonctionnement, le fait d’enfoncer ce bouton en état de
fonctionnement peut modifier le mode d’affichage.
1. Pour enlever le couvercle du compartiment arrière, appuyer sur le bouton blanc suivant la
direction des flèches imprimées.
2. Placer deux piles AAA dans le compartiment de piles. Respectez les signes plus (+) et moins
(-) dans le compartiment. Si les polarités ne correspondent pas, l’oxymètre pourrait être
endommagé.
3. Faire glisser la porte du couvercle du compartiment le long de la flèche illustrée dans le
dessin.
Veuillez enlever les piles si l’oxymètre ne doit pas être utilisé pendant une longue durée.
Veuillez remplacer les piles lorsque le voyant de charge commence à vaciller.
1. Faire filer l’extrémité la plus fine du cordon dans le trou de suspension.
2. Faire filer l’extrémité la plus épaisse du cordon dans l’extrémité filetée avant de tirer
fortement.
1. Maintenir l’oxymètre éloigné des jeunes enfants. Les petits éléments tels que le couvercle du
compartiment des piles, les piles et le cordon constituent des risques d’étouffement.
2. Ne pas suspendre le cordon sur le fil électrique du dispositif.
3. Veuillez noter que le cordon qui est lié à l’oxymètre peut causer une strangulation en raison
de sa longueur excessive.
Brève description du panneau avant
Configura tion des paramètres :
figure 1 figure 2
« Hi » veut dire « Plus haut » et « Lo » plus bas.
Settings
Alm Setup
Alm off
off
off
OK
3
Beep
Demo
Restore
Brightness
Exit
*
Settings
Spo2 Alm Hi
Sounds Setup
Spo2 Alm Lo
PR Alm Hi
PR Alm Lo
+/-
Exit
100
85
130
50
+
*
Longueur d'onde
660±5nm
940±10nm
Puissance de rayonnement
1.8mW
2.0mW
RED
IR
Température de stockage : -10 ~ 40 °C
Humidité ambiante :15 %~80 % en fonctionnement et 10%~95%
pendant le stockage Pression de l’air : 70 kPa~106 kPa
9. Déclaration : l’EMC de ce produit est conforme à la norme IEC60601-1-2.
10.Mesure de la performance dans des conditions de faible perfusion : équipement de test requis
(testeur d’oxymètre de pouls BIO-TEK INDEX) pourrait mesurer l’onde de pouls disponible avec
une amplitude de 6 % de l’amplitude de l’onde de pouls de simulation.
11.Capacité de résistance à l’interférence contre la lumière ambiante : le testeur de l’oxymètre de
pouls BIO-TEK INDEX exerce un signal de test interférant.
1.Classes de gestion des appareils médicaux : équipement Ⅱ
2.Type anti choc-électrique : Équipement à alimentation interne
3.Degré d’anti choc-électrique : Équipement de type BF
1. Remplacer les piles au bon moment lorsque le voyant de faible voltage s’allume.
2. Nettoyer la surface de l’oxymètre à pouls avant de l’utiliser pour le diagnostic d’un autre
patient.
3. Enlever les piles de l’oxymètre si vous ne l’utiliserez pas pendant une longue durée.
4. Il serait préférable d’entreposer le produit à une fourchette de température entre -10 ~ 40 °C
(14-104 °F) et une fourchette d’humidité entre 10%~95%.
5. Il est recommandé de maintenir le produit sec en tout temps. Un environnement humide
pourrait affecter sa durée de vie et même endommager le produit.
6. Veuillez respecter les lois locales pour éliminer les piles usées.
Classification
Entretien et entreposage
Accessoires du produit
Messprinzip
Schaubild des Funktionsprinzips
Klassifizierung
Wartung und Erhaltung
Principi della misurazione
Istruzioni per un utilizzo sicuro
Principi della misurazione
Classificazioni
Manutenzione e Conservazione
Accessori
1. une dentelle suspendue
2. un manuel d'utilisation
Directive et déclaration du fabricant concernant les rayonnements
électromagnétiques pour d’autres ÉQUIPEMENTS et SYSTÈMES
Conseils et déclaration du fabricant - émissions électromagnétiques
test d'émissions
Conformité
Émissions RF CISPR 11
Groupe 1
Émissions RF CISPR 11 Classe B
Émissions harmoniques CEI 61000-3-2
N/A
Fluctuations de tension / émissions
de scintillement CEI 61000-3-3
N/A
1
2
3
4
5
6
7
L'oxymètre de pouls du bout des doigts est destiné à être utilisé dans l'environnement
électromagnétique spécifié ci-dessous. Le client ou l'utilisateur de l'oxymètre de pouls digital
doit s'assurer qu'il est utilisé dans un tel environnement.
Problèmes éventuels et Dépannage
Sicherheitshinweise
Leistungsmerkmale
Caratteristiche principali
Istruzioni operative
Breve descrizione del pannello frontale
Configurazione delle impostazioni
Descrizioni dettagliate delle funzioni del prodotto:
Produktzubehör
Leitfaden und Erklärung des Herstellers ‒Elektromagnetische Strahlung
für andere Ausrüstungen und SYSTEME
Bedienungsanleitung
Problème Cause probable Solution
SpO2 ou PR
ne s’affiche
pas
normalement
1. Le doigt n’est pas bien
positionné
2. La valeur de
l’oxyhémoglobine du
patient est trop faible
pour être mesurée
1. Repositionnez le doigt
2. Essayez plusieurs fois. Si vous vous
assurez qu’il n’y a pas de problème avec
l’appareil, allez à l’hôpital sans tarder pour
un diagnostic exact
L’affichage
de SpO2 ou
PR est
instable
1. Le doigt n’est peut être
pas suffisamment
enfoncé
2. Le doigt tremble ou le
patient est sur unétat
de mouvement.
1. Repositionnez le doigt
2. Veuillez rester immobile
L’oxymètre
ne s’allume
pas
1. Courant insuffisant ou
éteint
2. Les piles ne sont pas
correctement installées
3. L’oxymètre peut être
endommagé
1. Veuillez remplacer les piles
2. Veuillez installer de nouveau les piles
3. Veuillez contacter le service à la clientèle
local
Les voyants
s’éteignent
soudainement
1. L'appareil s'éteint
automatiquement
lorsqu'aucun signal
n'est détecté pendant
8 secondes
2. Charge insuffisante
1. Normal
2. Remplacer les piles
Symboles et Définitions
Numéro de lot
inadéquation du signal一一
IP22
Premier chiffre caractéristique 2:
Contre la pénétration de corps
étrangers solides: diamètre ≥12,5 mm
Deuxième chiffre caractéristique 2
Contre l'ingestion d'eau avec des
effets néfastes: gouttes
(inclinaison de 15 °)
一一
①Indication des défauts de
sonde (condition de circuit ouvert
ou condition de circuit fermé)
②Indication des défauts du câble
de la sonde
③Indication des défauts du
prolongateur de câble de sonde
Pour protéger l'environnement, jetez les
batteries sur les sites de collecte
appropriés selon
aux réglementations nationales ou
locales.
Cet appareil n'a pas
fonction d'alarme
Type BF
Partie application
Numéro de série
Plage de température
Éviter la lumière
du soleil
Vers le haut vers
Date de fabrication
Fabricant
Représentant
syndical européen
Plage d'humidité
Garder au sec
Certification des
produits
Manuel de
référence
Précautions
95%
10%
-10℃
40℃
Comment remplacer les piles :
Remarque :
Utilisation du cordon
Avertissements !
Kurze Beschreibung des Frontpaneels
Parameter-Einrichtung:
Benutzerhandbuch (German)
Ver.1.2
Fingerspitzen-Pulsoximeter
Allgemeine Beschreibung
Detaillierte Beschreibung der
Produktfunktionen:
Geltungsbereich/bestimmungsgemäße Verwendung
Untersuchungen Probleme mit der Sauerstoffzufuhr verursachen,was zu verringerter
Hämoglobinsättigung führen kann. In der Folge können Symptome wie Migräne, Erbrechen und
allgemeine Körperschwäche auftreten. Darum ist es aus vielerlei klinischen medizinischen
Aspekten sehr wichtig, die Hämoglobinsättigung eines Patienten zu kennen.Das
Fingerspitzen-Pulsoximeter vereint in einem kleinen Volumen geringen Stromverbrauch, einfache
Bedienung und Transportfähigkeit. Der Patienten muss zur Diagnose lediglichBenutzerhandbuch
(German) Ver.1.2Fingerspitzen-Pulsoximeter einen Finger in den photoelektrischen
Fingerspitzensensor legen,und der Anzeigeschirm zeigt direkt den gemessenen
Hämoglobinsättigungswert. In klinischen Experimenten wurde nachgewiesen, dass sich das Gerät
durch ein hohes Maß an Präzision und Wiederholbarkeit auszeichnet.
Das Oximeter arbeitet folgendermaßen: Es wird eine Erfahrungsformel zur Datenverarbeitung
unter Anwendung des Lambert-Beerschen Gesetzes entsprechend den
Spektrumabsorptionseigenschaften von reduktivem Hämoglobin und Oxyhämoglobin (HbO2) im
roten und infrarotnahen Bereich ermittelt. Das Funktionsprinzip des Instruments ist
es,photoelektrische Oxyhämoglobinuntersuchungstechnologie mit Kapazitätspulsabtast- und
–aufzeichnungstechnologie so zu kombinieren, dass zwei Lampen mit unterschiedlicher
Wellenlänge (660 nm rotes Licht und 940 nm infrarotnahes Licht) durch einenperspektivischen
Fingerklemmensensor auf den Fingernagel fokussiert werden können. Mit Hilfe eines
lichtempfindlichen Elements kann dann ein gemessenes Signal erhalten werden. Die relevanten
Informationen aus der Messung werden in elektronischen Schaltkreisen und einem
Mikroprozessor verarbeitet und dann auf dem OLED angezeigt.
1. Röhre zum Empfangen von Infrarotstrahlen
2. Röhre zum Aussenden von Infrarotstrahlen
verfälscht werden.
17.Niedriger Blutdruck, starke Gefäßverengung, starke Anämie oder Hypothermie können die
Messungen verfälschen.
18.Durch Gabe von Kardiotonika nach Herzstillstand, oder wenn der Patient zittert, können die
Messungen verfälscht werden.
19.Helle oder lackierte Fingernägel können die SpO2-Messungen verfälschen.
20.Befolgen Sie die vor Ort geltenden Verordnungen und Recyclinganweisungen bezüglich der
Entsorgung oder des Recyclings des Gerätes oder seiner Bestandteile, einschließlich der
Batterien.
● OLED-Display
1. Das Produkt ist mit einem zweifarbigen OLED-Display ausgestattet und hat sechs
verschiedene Anzeigemodi
2. Geringer Stromverbrauch, 40 Stunden Dauerbetrieb möglich
3. Warnung bei niedrigem Batteriestand
4. Bei fehlendem Signal schaltet das Gerät nach 8 Sekunden inden Bereitschaftszustand
5. Visuelle und akustische Eingabeaufforderung
6. Geringes Volumen, geringes Gewicht, leicht zu tragen
1. Drücken Sie die Verriegelungstaste am Batteriefachdeckel.Verschieben Sie den
Batteriefachdeckel gleichzeitig inPfeilrichtung und öffnen das Batteriefach.
2. Setzen Sie zwei AAA-Batterien in das Batteriefach ein und achten auf die Polarität, die auf
dem Boden des Batteriefaches angegeben ist, bevor Sie das Batteriefach schließen.
3. Stecken Sie einen Finger in die Gummiöffnung des Oximeters (am besten stecken Sie den
Finger tief hinein), bevor Sie die Klammer lösen, mit dem Fingernagel nach oben.
4. Drücken Sie die Taste am Frontpaneel.
5. Ihr Finger darf nicht zittern, während das Oximeter arbeitet. Wir empfehlen Ihnen
stillzustehen, während Sie Ihr Oximeter verwenden.
6. Drücken Sie die Taste am Frontpaneel, wenn die Anzeigerichtung geändert werden soll.
7. Lesen Sie die relevanten Daten vom Anzeigeschirm ab.
8. Das Instrument hat einen Schlummermodus. Im Bereitschaftsmodus wird kein Signal
angezeigt.
9. Ersetzen Sie die Batterien, wenn das OLED anzeigt, dass der Batteriestrom schwach ist.
Wenn Sie den Finger in das Oximeter stecken, muss der Fingernagel nach oben zeigen.
Hinweis: Verwenden Sie medizinischen Alkohol zum Reinigen des Gummis vor jedem Test und
reinigen Sie den getesteten Finger vor und nach dem Test mit Alkohol. (Der Gummi im Inneren
des Oximeters ist ein medizinischer Gummi, der giftfrei und unschädlich ist und keine
Nebenwirkungen, wie zum Beispiel Allergien, auf der Haut verursacht.)
Beschreibung der Tastenfunktionen: Im Bereitschaftsmodus wird das Instrument mit der
Starttaste in den Betriebszustand versetzt. Wird diese Taste im Betriebszustand gedrückt, kann
der Anzeigemodus geändert werden.
1. Drücken Sie die Einschalttaste länger als 3 Sekunden, um auf die „Einstellungs“-Seite zu
gelangen (siehe Abbildung 1).Drücken Sie die Einschalttaste erneut (weniger als 1 Sekunde),
um den Modus nach unten zu scrollen, den Sie einstellen wollen.Das Signal „*“ bewegt sich
jedes Mal, wenn Sie die Einschalttaste drücken. Drücken Sie die Einschalttaste länger als 3
Sekunden, um die Einstellung zu beginnen.
2. Bewegen Sie das Signal „*“ auf die „Alarm-Einstellungen".Drücken Sie die Einschalttaste länger
als 3 Sekunden, um zur zweiten Seite der „Einstellungen“ zu gelangen (siehe Abbildung2).
Gehen Sie nun in der gleichen Weise vor wie in Abbildung 1. „Hi“ bedeutet höher, „Lo“ bedeutet
weniger.
1. Um das Batteriefach auf der Rückseite zu öffnen, drücken Sie die weiße Taste und schieben
Sie den Deckel in Pfeilrichtung.
2. Setzen Sie zwei AAA-Batterien ins Batteriefach ein. Achten Sie auf die Plus (+)- und Minus
(-)-Zeichen im Batteriefach. Wenn die Polaritäten nicht übereinstimmen, so kann das
Oximeter beschädigt werden.
3. Verschieben Sie den Batteriefachdeckel horizontal entlang der im Bild gezeigten
Pfeilrichtung.
Nehmen Sie die Batterien heraus, wenn das Pulsoximeter lange Zeit nicht benutzt wird.
Ersetzen Sie die Batterien, wenn die Energieanzeige zu flackern beginnt.
1.Fädeln Sie das dünnere Ende der Schlaufe durch das Aufhängeloch.
2.Fädeln Sie das dickere Ende durch das dünnere Ende, bevor Sie es festziehen.
1. Halten Sie das Oximeter von Kindern fern. Kleinteile wie Batteriefachdeckel, Batterie und
Trageschlaufe können verschluckt werden!
2. Achten Sie darauf, dass sich die Trageschlaufe nicht mit den elektrischen Drähten des
Gerätes verheddert.
3. Beachten Sie, dass die an dem Oximeter befestigte Trageschlaufe bei übermäßiger Länge
Strangulierungsgefahr birgt.
Questo pulsossimetro digitale è un dispositivo medico innovativo non invasivo, compatto,
pratico da utilizzare e trasportare con un basso consumo energetico. Si deve solo inserire la
punta del dito nel sensore dell’apparecchio, i valori SpO2 e la frequenza delle pulsazioni e
l’indice di perfusione compaiano sullo schermo in modo rapido e preciso.
I pulsossimetri da dito possono essere utilizzati per misurare la saturazione dell'emoglobina
umana e la frequenza del polso attraverso le dita e possono essere utilizzati in ospedali, case,
scuole e centri medici.
La saturazione dell’emoglobina indica in percentuale la quantità di ossiemoglobina (HbO2) nel
sangue, ossia la quantità totale di emoglobina in grado di legarsi all’ossigeno (Hb).
In altre parole, è la coerenza dell'ossiemoglobina nel sangue e si tratta di un parametro molto
importante per il sistema respiratorio. Molte malattie respiratorie possono portare a un
abbassamento della saturazione di ossigeno nel sangue umano. Inoltre, esistono molteplici
fattori che possono ridurre la saturazione di ossigeno: stordimento, astenia, vomito e possono
Abbildung 1 Abbildung 2
Settings
Alm Setup
Alm off
off
off
OK
3
Beep
Demo
Restore
Brightness
Exit
*
Settings
Spo2 Alm Hi
Sounds Setup
Spo2 Alm Lo
PR Alm Hi
PR Alm Lo
+/-
Exit
100
85
130
50
+
*
Wellenlänge
660±5nm
940±10nm
Strahlungsleistung
1.8mW
2.0mW
RED
IR
5. Wir empfehlen, das Produkt stets trocken zu halten. Eine
feuchte Umgebung könnte seine Lebensdauer verkürzen und es sogar beschädigen.
6.Entsorgen Sie die Batterien unbedingt gemäß den örtlichen Vorschriften.
1. Ein Lanyard
2. Eine Bedienungsanleitung
Anleitung und Herstellererklärung - elektromagnetische Emission
Emissionsprüfung
Beachtung
HF-Emissionen CISPR 11
Gruppe 1
1
2
3
4
Das Fingerspitzen-Pulsoximeter ist für die Verwendung in der unten angegebenen
elektromagnetischen Umgebung vorgesehen. Der Kunde oder der Benutzer des
Fingerspitzen-Pulsoximeters sollte sicherstellen, dass es in einer solchen Umgebung
verwendet wird.
HF-Emissionen CISPR 11 Klasse b
Oberschwingungsemissionen IEC 61000-3-2
N / A
Spannungsschwankungen / Flimmeremissionen IEC 61000-3-3
N/A
5
6
7
Mögliche Probleme und Behebung
Problem
Mögliche Ursache Lösung
SpO2 oder
PR kann
nicht normal
angezeigt
werden
1. Finger ist nicht richtig
eingesteckt
2. Der Oxyhämoglobinwert
des Patienten ist zu
gering für eine Messung
1. Stecken Sie den Finger erneut und
richtig hinein.
2. Versuchen Sie es mehrere Male. Wenn
Sie sicher sind, dass kein Problem mit
dem Gerät vorliegt, lassen Sie zeitnah
eine exakte Diagnose im Krankenhaus
erstellen.
SpO2 oder
PR wird
instabil
angezeigt
1. Der Finger ist
möglicherweise nicht tief
genug eingesteckt.
2. Der Finger zittert, oder
der Patient befindet sich
in Bewegung.
1. Stecken Sie den Finger erneut und
richtig hinein
2. Vermeiden Sie Bewegung.
Das Oximeter
kann nicht
eingeschaltet
werden
1. Zu wenig Strom oder
Strom aus.
2. Batterien möglicherweise
falsch eingelegt.
3. Das Oximeter könnte
beschädigt sein.
1. Wechseln Sie die Batterien.
2. Setzen Sie die Batterien richtig herum
ein.
3. Setzen Sie sich mit dem lokalen
Kundendienst in Verbindung.
Anzeigelampen
erlöschen
plötzlich
1. Das Produkt schaltet sich
automatisch aus, wenn 8
Sekunden lang kein
Signal detektiert wird.
2. Zu wenig Strom
1. Normal
2. Wechseln Sie die Batterien.
Symbole und Definitionen Wechseln der Batterien:
Hinweis:
Chargennummer
Unzulänglichkeit signalisieren一一
IP22
Erste Kennzahl 2:
Gegen das Eindringen fester
Fremdkörper: ≥ 12,5 mm
Durchmesser
Zweite Kennzahl 2
Gegen Wasser mit schädlichen
Auswirkungen: Tropfen (15º geneigt)
一一
① Anzeige von Sondenfehlern
(Leerlaufzustand oder
Schließkreiszustand)
② Anzeige von Sondenkabelfehlern
③Anzeige von
Sondenkabel-Extender-Fehlern
Zum Schutz der Umwelt leer
entsorgen Batterien an geeigneten
Sammelstellen entsprechend
nach nationalen oder lokalen
Vorschriften.
Dieses Gerät hat keine
Alarmfunktion
BF-Typ
Anwendungsteil
Ordnungsnummer
Temperaturbereich
Vermeiden Sie
Sonnenlicht
Auf in Richtung
Datum von
Herstellung
Hersteller
Vertreter der
Europäischen Union
Luftfeuchtigkeitsbereich
Bleib trocken
Produktzertifizierung
Referenz
Handbuch
Vorsichtsma
ßnahmen
95%
10%
-10℃
40℃
Verwenden der Trageschlaufe
Vorsicht!
Manuale Utente (Italian)
Ver.1.2
Pulsossimetro digitale
Ambito di applicazione / destinazione d'uso
Descrizione Generale
essere causa di pericolo.Pertanto, è molto importante per il medico conoscere la
saturazione di ossigeno del paziente in tempo reale. Il pulsossimetro è caratterizzato da piccole
dimensioni, basso consumo energetico, semplice funzionamento e portabilità. Per
eseguire la diagnosi è sufficiente che il paziente posizioni un dito malfunzionamento della
regolazione automatica organica causata da anestesia, traumi post-operatori importanti, disagi
causati da particolari esami medici. Tali situazioni possono causare a sua scelta sopra il sensore
fotoelettrico all’interno. Il valore misurato visualizzato sullo schermo indica il livello di
saturazione dell’emoglobina. Studi clinici ne hanno attestato l’elevata precisione e ripetibilità.
Il principio di funzionamento dell’ossimetro è l’utilizzo di una formula matematica che si
avvale della legge di Lambert Beer secondo le caratteristiche di assorbimento dello spettro di
emoglobina ridotta e dell'ossiemoglobina (HbO2) in luce e in prossimità di zone a infrarossi. Il
principio di funzionamento dello strumento è la Tecnologia di Ispezione Fotoelettrica
dell’Ossiemoglobina, adottata in conformità alla scansione pulsata capacitiva e alla tecnologia di
registrazione, in modo che due fasci di luce di diversa lunghezza d'onda (660 nm e 940 nm)
possono essere focalizzati sul dito attraverso un apposito sensore. Un segnale misurabile è
quindi ottenuto da un elemento fotosensibile, e verrà visualizzato sul display dell’ossimetro.
1. Tipo di protezione contro shock elettrici: Dispositivo ad alimentazione interna.Tipo di
protezione con alimentazione interna.
2. Grado di protezione contro shock elettrici: Apparecchio di tipo BF. ClasseⅡ
3. Grado di protezione contro ingresso accidentale di liquidi:Apparecchio senza protezione
contro ingresso accidentale di liquidi. Apparliquidi.
1. Un cordino
2. Un manuale utente
1. Sostituire le batterie nel caso il display visualizzi l’icona di batteria scarica.
2. Pulire la superficie interna dell’ossimetro prima di ogni utilizzo.
3. Rimuovere le batterie se si prevede di non utilizzare il saturimetro per lungo tempo.
Rimuovere le batterie se si p saturimetro per lungo tempo.
4. Conservare il prodotto in un luogo con temperatura ambiente tra -10°C e +40°C e umidità
relativa inferiore al 10%~95%.
5. Si raccomanda di conservare il dispositivo in luogo asciutto. Un ambiente umido potrebbe
danneggiare il prodotto. Prodotto soggetto a Direttiva RAEE. ambiente umido potrebbe
danneggi
6. Prodotto soggetto a Direttiva RAEE.
1. Emettitore luce rossa e infrarossa
2. Ricevitore luce rossa e infrarossa
Display OLED:
Modalità di visualizzazione display OLED:
Tasto Avvio/Mode
Funzione chiave: Accendere/Spegnere la macchina;
Cambiare direzione/visualizzazione display durante il funzionamento.
Immagine 1 Immagine 2
Settings
Alm Setup
Alm off
off
off
OK
3
Beep
Demo
Restore
Brightness
Exit
*
Settings
Spo2 Alm Hi
Sounds Setup
Spo2 Alm Lo
PR Alm Hi
PR Alm Lo
+/-
Exit
100
85
130
50
+
*
Sotto il 70% nessun requisito;
Risoluzione: 1%
3. PR range Campo di misura : 30 BPM ~ 254 BPM
Precisione : ≤100BPM ,±1BPM;>100BPM ,±2BPM
4. Parametri della sonda LED
Questo parametro può essere particolarmente utile per i medici.
5. Indice PI : ambito di misurazione : 0 ~ 20 (opzionale)
6. Alimentare : due batterie alcaline AAA da 1,5 V.
6. Alimentare : due batterie alcaline AAA da 1,5 V.
7. Standby automatico : il prodotto si spegne da solo quando non sono presenti dita nel
prodotto per circa 8 secondi
8. Avvio automatico: ogni strumento da 5 secondi rileverà automaticamente il segnale, dopo il
buco con il dito, l'avvio automatico tempestivo; (opzionale)
9. Funzione accelerometro: movimento delle dita, la visualizzazione dello schermo cambierà
con le modifiche dell'accelerometro (opzionale)
10.Dimensioni : 58mm × 36mm × 33mm
11.Ambiente operativo:
temperatura: 5 ℃ ~ 40 ℃
Umidità: 15% ~ 80%
Pressione atmosferica: 70kPa ~ 106kPa
Trasporto, ambiente di stoccaggio:
Temperatura: -10 ℃ ~ 40 ℃
Umidità: 10%~95%
Pressione atmosferica: 70kPa ~ 106kPa, gas non corrosivo e ambiente ben ventilato.
12.Dichiarazione : La compatibilità elettromagnetica di questo
prodotto è conforme allo standard IEC60601-1-2.
According to French Decree No. 2014-1577,The symbol indicates recycling by category.
Grüner Punkt Recycling
Stand-By
Selon le décret français n° 2014-1577,Le symbole indique le recyclage par catégorie.
Stand-By
Grüner Punkt Recycling
Gemäß dem französischen Dekret Nr. 2014-1577
Das Symbol zeigt die Entsorgung nach Abfallarten an.
Stand-By
Grüner Punkt Recycling
1 2 3 4
76 8 9 10
1312 14 15 16
1918 20 21 22
2524 26 27 28
3130 32 33 34
3736 38 39 40
5
11
17
23
29
35
41
4342 44 45 46 47