20.11.2015 Specifications are subject to change for improvement without prior notice.
Replacing/Adjusting the Knife
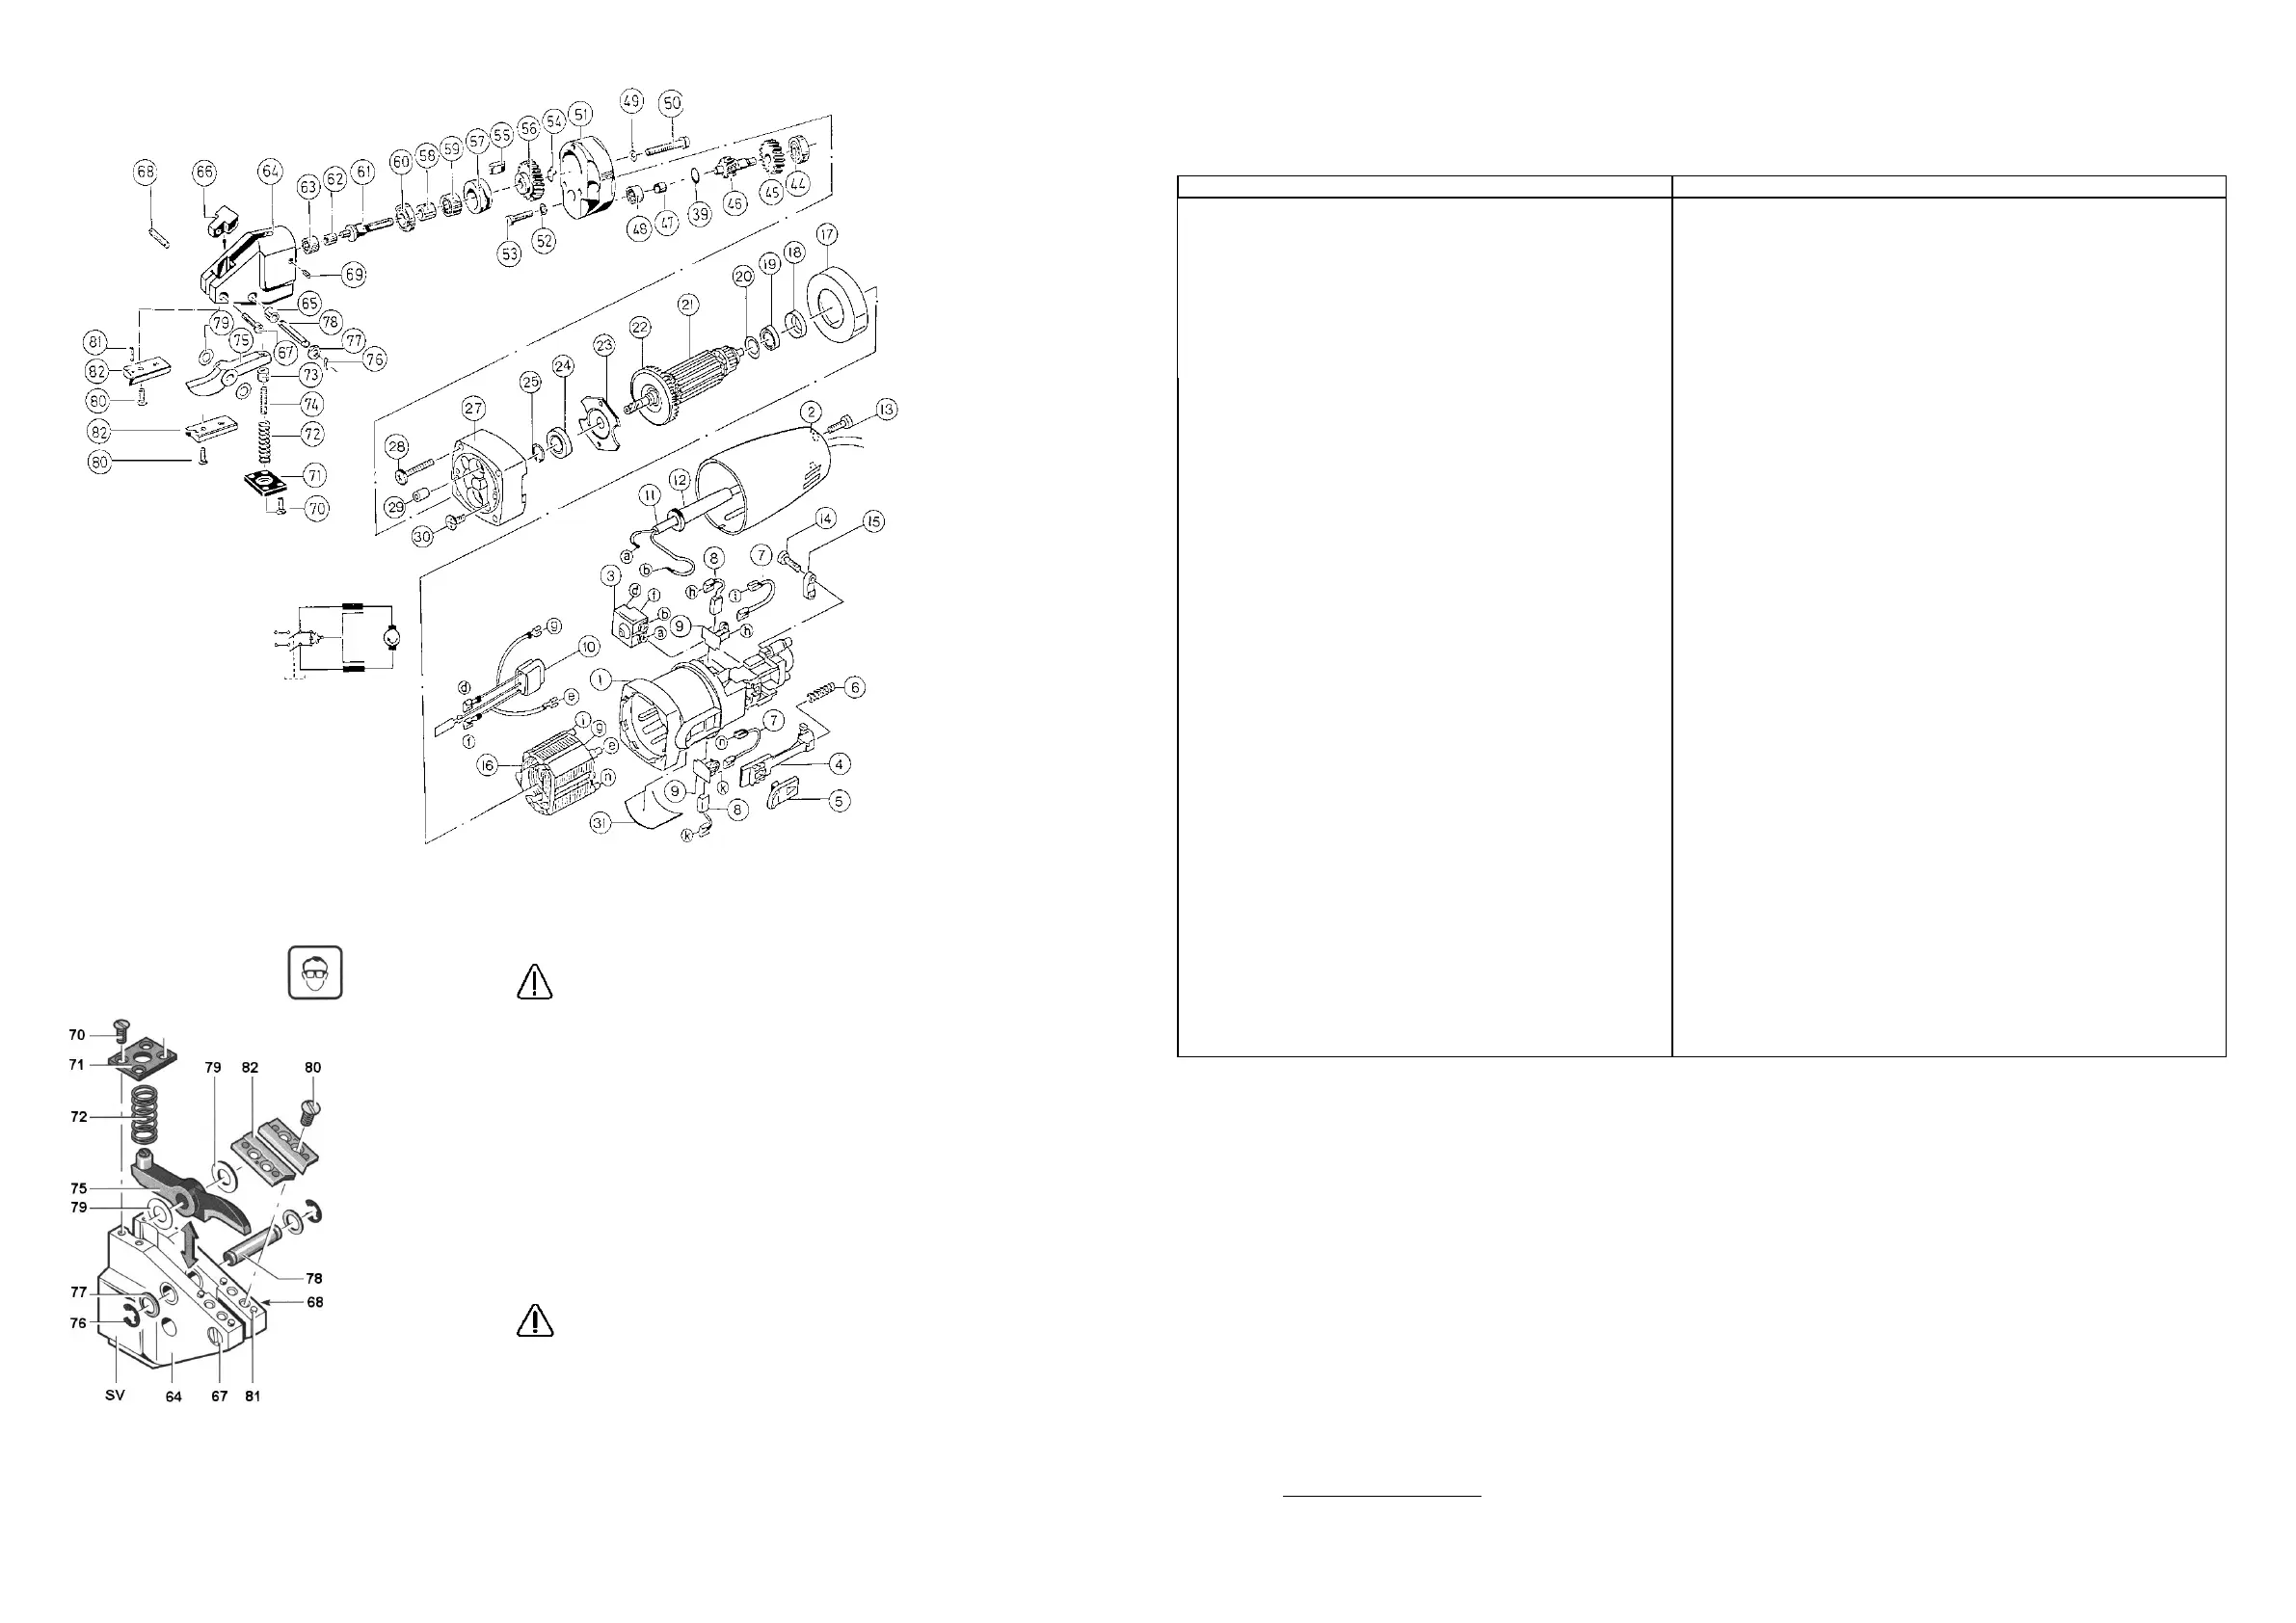
Before working on machine disconnect from power
supply by removing plug from socket.
Wear protective glasses!
Replacing the Knife
Clamp the machine in a vice on the clamping surfaces
SV between aluminium protective jaws.
Unscrew the screws 70 and remove the spring plate 71.
Remove the spring 72. Remove the Cotter Pin 76 and the Washer
77. Push back the knife pin 78.
Do NOT interchange the Spacing Shims 79: the wrong spacing
could ruin the jaws and knife.
Insert a new knife with the old spacing Shims 79. Insert the knife pin
8. Mount the washer 77 and the Cotter Pin 76.
Insert the spring 72. Reassemble spring plate 71.
Replacing the Jaws
Loosen the screws 80 and remove the jaws 82. Press out the
positioning pins 81. Mount new jaws and positioning pins. Tighten
the screws 80.
Adjusting the knife Clearance
For clearance between knife and jaws that is too large, loosen the
fillister head screw 67. Adjust the clearance with the setscrew 68.
Retighten the fillister head screw 67.
The knife must not rub on the jaws: Danger of breakage.
Note: If heavy burring is produced while cutting, repeat the
adjustment.
Sharpening the Knife/Jaws
The Knife and the Jaws must be sharpened and adjusted at the
same time. This work should be performed by an authorised
DRÄCO customer service location. Send in the complete machine
for this purpose.
Spare part List DRÄCO Radius Seam Metal Shear 3514-7R
Shear Head 3514-7R cpl. assembl.
Drive Shaft cpl. Pos. 54-62
Pinion with Gear cpl. Pos. 39, 44-47
Gear Case Cover Pos. 48-53
Cover for Needle Bearing Pos. 57+59
Eccentric Shaft assembled Pos. 54+55,60-62
Head Casting Pos. 63-65+69
Spring Cover Plate Pos. 70-72
Knife Adjust Screw with Locking
Knife-pin set BG12400+BG35145
Set of Jaws 3514-7R Pos. 80-82
Max Draenert GmbH & Co.KG
Electric - Cordless - Pneumatic Tools - Machines
Germany
Production Shears
K-Series
http://www.dracotools.com
20.11.2015 Specifications are subject to change for improvement without prior notice.
Replacing/Adjusting the Knife
Before working on machine disconnect from power
supply by removing plug from socket.
Wear protective glasses!
Replacing the Knife
Clamp the machine in a vice on the clamping surfaces
SV between aluminium protective jaws.
Unscrew the screws 70 and remove the spring plate 71.
Remove the spring 72. Remove the Cotter Pin 76 and the Washer
77. Push back the knife pin 78.
Do NOT interchange the Spacing Shims 79: the wrong spacing
could ruin the jaws and knife.
Insert a new knife with the old spacing Shims 79. Insert the knife pin
8. Mount the washer 77 and the Cotter Pin 76.
Insert the spring 72. Reassemble spring plate 71.
Replacing the Jaws
Loosen the screws 80 and remove the jaws 82. Press out the
positioning pins 81. Mount new jaws and positioning pins. Tighten
the screws 80.
Adjusting the knife Clearance
For clearance between knife and jaws that is too large, loosen the
fillister head screw 67. Adjust the clearance with the setscrew 68.
Retighten the fillister head screw 67.
The knife must not rub on the jaws: Danger of breakage.
Note: If heavy burring is produced while cutting, repeat the
adjustment.
Sharpening the Knife/Jaws
The Knife and the Jaws must be sharpened and adjusted at the
same time. This work should be performed by an authorised
DRÄCO customer service location. Send in the complete machine
for this purpose.
Spare part List DRÄCO Radius Seam Metal Shear 3514-7R
Shear Head 3514-7R cpl. assembl.
Drive Shaft cpl. Pos. 54-62
Pinion with Gear cpl. Pos. 39, 44-47
Gear Case Cover Pos. 48-53
Cover for Needle Bearing Pos. 57+59
Eccentric Shaft assembled Pos. 54+55,60-62
Head Casting Pos. 63-65+69
Spring Cover Plate Pos. 70-72
Knife Adjust Screw with Locking
Knife-pin set BG12400+BG35145
Set of Jaws 3514-7R Pos. 80-82
Max Draenert GmbH & Co.KG
Electric - Cordless - Pneumatic Tools - Machines
Germany
Production Shears
K-Series
http://www.dracotools.com
 Loading...