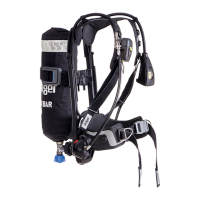
PSS 7000 Series with Sentinel 7000
Self-contained breathing apparatus with electronic monitoring system
Instructions for Use
3367122 (A3-D-P) Page 4 of 5
5. Press and release the right button (Fig B) of the user interface to check
that the uploaded data is correct. The user details scroll from right to
left across the screen (Fig AA). Repeat the procedure if the information
is incomplete or inaccurate.
6. If necessary, switch off by pressing and holding the left and right
buttons of the user interface (Fig B) until the display clears, then
immediately release the buttons.
Further options for personal identity information and more scrolling options
are available using Dräger PC Link. Contact Dräger for full details.
5 Troubleshooting
The troubleshooting guide shows fault diagnosis and repair information
applicable to breathing apparatus users. Further troubleshooting and
repair information is available in instructions for use supplied with
associated equipment.
Where the troubleshooting guide shows more than one fault or remedy,
carry out repair actions in the order that they appear in the table.
Contact service personnel or Dräger when the remedy information
indicates a service task, or if the symptom remains after all remedy actions
have been attempted.
6 Maintenance
6.1 Maintenance table
Service and test the breathing apparatus, including out-of-use apparatus,
in accordance with the maintenance table. Record all service details and
testing. Refer also to the instructions for use for the lung demand valve,
face mask, and other associated equipment.
Additional inspection and testing may be required in the country of use to
ensure compliance with national regulations.
Symptom Fault Remedy
Face mask air leak Lung demand valve O-ring
leaking
Replace or lubricate O-ring
Head straps not tight Tighten
Exhalation valve leaking Service task
Speech diaphragm
defective
Service task
Unsatisfactory
communication
Speech diaphragm
defective
Service task
High-pressure air leak or
failed leak test
Loose or dirty connector Disconnect, clean, and
reconnect couplings, and
retest
Faulty hose or component Substitute user
replaceable accessories
and retest
Air leak from medium-
pressure hose connection
at the first-stage regulator
(excess flow valve)
Faulty O-ring, retainer,
spring, or first-stage
regulator
Service task
Air leak from lung demand
valve
Ice particles on sealing
elements
Press the front button
(Fig J, Item 2), allow a rush
of air to pass through the
valve, then quickly press
the reset button (Fig J,
Item 1) to switch off the
positive pressure.
Air leak from quick connect
coupling
Ice particles on sealing
elements
Disconnect then reconnect
the cylinder to the
breathing apparatus (see
the quick connect coupling
instructions for use) and
retest.
Lung demand valve
allowing constant air flow
into the face mask
Bypass button engaged Turn off the bypass button
(Fig J, Item 3)
Internal fault Service task
High or low medium-
pressure
First-stage regulator fault Service task
Poor sounding whistle Whistle dirty Clean whistle flute and
retest
Whistle not functioning
correctly
Activation mechanism fault Service task
Low battery indication on
the user interface (Fig N)
Low main battery Replace the main battery
Fault code indication on
the user interface (Fig Y)
Sentinel 7000 failure Service task
Unable to switch
Sentinel 7000 on
Low main battery Replace the main battery
Low cylinder pressure Recharge cylinder to
maximum working
pressure
Unknown Service task
HUD green/yellow LED
flashing green
Low HUD battery Replace the HUD battery
HUD green/yellow LED
flashing yellow
Low main battery Replace the main battery
HUD will not log on to the
Sentinel 7000
HUD out of range More the HUD to within
three feet (approximately
900 mm) of the pressure
module
Low HUD battery Replace the HUD battery
Low cylinder pressure Recharge the cylinder to
maximum working
pressure
Battery pack sliding locks
not moving to the locked
position
Dirty, damaged, or faulty
components
Attempt remedy actions in
this order:
1. Push down firmly on the
battery pack
2. Remove and clean the
battery pack and backplate
recess and retry
3. Replace the battery
pack and retry
4. Contact Dräger
Component/
system
Task
After
use
Every
month
Every
year
Complete
apparatus
Clean and disinfect (see Section 6.2) O
Visual inspection (see Section 4.6.1) O O
Functional testing (see Section 4.6.5) O O
Breathing cycle and static tests (see
Note 1)
O
6.2 Cleaning and disinfecting
CAUTION
Trapped water and ice inside the pneumatic system (such as the lung
demand valve) may impair the operation of the breathing apparatus.
► Prevent any liquid from entering the pneumatic system, and
thoroughly dry the breathing apparatus after cleaning and disinfecting.
NOTICE
Cleaning agents and disinfectants listed in this section are not
manufactured by Dräger and have been reviewed only for compatibility
when used to clean or disinfect the subject Dräger products.
► Read and comply with all safety precautions provided by the
manufacturers of such agents and disinfectants.
Using cleaning and disinfecting methods not described in this section may
damage the equipment.
► Do not exceed 86 °F (30 °C) for washing, disinfecting, and rinsing
solutions.
► Do not exceed 140 °F (60 °C) for drying, and remove components
from the drying facility immediately when dry. Drying time in a heated
dryer must not exceed 30 minutes.
► Do not immerse pneumatic or electronic components in cleaning
solutions or water.
Refer also to the instructions for use for the lung demand valve, face mask,
and other associated equipment.
6.2.1 Manual cleaning of the breathing apparatus (USA)
Cleaning and disinfecting materials:
● Cleaning agent – 1008 Green Liquid Hand Dish Wash.
● Disinfecting agent – 800 Spur-Tex
®
Disinfectant Cleaner-Deodorant
(concentration: 1.6 % (2 fl oz per gallon)).
● Use only clean lint-free cloths.
1. Prepare cleaning solution as per manufacturer’s instructions. Clean
the breathing apparatus manually using a cloth moistened with
cleaning solution to remove excess dirt.
2. Prepare disinfecting solution as per manufacturer’s instructions. Apply
to all internal and external surfaces, ensuring that all surfaces remain
visibly wet for 15 minutes.
3. Rinse all components thoroughly with clean water to remove all
cleaning and disinfecting agents.
4. Dry all components using a dry cloth, in a heated dryer or in air.
5. Contact service personnel or Dräger if disassembly of the pneumatic
system or electronic components is required.
6.2.2 Manual cleaning of the breathing apparatus (Canada)
Cleaning and disinfecting materials:
● Cleaning agent – mild soap solution.
● Disinfecting agent – Neutral Disinfectant Cleaner (concentration:
0.5 % (0.5 fl oz per gallon or 15 mL per 3.785 liters)).
● Use only clean lint-free cloths.
1. Prepare cleaning solution as per manufacturer’s instructions. Clean
the breathing apparatus manually using a cloth moistened with
cleaning solution to remove excess dirt.
2. Prepare disinfecting solution as per manufacturer’s instructions. Apply
to all internal and external surfaces, ensuring that all surfaces remain
visibly wet for 10 minutes.
3. Rinse all components thoroughly with clean water to remove all
cleaning and disinfecting agents.
4. Dry all components using a dry cloth, in a heated dryer or in air.
5. Contact service personnel or Dräger if disassembly of the pneumatic
system or electronic components is required.
6.2.3 Carrying harness – Thorough cleaning
NOTICE
Untrained personnel are not permitted to disassemble the breathing
apparatus as they could inadvertently damage the equipment.
► Thorough cleaning may only be carried out by suitably trained
personnel.
Lung demand
valve
Clean and disinfect (see Note 2 and
Section 6.2)
O
Backup
battery
Replace O
First-stage
regulator
Medium-pressure check (see Note 1) O
Inspect the high-pressure O-ring (see
Note 1 and Note 3)
O
Cylinder Charge cylinder to correct working
pressure
O
Check charged pressure (stored
cylinders only)
O
Check test date of cylinder (carbon
composite cylinders over 15 years old
must be retired)
O
Recertification According to national
regulations in the country of
use
Cylinder valve Overhaul At the time of cylinder
recertification
Notes
O Dräger recommendations
1 These maintenance tasks may only be carried out by Dräger or trained
service personnel. Details of the tests are contained in the Technical
Manual which is issued to service personnel that have attended a
relevant Dräger maintenance course.
2 Lightly lubricate the O-ring of the lung demand valve as required
(recommended lubricant is Dow Corning
®
Molykote
®
111). Products
other than the recommended lubricant are not tested and may damage
the equipment.
3 Replace the high-pressure connector O-ring if it is found to leak during
functional testing or if the O-ring is visibly damaged.
Component/
system
Task
After
use
Every
month
Every
year
1. Remove the harness from the carrying system and clean using one of
the following methods:
a. Clean manually in a bath containing recommended cleaning or
disinfecting agents.
b. Machine wash (at 86 °F (30 °C)) using a proprietary brand
washing solution (do not use biological washing powder).
2. Rinse the harness thoroughly with clean water to remove all cleaning
and disinfecting agents.
3. Dry all components including internal parts.
6.3 Maintenance work
6.3.1 Compressed air cylinder charging
WARNING
Air quality for compressed air cylinders must conform to the minimum
grade requirements for Type 1 gaseous air as defined in the CGA
Commodity Specification for Air, G-7.1 (Grade D or higher quality) and,
where appropriate, be in accordance with: NFPA 1989 Standard on
Breathing Air Quality for Emergency Services Respiratory Protection.
► Ensure that the air supply meets these requirements.
Refer to the instructions supplied with the cylinder and the charging
apparatus for recharging a compressed air cylinder.
7 Transport
Transport the product in its original packaging.
8 Storage
8.1 Storage preparation
● Extend the shoulder harness, waist belt, and the straps of the face
mask.
● For storage, place the face mask in a protective bag (contact Dräger
for supply of a suitable bag).
● Route pneumatic hoses in such a way that the bend radius is not too
acute and the hose is not stretched, compressed, or twisted.
● With the system switched off, a small amount of battery power is
consumed. If the system is not to be used for a long period, remove the
batteries (see Section 4.6.3).
8.2 Storage conditions
● Store the equipment between 5 °F to 77 °F (-15 °C to +25 °C). Ensure
that the environment is dry, free from dust and dirt, and does not
subject the equipment to wear or damage due to abrasion. Do not
store the equipment in direct sunlight.
● Fix the breathing apparatus securely to any raised mounting point to
prevent it from falling.
● If storing the equipment in a vehicle, ensure that the breathing
apparatus is securely retained and does not interfere with the
operation of the vehicle.
9 Disposal
Dispose of the product in accordance with the applicable rules and
regulations.
9.1 Service life
● All components are designed to last the lifetime of the equipment if
they are regularly inspected and maintained as described in
Section 6.1.
● Retire equipment in accordance with NFPA 1852 if it can no longer be
repaired to a fully serviceable condition.
● Carbon composite cylinders over 15 years old must be retired.
10 Technical data
Compressed air cylinders:
● 30 minutes to 60 minutes capacity.
● 2216 psi or 4500 psi pressure.
● Composite materials.
Cylinder high-pressure connectors:
● 2216 psi connector to CGA 346.
● 4500 psi connector to CGA 347.
● Quick connect coupling (2216 psi or 4500 psi).
Power supplies:
● Main battery: 7.5 V.
● Backup battery: 3 V.
● Head-up display battery: 3 V.
RIC UAC Connector:
● 2216 psi or 4500 psi, male, quick coupling with relief valve.
Lung demand valve to face mask connector:
● Dräger push-in connector.
EOSTI Alarms – Activation commencement range (mechanical and
electronic):
● 2216 psi cylinder: 819 psi to 732 psi.
● 4500 psi cylinder: 1665 psi to 1485 psi.
 Loading...