45
Replacing the Sensors
Replacing the Sensors
● Switch off the device: keep the key and
the key depressed at the same time.
● Loosen the screw (2.5 mm hexagon
socket) on the power pack and remove
the power pack.
● Loosen the 4 screws (1.5 mm hexagon
socket) on the rear panel of the device.
● Remove the upper half of the housing.
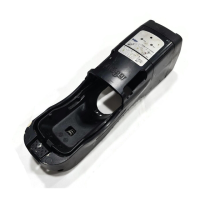
Position of the sensors:
1 DrägerSensor CatEx 125 – 68 11 050
2 DrägerSensor XXS O
2
– 68 10 881
(blue marking)
3 DrägerSensor XXS H
2
S – 68 10 883
(yellow marking)
4 DrägerSensor XXS CO – 68 10 882
(gray marking)
● Remove the sensor to be replaced from
the sensor receptacle – in the case of the
DrägerSensor CatEx 125, disconnect the
flat cable connection before.
● Insert the new sensor into the sensor
receptacle.
● Insert the flat cable connection of the
DrägerSensor CatEx 125 into the plug-in
connector on the board.
● Check that the sensors are positioned
correctly and make adjustments if
necessary.
● Attach the upper half of the housing and
tighten the 4 screws on the rear panel.
● Insert the power pack into the device and
tighten the screw.
● Switch on the device –
Allow the sensors to warm up completely
(max. 15 minutes).
ATTENTION: The position of the sensors
must not be swapped! If the position is
swapped, it can result in damage to the
sensors.
01123854_01.eps
0
OK
on
M
01923854_01.eps
0
2
1
3
4
 Loading...