Recommend product
on Amazon:
DROK Buck Converter
Any questions please contact
us through Amazon:
Function description:
1). “SELECT” button: short press --- switch displaying
voltage/current/power/display all parameters in turns;
long press --- enter or exit calibration mode.
2). “ON/OFF” button: short press --- turn on/off output;
long press --- set output default on/off after power on,
long press for 3s and release, if displays ON, it means
output defaulted on after power on, if displays OFF, it
means output defaulted off after power on.
12. Dimension: 84.5x35x19mm
10. Anti reverse irrigation protection: Yes. Can be used to
charge the battery directly without adding a diode.
11. Short-circuit protection: Yes
9. Working current: 30mA
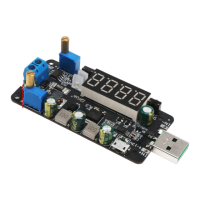
1. Buttons
2. Potentiometers
1).Input: 3 kinds of input method -- USB male input, micro USB
input, solder terminal input.
2).Output: 2P blue terminal output.
1). Current potentiometer CC: rotate clockwise can increase
limited current value. When load current reaches the limited
current, it will enter constant current status.
Note:
It doesn’t mean that the current can always be increased by
rotating the potentiometer. When at constant voltage status,
the output current depends on the load and varies according
to the load.
Max output current (constant current value) setting
method:
switch to display current, make a short circuit on output and
rotate the CC potentiometer, the current value displayed is
the max output current value.
2). Voltage potentiometer CV: rotate clockwise can increase
output voltage.
3. Indicators
1).CC: Constant current indicator. Red. Lights on when at
constant current status.
2).ON: Output status indicator. Green.
4. Input & output terminal
Accuracy Adjustment Method:
1. Output voltage adjustment:
When the screen displays voltage value, long press “SELECT”
button for 3s and release, the display will flash.
Short press “SELECT” or “ON/OFF” button, the voltage value
will increase/decrease by one unit.
When output voltage is low, it may need press for several times
to make the value change by 0.1V.
Long press “SELECT” button for more than 3s, it will exit
adjustment mode.
2. Output current adjustment:
When the screen displays current value, long press “SELECT”
button for 3s and release, the display will flash.
Short press “SELECT” or “ON/OFF” button, the current value
will increase/decrease by one unit.
When output current is low, it may need press for several times
to make the value change by 0.01A.
Long press “SELECT” button for more than 3s, it will exit
adjustment mode.
Note:
It is more accurate to make the adjustment when current is
higher than 1A; When output current < 0.05A, the display
error will be large; when output current < 10-40mA, it may
fail to display.
 Loading...