20
Warning notices
• Warning: The cutting mechanism will continue to spin after the motor
has been switched off.
• Keep the extension cables away from the cutting mechanisms.
Assembly
Remove the tool from the packaging. Do not plug it into the electrical grid before
assembly. This also applies when making any adjustments.
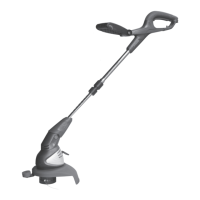
Assembling the Lawn Trimmer
• Put the protective cover (7) onto the motor head (12) and attach with the enclosed
screws (Fig. 1).
• First attach the screws shown in (Fig. 1) and subsequently the other two screws
connected with the edge guide can be attached (Fig. 2).
• The handle is mounted as illustrated in (Fig. 3).
Replacement parts for the E-Flor RT 550
Spare string cartridge: Product no. 1198693
Switching it on/o
To turn on the device, press the ON/OFF switch (2). To switch off the device, let go of the
ON/ OFF switch (2).
Adjusting the trimmer string
The lawn trimmer has a partially automatic string lengthening system.
The trimmer string is adjusted automatically by means of centrifugal force and the spring
action.
Replacing the Trimmer Line
If you must replace the line spool or wind a new line, pull the power plug out of the
electrical outlet and proceed as follows:
Press the locking device in sideways on the cap of the hub (Fig. 4). Remove the cap of the
hub from the drive shaft. Remove the line spool from the drive shaft and either replace
this with a new line spool or wind new line onto the spool.
Thread approximately 110 mm of cutting line from one end of the spool through the hole
of the hub cap and approximately 150 mm of the cutting line through the hole located
across from it. Put the spool back on again and make sure that the line is not jammed.
Slide the cap of the hub onto the drive shaft until the locking device locks into place.
1183809 E-Flor RT 550.indd 20 10.10.12 08:42