I.B. 32-255-1G
Page 39
Effective 12/02
CAN RESULT FROM CONTACT WITH ENERGIZED
EQUIPMENT. ALWAYS VERIFY THAT NO VOLTAGE
IS PRESENT BEFORE PROCEEDING WITH THE
TASK, AND ALWAYS FOLLOW GENERALLY
ACCEPTED SAFETY PROCEDURES.
Safety Precautions: Read and understand these
instructions before attempting any maintenance, repair
or testing on the breaker. The user is cautioned to
observe all recommendations, warnings and cautions
relating to the safety of personnel and equipment.
The recommendations and information contained herein
are based on Cutler-Hammer experience and judgment,
but should not be considered to be all-inclusive or cov-
ering every application or circumstance which may
arise. If further information is required, you should
consult Cutler-Hammer.
Testing Procedures: Assuming that the breaker is
safely pulled out to the Test/Disconnect position in the
enclosure or placed on the workbench, follow this proce-
dure to perform the CloSure
TM
Test. For further instruc-
tions on disconnecting the circuit breaker consult
Section 4 of this manual. If the enclosure is equipped
with the MOC operating in the test position also, make
certain that the MOC is connected to operate.
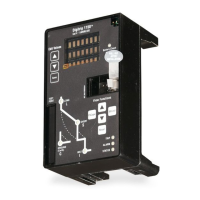
Step 1 -
On the front cover identify the status indicators.
MAKE SURE THE CLOSING SPRING STATUS INDI-
CATES
“Discharged”
AND THE MAIN CONTACT
INDICATOR SHOWS
“Open”
(Figure 6-5).
Step 2 -
Remove the circuit breaker front cover. Be sure
to save the original fasteners for reassembly.
Step 3 -
Cut a piece of one inch wide drafting/masking
tape approximately 8 to 10 inches long.
Step 4 -
Place the tape around the cam starting from the
bottom up. Make certain that the tape adheres well to
the cam surface. (See Figures 6-6, 6-7 and 6-8).
Figure 6-6 Starting Tape at Bottom of Cam
Figure 6-9 Attaching CloSure
TM
Test Tool at Hole “A”
Figure 6-8 Attaching Tape Around to Back of Cam
Figure 6-7 Wrapping Tape Up Around Cam
A
 Loading...