TD03309002E For more information visit:
www.EatonElectrical.com
Technical Data
Effective: January 2005 Page
3
Storage, Handling,
Installation and
Maintenance of Controllers
Cleaning
Soot, smoke, or stained areas (other
than inside arc chutes), or other
unusual deposits, should be investi-
gated and the source determined
before cleaning is undertaken. Vacuum
or wipe clean all exposed surfaces of
the control component and the inside
of its enclosure. Equipment may be
vacuumed or blown clean with com-
pressed air that is dry and free from
oil. (Be alert to built-in oilers in factory
compressed air lines!) If air blowing
techniques are used, remove arc cov-
ers from contactors and seal openings
to control circuit contacts that are
present. It is essential that the foreign
debris be removed from the control
enclosure, not merely rearranged. Be
careful not to force debris into other
components such as circuit breakers.
Control equipment should be clean
and dry. Remove dust and dirt inside
and outside the cabinet without using
liquid cleaner. Remove foreign mate-
rial from the outside top and inside
bottom of the enclosure, including
hardware and debris, so that future
examination will reveal any parts that
have fallen off or dropped onto the
equipment. If there are liquids spread
inside, determine the source and cor-
rect by sealing conduit, adding space
heaters, or other action as applicable.
It is advised that proper personal pro-
tection equipment be used while
cleaning.
Mechanical checks
Tighten all electrical connections. Look
for signs of overheated joints, charred
insulation, discolored terminals, etc.
Mechanically clean to a bright finish
(don’t use emery paper) or replace
those terminations that have become
discolored. Determine the cause of the
loose joint and correct. Be particularly
careful with aluminum wire connec-
tions. Aluminum wire is best termi-
nated with a crimp type lug that is
attached to the control component.
When screw type lugs (marked CU/AL)
are used with aluminum wire, joints
should be checked for tightness every
200 operations of the device.
Wires and cables should be examined
to eliminate any chafing against metal
edges caused by vibration, that could
progress to an insulation failure. Any
temporary wiring should be removed,
or permanently secured and diagrams
marked accordingly.
The intended movement of mechani-
cal parts, such as the armature and
contacts of electromechanical contac-
tors, and mechanical interlocks should
be checked for freedom of motion and
functional operation.
Wrap-Up
Check all indicating lamps, mechanical
flags, doors, latches, and similar auxil-
iaries and repair, if required.
Log changes and observations into
record book before returning equip-
ment into service. Do not remove any
labels or nameplates. Restore any that
are damaged.
Contact Wear and Replacement
Contactors are subject to both mechani-
cal and electrical wear during their
operation. In most cases mechanical
wear is insignificant. The erosion of
the contacts is due to electrical wear.
During arcing, material from each
contact is vaporized and blown away
from the useful contacting surface.
A critical examination of the appear-
ance of the contact surfaces and a
measurement of the remaining contact
overtravel will give the user the infor-
mation required to get the maximum
contact life.
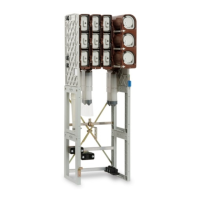
Figure 1. Example Contact Configuration
Cover Screws
Contacts
Cover Screws Contacts
 Loading...