26 Analog input module XN-322-10AI-TEKT
26.1 Pin assignment and status LEDs
XN300 slice modules 02/24 MN050002EN Eaton.com 190
26.1 Pin assignment and status LEDs
Table 11 Status LED table
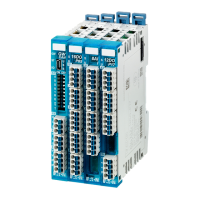
a X1
– 1+ analog input 1+
– 1- analog input 1-
– 2+ analog input 2
– 2- analog input 2-
b X2
– 3+ analog input 3+
– 3- analog input 3-
– 4+ analog input 4+
– 4- analog input 4-
c X3
– 5+ analog input 5+
– 5- analog input 5-
– 6+ analog input 6+
– 6- analog input 6-
d X4
– 7+ analog input 7+
– 7- analog input 7-
– 8+ analog input 8+
– 8- analog input 8-
e X5
– K+ analog input KTY 1+
– K- analog input GND
– K+ analog input KTY 2+
– K- analog input GND
f Module status LED
g User LED
Figure 105: LED signals and pin assignment
Module status
Green ON System OK
OFF No power
FLASHES (5 Hz) No communications
User yellow ON The user can set the LED signals as necessary.
(For example, the visualization interface can be used to set
the module's LED to flash so that it is easier to find the
module inside the control panel.)
OFF
FLASH
(200 ms ON,
1000 ms OFF)
FLASH
(1000 ms ON,
200 ms OFF)
X1
1+
1-
2+
2-
S
U
X2
3+
3-
4+
4-
X3
5+
5-
6+
6-
X4
7+
7-
8+
8-
X5
K+
K-
K+
K-
10AI
TEKT
①
②
③
④
⑤
⑦
⑥
 Loading...