EBS Ink Jet Systeme GmbH D-51588 Nümbrecht, Germany, Alte Ziegelei 19-25 ++49 (0)2293/939-0 ++49 (0)2293/939-3 e-mail: mail@ebs-inkjet.de
20 20140417#2.2 edited on 2014.04.17 18
the iModule
®
replacement procedure starts and it can take up to 20 minutes. The following message is dis-
played:
iModule replacement procedure
in progress.
iModule is under pressure !!
Do not remove iModule.
Wait for relevant message.
At that time the flow of ink in the head is stopped, the ink filtering procedure takes place for a short time and ink
system pressure is reduced (these operations are indicated by the blinking green LED above the
INK
ON
/
OFF
key on
the operation panel). Wait for the following message:
While the printer is running:
- Press transport protection,
- Remove iModule & wait
for next message.
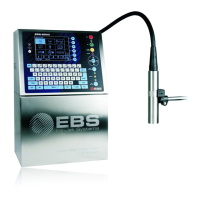
5. Close the transport-safety valve (see Fig. 5.2.2) a
nd then remove iModule
®
from the printer. In order to pull out
the iModule
®
from the inside of the ink system chamber you need to tilt two fastening latches aside (see
Fig. 5.1). A fe
w seconds after this operation the following message is displayed:
Insert iModule & wait
for next message.
NOTE:
The connections of the iModule
®
removed should be secured against potential leaks with spe-
cial plugs supplied together with a new Module
®
.
6. Install a new iModule
®
in the printer by pushing the module along the slideways to the limit (when the iModule
®
reaches its proper position, the latches make a characteristic sound – a ”click”). When the module is detected
in the printer, the following message is displayed:
A new iModule detected
Operating time hhhh:mm
Expiry date dd.mm.yy
Shelf life dd.mm.yy
C=0
Do you really want to install it?
(Y,N)? and the BOTTOM LED on the inner
panel starts blinking, which means that
the module is empty.
7. After the ”Y” key or the
icon has been
pressed as confirmation, the following mes-
sage is displayed:
CODE VERIFYING:
WAIT 10 SECONDS PLEASE
and in a few seconds - another one:
Open transport protection,
and then press ENTER.
Follow the above given request (and that on
the sticker on the iModule
®
) and open
the transport-safety valve of the iModule
®
(see Fig. 5.2.2). When the operation is com-
pleted, confirm it with the
icon.
transport
valve
iModule
iModule
installing direction
Fig. 5.2.1