EasyManua.ls Logo

EDUP HOME EH-001 - User Manual

EDUP HOME EH-001
4 pages
Print Icon
To Next Page IconTo Next Page
Loading...
User Manual
30 LED wall clock
Introduction
Thanks for choosing our product, Please read the
user manual carefully before using the 3d led clock
A fashionable and easy-to-read clock with LED
"8888" digital display.
The led clock is suitable for anywhere, living room,
bedroom, office, coffee shop, gym ,warehouse,
guesthouse,basement and so on.
Brightness sensor adjustment, brightness is very
comfortable, and you can set it manually.
Multifunction: 12 or 24 Hour Display, Time/Date
Display, Temperature Display, Alarm, Night Light.
Alarm reminder: 0-24h alarm clock with 1 minutes
beeper.
Temperature display,
0
( / °F
-2-
Hook hole
Two ways to set the clock
1. Remote Operation
Time setting
Press the "CLOCK" button to enter the time setting,
"AT" button to change the values,
press
the"►"
button to set Hour/ Minute,
press the "CLOCK" button to confirm and set
Month/ Day, and press the "CLOCK" button to
set Year.
Finally press the "CLOCK" button again to
saving setting.
-3-
Question and Answer IconNeed help?

Do you have a question about the EDUP HOME EH-001 and is the answer not in the manual?

Summary

Introduction to 3 D LED Wall Clock

Setting the Clock: Remote Operation

Remote Time Setting

Guide on setting the clock's time using the remote control buttons.

Remote Seconds Flashing Control

Adjusting the colon's flashing mode (flash or keep on) via the remote.

Remote Loop Display Mode

Setting the clock to cycle through Date, Temperature, and Time displays.

Remote Brightness Adjustment

Controlling screen brightness levels, including automatic adjustment and off.

Remote Temperature Display Setting

Switching temperature display between Celsius (°C) and Fahrenheit (°F).

Remote Alarm Setting

Instructions for setting specific alarm times and enabling/disabling alarms.

Remote Snooze Functionality

Details on how the snooze feature works after an alarm is triggered.

Setting the Clock: Key Operation

Manual Time Setting

Setting the clock's time and date using buttons on the back of the device.

Manual 12;24 Hour Time Switch

Switching between 12-hour and 24-hour time formats using the '+' key.

Manual Seconds Flashing Control

Setting the colon to flash or remain static via button press.

Manual Brightness Adjustment

Adjusting brightness levels using the 'SET' button on the clock.

Manual Loop Display Mode

Activating or deactivating the automatic cycling of display modes.

Manual Alarm Setting

Configuring alarm times and ON/OFF status using the clock's buttons.

Specifications and Service

Overview

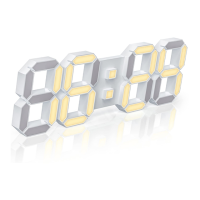
This document describes the EH-001 3D LED wall clock, a fashionable and easy-to-read digital clock designed for various indoor environments.

Function Description:

The EH-001 is a versatile 3D LED wall clock with a "8888" digital display. It is suitable for a wide range of locations including living rooms, bedrooms, offices, coffee shops, gyms, warehouses, guesthouses, and basements. Its core functions include time display (12 or 24-hour format), date display, temperature display, alarm, and night light. The clock features a brightness sensor for automatic adjustment, ensuring comfortable viewing, and also allows for manual brightness settings. An alarm reminder function is included, offering a 0-24 hour alarm clock with a 1-minute beeper. The temperature can be displayed in either Celsius (°C) or Fahrenheit (°F).

Important Technical Specifications:

  • Model: EH-001
  • Input: 5V/1A
  • Weight: 350g
  • Product Dimensions: 14.96 x 5.12 x 0.94 inches

Usage Features:

Remote Operation:

The clock can be operated using a remote control with dedicated buttons for various functions:

  • 12/24H Switch: Toggles between 12-hour and 24-hour time formats.
  • Loop Display: Cycles through Date, Temperature, and Time displays.
  • Time Setting: Allows adjustment of Hour, Minute, Month, Day, and Year.
    • To set the time, press the "CLOCK" button to enter time setting mode. Use the "▲" and "▼" buttons to change values. Press the "►" button to set Hour/Minute, then "CLOCK" to confirm and set Month/Day, and again "CLOCK" to set Year. Finally, press "CLOCK" to save settings.
  • Temperature Setting: Displays temperature in °C or °F.
    • Press the "TEMP" button to display the temperature.
  • Alarm Setting: Configures alarm time and enables/disables the alarm.
    • Press the "ALARM" button to enter alarm setting mode. Press "ALARM" again to set a specific time. Continue pressing "ALARM" to confirm. Use "▼" to select "ON/OFF" for the alarm, then press "ALARM" to confirm.
    • Quick tip: Pressing "ALARM" then "▼" can quickly turn the alarm ON/OFF.
  • Seconds Flashing: Controls whether the colon separating hours and minutes flashes or remains steady.
    • Press the "►" button to set the colon to flash or keep on.
  • Brightness Switch: Adjusts the display brightness.
    • Press the "BRIGHT" button to cycle through "High - Medium - Low - Automatic Adjustment - OFF" brightness levels.
    • Note: In "OFF" state, only the "BRIGHT" button will temporarily light up the display for 3 seconds; other buttons will not affect brightness.
  • Snooze: When the alarm sounds, it will ring for 1 minute. If no action is taken, it will ring again 5 minutes later. This cycle repeats three times before automatically turning off.
    • Pressing any button will turn off the snooze.

Key Operation on the Back of the Clock:

The clock also features physical buttons on its back for direct operation: "SET", "+", and "-".

  • Time Setting:
    • Under time display, press and hold "SET" for 3 seconds to enter time setting (hour part will flash).
    • Short press "SET" to switch between hours, minutes, months, days, years, and °C/°F.
    • Use "+" and "-" to change values. Press and hold "+" or "-" for continuous adjustment.
  • 12/24-hour Time Switch:
    • Short press the "+" key.
  • Seconds Flashing:
    • Press and hold the "-" key for 3 seconds to set the colon to flash or keep on.
  • Brightness Setting:
    • Short press the "SET" key to adjust brightness: "High - Medium - Low - Automatic Adjustment - OFF".
  • Loop Display:
    • Press and hold the "+" key for 3 seconds to set loop display mode (Date → Temperature → Time). Press and hold again for 3 seconds to turn off.
  • Alarm Setting:
    • First, short press the "-" key to display the alarm time.
    • Then, press and hold the "SET" key for 2 seconds to set a specific time. Use "+" or "-" to adjust the hour value.
    • Press "SET" to switch to minutes and set the desired value.
    • Press "SET" one more time to select ALARM "ON/OFF" (use "-" to select).
    • Finally, press "SET" again to save.
    • Quick tip: Press "-" key twice to turn the alarm ON/OFF.
    • Note: If no operation is performed for 15 consecutive seconds during any setting adjustment, the input value will be automatically saved and the setting mode will exit.

Maintenance Features:

The manual does not explicitly detail maintenance features. However, it provides after-sales service information for issues related to the clock, remote, or power cord. Users are advised to contact the seller through Amazon message for any problems.

EDUP HOME EH-001 Specifications

General IconGeneral
BrandEDUP HOME
ModelEH-001
CategoryClock
LanguageEnglish