1. Product Overview 4. Note
• When the water level is too low, the operation indicator lights up red.
• When the appliance is carrying water, the operation indicator ashes white.
• When the unit is in operation, it automatically lls water into the water tank of the
housing. When the water runs out, the unit automatically stops working.
• If you remove the water tank, the unit no longer produces mist and the operating
display lights up red. If it is put back on, it returns to its previous operating state.
5. Cleaning information
Turn o the appliance, unplug the power plug and open the lid, pour out the remai-
ning water of the water tank and the housing. Clean the product and the water tank
with a clean towel. Cleaning every three days is recommended. The product should
also be cleaned when it is not in use.
1. Don’t rinse the product with water to prevent the water from damaging the
product.
2. Please note that the magnetic surface of the water valve at the bottom of the water tank should be kept clean and avoid the
adsorption of foreign bodies. Otherwise, the unit may not function properly or defects may occur.
6. Caution
1. Clean tap water or pure water at normal temperature is suitable for this product.
2. Place the product on a horizontal surface before use.
3. Pour the water after use, otherwise bacteria may form.
4. Unplug the product from the power supply if the product is not used for a long period of time.
5. The appliance produces mist, so keep it away from valuable objects.
6. DO NOT operate the unit if there is no water to prevent the unit from working properly.
7. DO NOT pour water directly into the water tank of the housing, especially DO NOT pour water into the air outlet.
8. use contrary to the intended purpose
7. Intended use
The product may only be used for the application intended in the catalogues and technical descriptions. Any other use or use
beyond this is considered improper use. In the event of improper use, the seller assumes no liability for any damage that may
occur and no guarantee for the proper and functional operation of the components. Intended use also includes observing all
instructions in the operating manual. This is indicated by the symbol on the type plate. The proper and safe operation of
the products requires proper transport, storage, installation and assembly as well as careful operation and maintenance. The
recurring inspections according to DGUV V3 must be observed. The unit must be installed in such a way that the mains plug is
freely accessible at all times.
8. Use contrary to intended purpose
If the product is used contrary to the intended purpose, both danger to life and limb and damage to property can occur. For
this reason, use contrary to the intended purpose is prohibited. If the product is not used as intended, the seller accepts no li-
ability for any damage that may occur and does not guarantee that the components will work properly and function properly.
To prevent improper use of the humidi er, the following instructions must be observed:
• The humidi er may only be operated with the mains voltage speci ed on, the is printed on the nameplate.
• Do not use ammable or aggressive chemicals (acids, etc.) for cleaning.
• Before cleaning the unit, make sure to unplug the power plug and let the unit cool down.
• If any transport damage is found, do not connect the unit.
• To ll the unit with water, pull the mains plug and make sure that the unit is not placed in water and no water enters the
slots in the bottom of the unit.
• The device may only be operated indoors and in a dry environment.
• The unit must not be placed in the hands of children!
• Do not remove the lid during operation and do not reach into the humidi er!
• For optimum e ectiveness, a cleaning brush is included with the device, which has visible adhesions can be removed at the
central ultrasonic transducer and in the device tray.
• The appliance must only be used with water or the emmi® room fresheners.
2. Bedienungsanleitung
Das Luftbefeuchtungsgerät eignet sich zur Befeuchtung trockener Luft im Innenbereich.
Vor Inbetriebnahme ist der Tank mit Wasser – maximal bis zu der innen in der Wanne aufgedruckten MAX-Linie – zu befüllen.
2 3
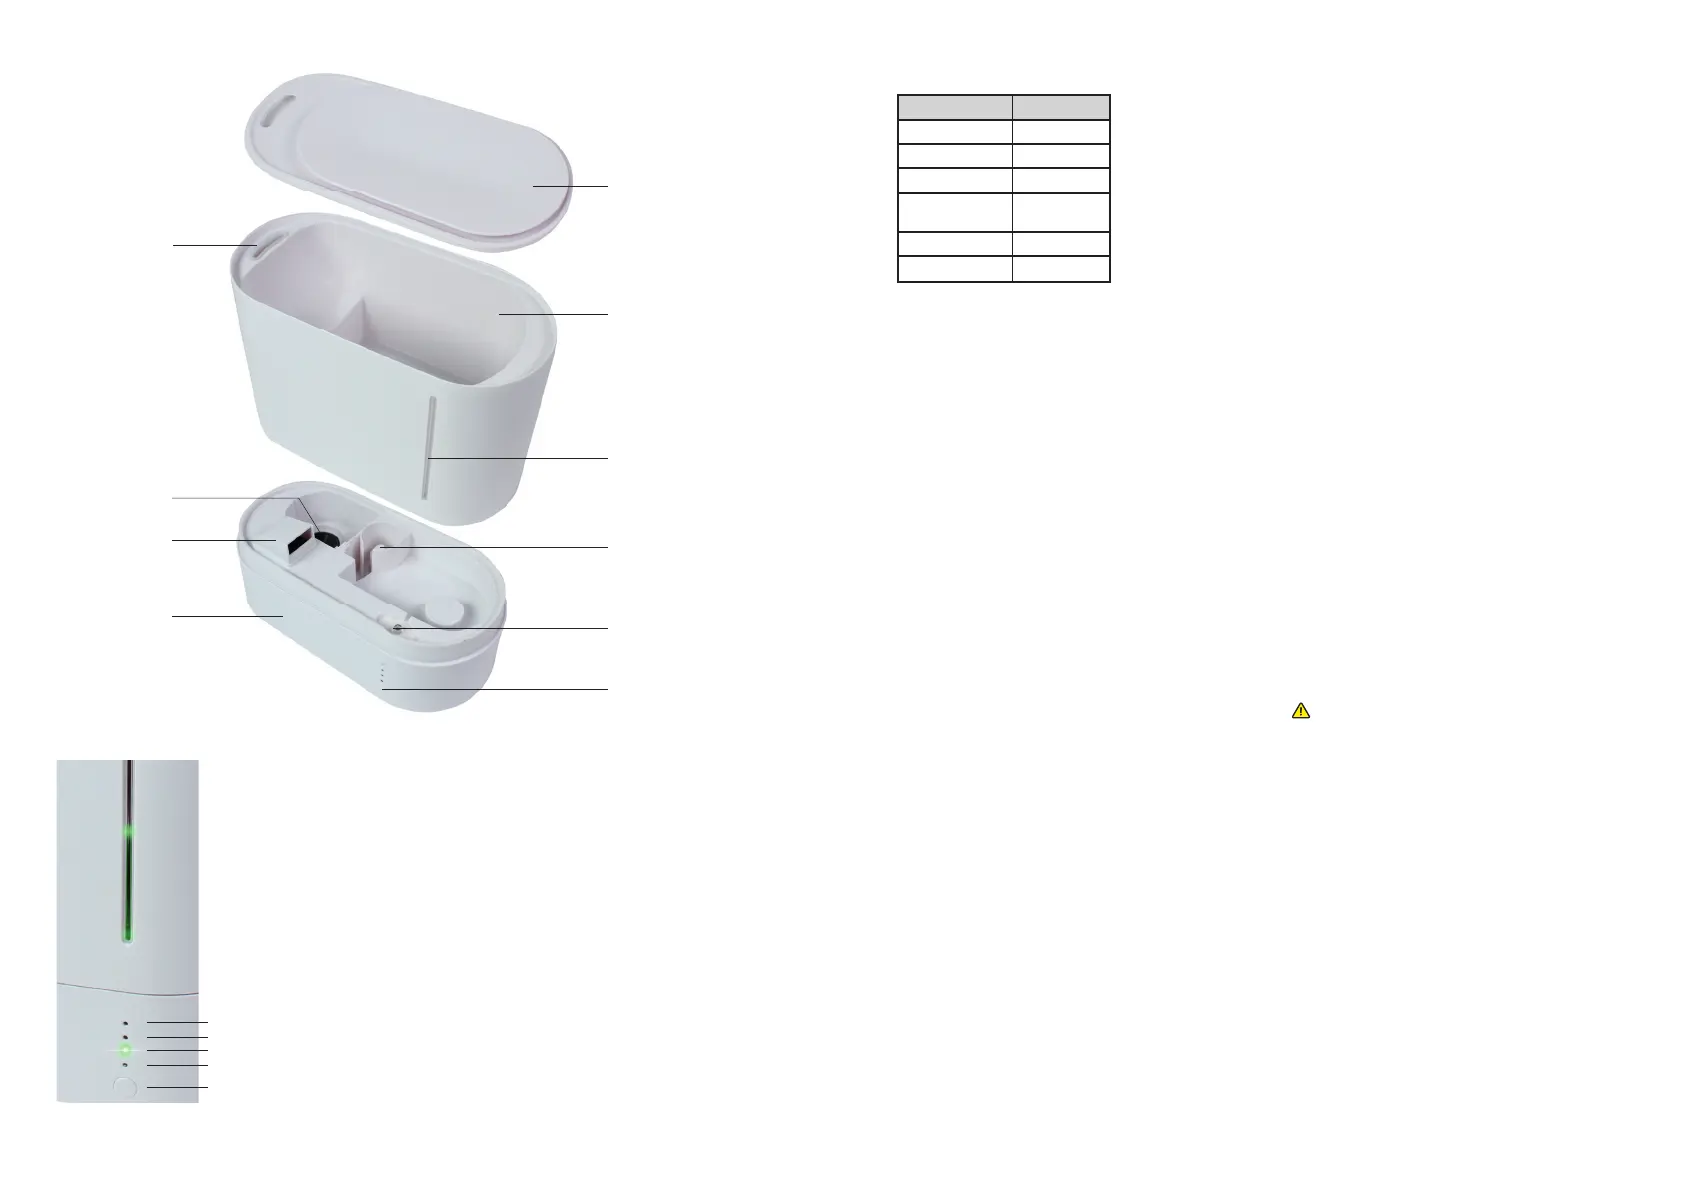
high mode indicator
medium mode indicator
low mode indicator
power indicator
ON/OFF Button
Water level window
Cover
Mist outlet
Mist Chip
Air inlet
Housing
Water tank
ON/OFF Button
Lighting
Water level controller
2. Technical Data
Parameter Humidifi er
Length (mm) 250
Wide (mm) 117
Height (mm) 218
Working
voltage
AC 100-240V
50/60HZ
Volume (L) 2,2
Power (W) 21
Technical change reserved.
3. Function lnstruction
1.Open the lid and pour water into the water tank. The water should not
exceed the Max water level bar.
2. Replace the lid, place the water tank on the housing and put the plug
into the plug socket. After the power indicator lights up white for about 2
seconds, the appliance goes into the stand-by-mode.
3. Press the ON/OFF button and the power indicator will light up white, to-
gether with the rst LED and the green water level indicator. The appliance
will start working in stage 1 (low-mode).
4. Press the button again to switch from level 1 (low-mode) to the stronger
level 2 (medium-mode).
5. Press the button once more to switch from level 2 (medium-mode) to
level 3 (high-mode).
6. Press the button a fourth time to switch back to stand-by-mode.
7. Press and hold the button for 3 seconds to switch the water level indicator
on or o . The water level can be observed at the water level window. The
water level indicator is not a ected by lack of water or switching o .
 Loading...