2
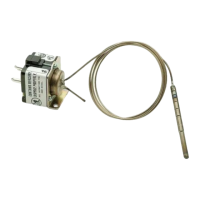
INSTALLATION
If the equipment manufacturer has provided installation
instructions, follow those instructions. If none are avail-
able, use the following general replacement instructions
as a guideline.
To avoid personal injury and/or property damage,
shut off gas and electric to heating system until
installation is complete.
1. Turn off electric power and gas supply to the heater
or appliance until replacement is complete.
2. Depending on the application, the sensor may be
located in the pilot flame or the main burner. Note the
location of the sensor with respect to the burner and
how it is mounted before removing the sensor.
3. Unplug the switch from the gas valve or disconnect
wires from the quick connect terminals on the sensor
panel. Be sure to label each wire before disconnect-
ing.
4. Remove mounting screws or clamps that secure the
sensor to the burner and remove sensor from appli-
ance.
5. Carefully uncoil capillary of new sensor, making sure
that it does not have any sharp bends or kinks. Be
particularly careful with that part of the capillary
connected to the diaphragm.
6. Install replacement sensor. Make certain that the
sensing element is in the same position relative to the
burner as the one removed. Secure sensor using
screws or hardware previously removed.
7. Make electrical connections by plugging sensor switch
case into gas valve receptacle or connecting labeled
wires to the proper terminals on the sensor panel.
6. Turn on gas and electrical power to the system.
Check system for proper operation. Follow the appli-
ance manufacturer's recommended installation and/
or service instructions to ensure proper operation.
CAUTION
!
 Loading...