OPERATION
POWERING THE PRODUCT ON AND OFF
HOLD
INSPECT
REF
mm/m
in/ft
HOLD
CAL
Press the button to power the product on or o. The
product will go through a brief calibration before beeping to
indicate that it is ready.
NOTE: The product will power o after 15 minutes of
inactivity. To change this, press the
button and the
button at the same time to cycle through the 1/4 h, 1/2 h, 1
h, and 2 hrs options.
USING THE PRODUCT
Place the product on a smooth and even surface. The
product can be placed upside down, in a horizontal position,
or in a vertical position.
NOTE: “tILt” will be displayed if the product is tilted beyond
30° to the front or back.
LEVELING THE PRODUCT
Correction Main display Top display
Move right side up
%
%
Move left side up
%
%
Level
%
%
The direction arrows and + - indicate the side of the
product that needs to move up or down.
SELECTING THE DISPLAY MODE
Press the MODE button to cycle through the seven modes.
The last selected mode will default when the product is
powered on again.
MODE DESCRIPTION FUNCTION
MODE 1 Rough-in Degrees given in whole, round numbers
MODE 2 Degree 1 Degrees given to one decimal
MODE 3 Degree 2 Degrees given to two decimals
MODE 4
Percentage,
Slope
Percentage given to two decimals
MODE 5 MM/M Millimeters/Meter given in decimal format
MODE 6 IN/FT 1 Inches/Feet given in decimal format
MODE 7 IN/FT 2 Inches/Feet given in fraction format
USING THE AUDIO LEVELING
Press the button to turn the audio leveling on and off.
When on, the product will sound when it is within 2° of
level, changing pitch and increasing frequency as zero is
approached. A solid tone indicates zero.
USING THE BACKLIGHT
Use the button to cycle through Off, High, and Low. The
backlight will go off after 3 minutes of inactivity.
LOCKING THE NUMERIC DISPLAY
HOLD
HOLD
Press the HOLD button to lock the measurement value displayed
on the LED display.
The
icon will appear on the top-right corner of the LED
display to indicate that the Hold function is currently active.
To unlock the measurement value, press the HOLD button
again. The
icon on the top-right corner of the LED
display disappears.
USING THE INSPECT FUNCTION
INSPECT
INSPECT
To set a defined reference angle to “zero”, set the product
to the preferred angle, and press the INSPECT button. The
icon will begin flashing and the new angle will be set
as “zero”.
To display the reference angle, press the INSPECT button
again. The reference angle will appear for 3 seconds.
To return to true zero, press and hold the INSPECT button
for 2 seconds.
USING THE VIAL SYNC
To calibrate the vial bubble to the digital read-out:
1. Set the product on a stable surface, either vertical or
horizontal. Ensure that the bubble is centered in the
marks.
2. Press the MODE and INSPECT buttons at the same
time. “CAL” will appear on the display.
3. Press and hold the MODE and INSPECT buttons for 1
second to start the calibration sequence.
4. When the calibration is complete, the audio will sound
and the display will return to the measurement. The
icon will appear on the display.
NOTE: If the vial bubble and the factory settings are too far
out of sync, “Err” will appear on the display. Power o the
product to reset.
To return to factory calibration:
1. Press the MODE and INSPECT buttons at the same
time. “CAL” will appear on the display.
2. Press and hold the INSPECT button for 2 seconds. All
the icons will appear on the display.
3. When the calibration is complete, the audio will sound
and the display will return to the measurement. The
icon will no longer appear on the display.
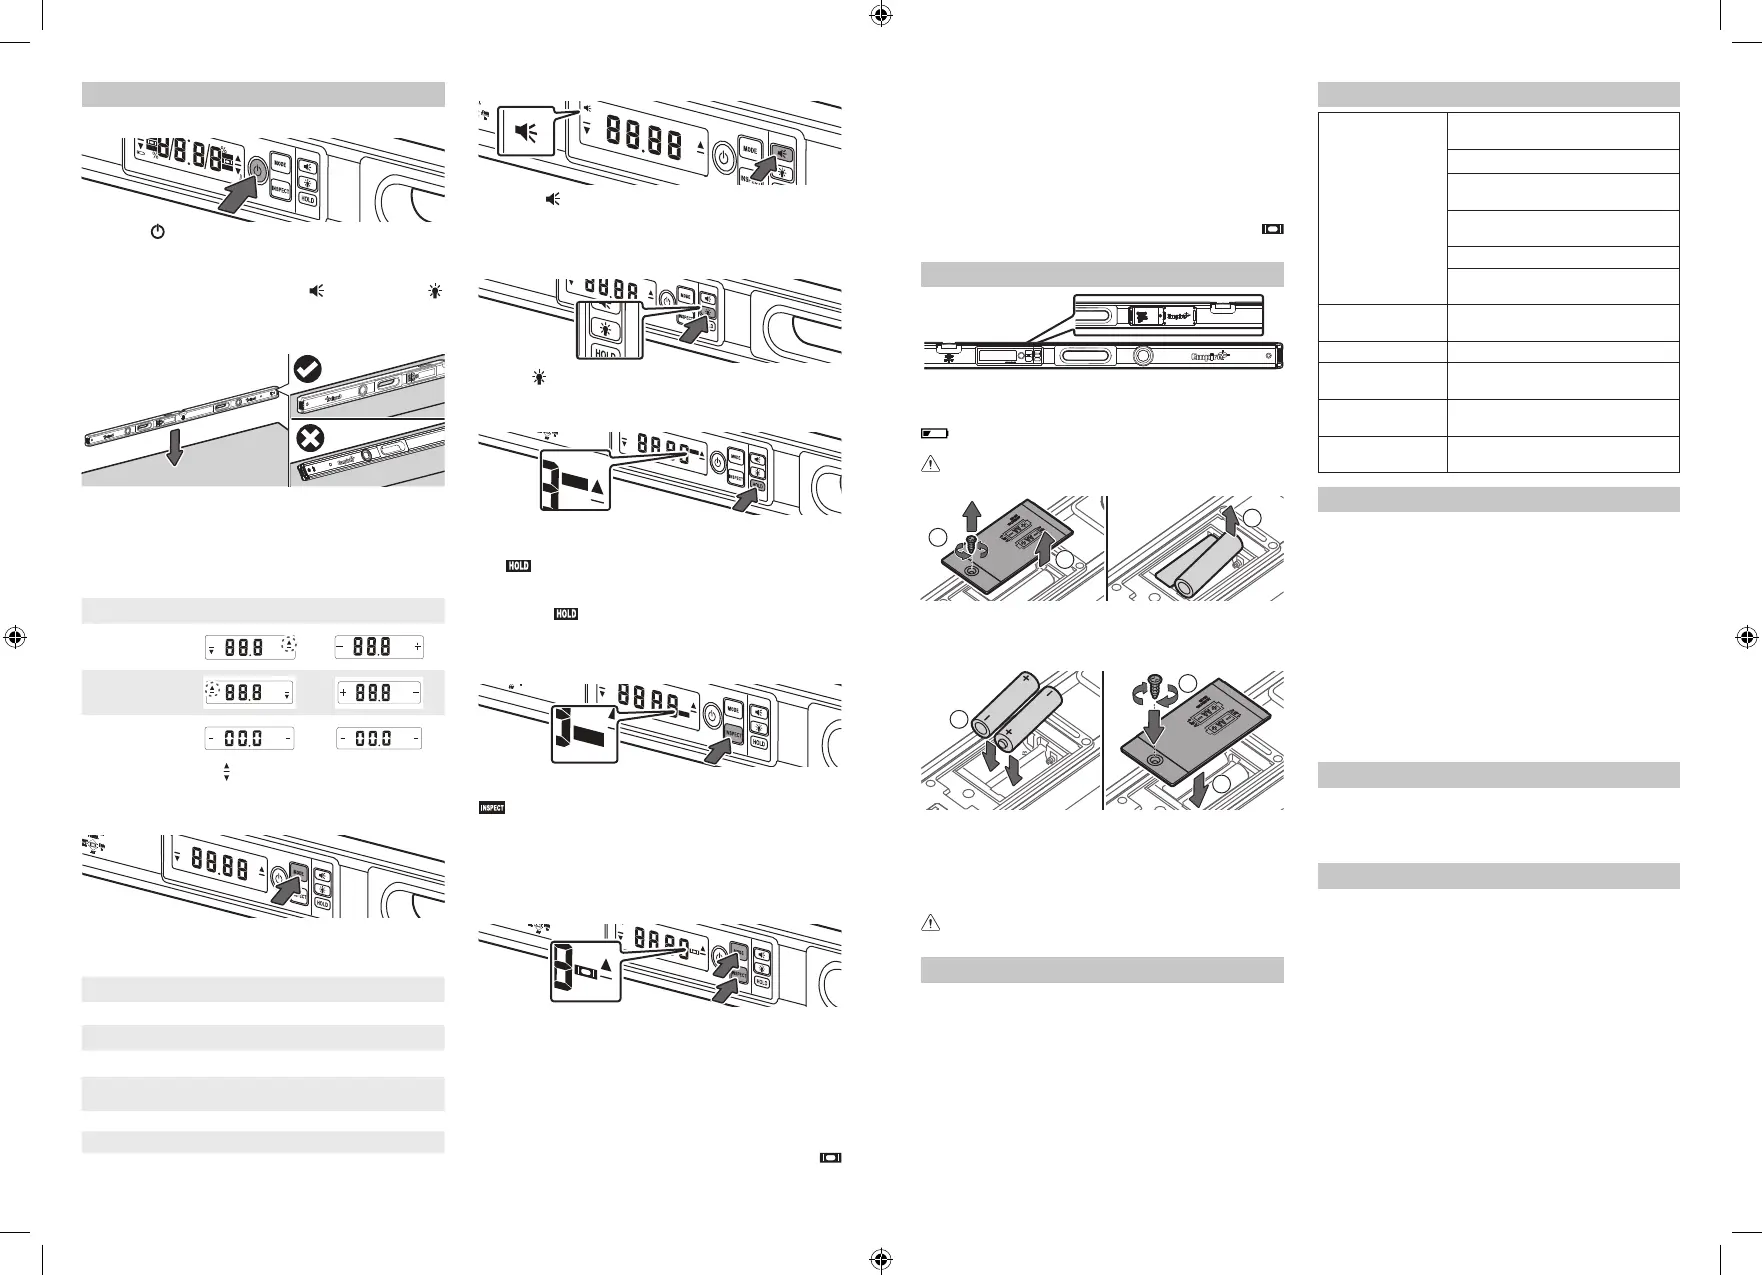
BATTERY REPLACEMENT
NOTE: Only use alkaline batteries. Do not use zinc-carbon
batteries. If the product will not be used for a long time,
remove the batteries as a protection against corrosion. The
icon will appear on the LED display if the batteries
need to be replaced.
WARNING! Do not remove the batteries while the
product is powered on.
1
2
3
1. Remove the screw securing the battery cover at the
back of the product.
2. Remove the battery cover.
3. Remove the spent AA batteries.
4
5
6
4. Place two new AA batteries inside the battery compartment.
NOTE: Make sure to place the batteries based on the
polarity indicated on the battery compartment.
5. Replace the battery cover.
6. Replace the battery cover screw. Make sure to properly
tighten the screw to secure the battery cover.
WARNING! Do not use the product if the battery cover
is not properly installed.
CARE AND MAINTENANCE
■ Always handle the product with care. Do not bump,
knock, or drop the product.
■ Keep the product free from high concentrations of dust
and liquids.
■ After each use, clean the product with a damp, soft
cloth. Avoid using aggressive cleaning agents and
solvents.
■ Do not expose the product to shock, continuous
vibration, or extreme temperatures. Store the product in
temperatures between -20 °C and 65 °C.
SPECIFICATIONS
Electronic module
accuracy
≤ 0.1° at 0° and 90° (20 °C + / -5
°C)
≤ 0.2° at 0° and 90° (10 °C~30 °C)
≤ 0.3° at 0° and 90° (out of 10
°C~30 °C)
≤ 0.2° between 0° and 90° (20 °C
+ / -5°C)
≤ 0.35° at 0° and 90° (10 °C~30 °C)
≤ 0.5° between 0° and 90° (10
°C~30 °C)
Spiral vial
accuracy
±0.5 mm/m in all positions
Power supply 2 x 1.5 V AA alkaline batteries
Working
temperature range
14 °F to 122 °F (-10 °C to 50 °C)
Storage
temperature range
-4 °F to 149 °F (-20 °C to 65 °C)
Battery operation
length
up to 150 hrs
EMPIRE® PRODUCT LIFETIME GUARANTEE
Should this product fail to perform within its lifetime and
excluding normal wear and tear and provided the damage
has not been caused by inappropriate use or alteration,
simply return it to the place of purchase, along with
your proof of purchase or contact us. You will then be
advised as to whether you are entitled to refund, repair
or a replacement. Repaired or replacement goods will be
returned at our cost. In addition to this warranty, our goods
come with guarantees that cannot be excluded under the
Australian and New Zealand Consumer Law. You are
entitled to a replacement or refund for a major failure and
compensation for any other reasonably foreseeable loss or
damage. You are also entitled to have the goods repaired
or replaced if the goods fail to be of acceptable quality and
the failure does not amount to a major failure.
SERVICE – AUSTRALIA
1300-361-505
Monday – Friday 8am–5pm AEST
Or visit empiretools.com.au/support/contact-us
SERVICE – NEW ZEALAND
0800-279-624
Monday – Friday 6am–5pm AEST
Or visit empiretools.co.nz/support/contact-us
961001918-01
Distributed by:
Techtronic Industries Australia Pty Ltd
31 Gilby Road, Mt. Waverly, 3149 VIC
www.empiretools.com.au
1300 361 505
Techtronic Industries N.Z. Ltd
Unit C, 70 Business Parade South,
Highbrook, Auckland, 2013,
New Zealand
www.empiretools.co.nz
0800 279 624
 Loading...