Do you have a question about the ENCLO EC18020 and is the answer not in the manual?
Essential advice for a smooth assembly process, including surface protection and workspace.
Instructions for reporting issues and ordering replacement parts via website or customer service.
Contact details for customer support regarding assembly or installation queries.
Guidance on how to initiate a return, emphasizing first contacting the seller.
Instruction to verify internal packaging materials within larger components.
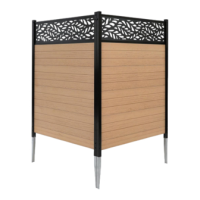
Detailed measurements of the screen's overall dimensions and required post insertion depth.
Catalog of vinyl components including panels, wide boards, and thin boards with dimensions.
Catalog of aluminum components such as rails and posts with dimensions.
Listing of small items like post caps, joiner clips, and screws for assembly.
Assemble the lasercut panel with upper and lower aluminum rails.
Connect vertical posts and secure the assembled frame with screws.
Slide wide boards and thin board into the frame's grooves.
Insert ground stakes, secure them, and use methods for hard ground.
Join panels at angles and attach post caps to complete the unit.
This document provides assembly instructions for the Nappa Privacy Screen Kit, a 2-pack privacy screen designed to "hide it with style." The kit is available in two color options: EC18020 (Cedar Color) and EC18021 (Charcoal Color). The estimated assembly time for the kit is 90 minutes. An assembly video is also available by scanning a QR code provided in the manual.
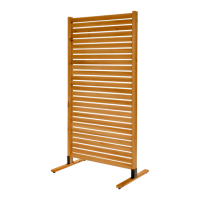
The Nappa Privacy Screen Kit is designed to provide privacy and enhance the aesthetic appeal of outdoor spaces. It consists of two privacy screen panels that can be assembled to create a freestanding barrier. The screens feature a decorative lasercut panel at the top with a leaf-like design, complemented by horizontal wide and thin boards below. The kit is intended for ground installation, with posts that are inserted into the soil to secure the screens. The panels can be configured at either a 90-degree or 180-degree angle to suit different spatial requirements.
| Brand | ENCLO |
|---|---|
| Model | EC18020 |
| Category | Outdoor Furnishing |
| Language | English |