Operation Cerabar S PMP71 with 4 to 20 mA HART
32 Endress+Hauser
The table provides an overview of the locking functions:
5.8.1 Locking/unlocking operation locally via DIP switch
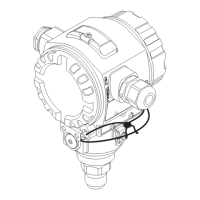
P01-xxxxxxxx-19-xx-xx-xx-133
Fig. 20: Position of DIP switch for "hardware locking" on the electronic insert
1 If necessary, remove onsite display (optional)
2 DIP switch is at "on": operation is locked.
3 DIP switch is at "off": operation is unlocked (operation possible)
5.8.2 Locking/unlocking operation via onsite display or remote
operation
Locking via View/read
parameter
Modify/write via
1)
1) Parameters which refer to how the display appears, e.g. LANGUAGE and DISPLAY CONTRAST can still be altered.
Unlocking via
Onsite
display
Remote
operation
DIP switch Onsite
display
Remote
operation
DIP switch Yes No No Yes No No
Onsite display Yes No No No Yes Yes
Remote operation Yes No No No Yes Yes
➀
➁➂
off
on
21
off
on
21
Damping [ ]t
Damping [ ]t
E
+
–
HW-Version:
SW-Version:
250002271-–
HART
R
FIELD COMMUNICATION PROTOCOL
1
2
21
PC
Description
Locking operation 1. Select the INSERT PIN NO. parameter,
menu path: OPERATING MENU → OPERATION → INSERT PIN NO.
2. To lock operation, enter a number for this parameter between 0 and 9999 that is
≠100.
Unlocking operation 1. Select INSERT PIN NO. parameter.
2. To unlock operation, enter "100" for the parameter.
 Loading...